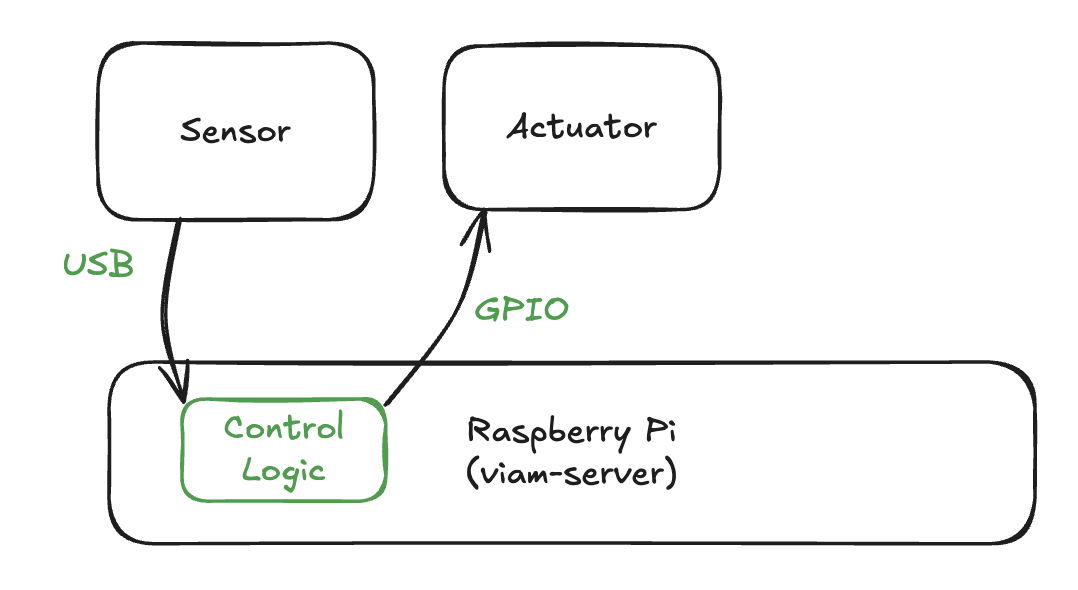
Let's say you have a machine in Viam with a sensor and an actuator, like a webcam and a lamp plugged into a smart outlet. You want the machine to monitor the video feed, in this case, turning on the lamp when a person is detected.
And while you could run this logic from a laptop, a cloud server, or a web app, running it on the device itself ensures it works reliably and in real time, even without internet connectivity or external dependencies.
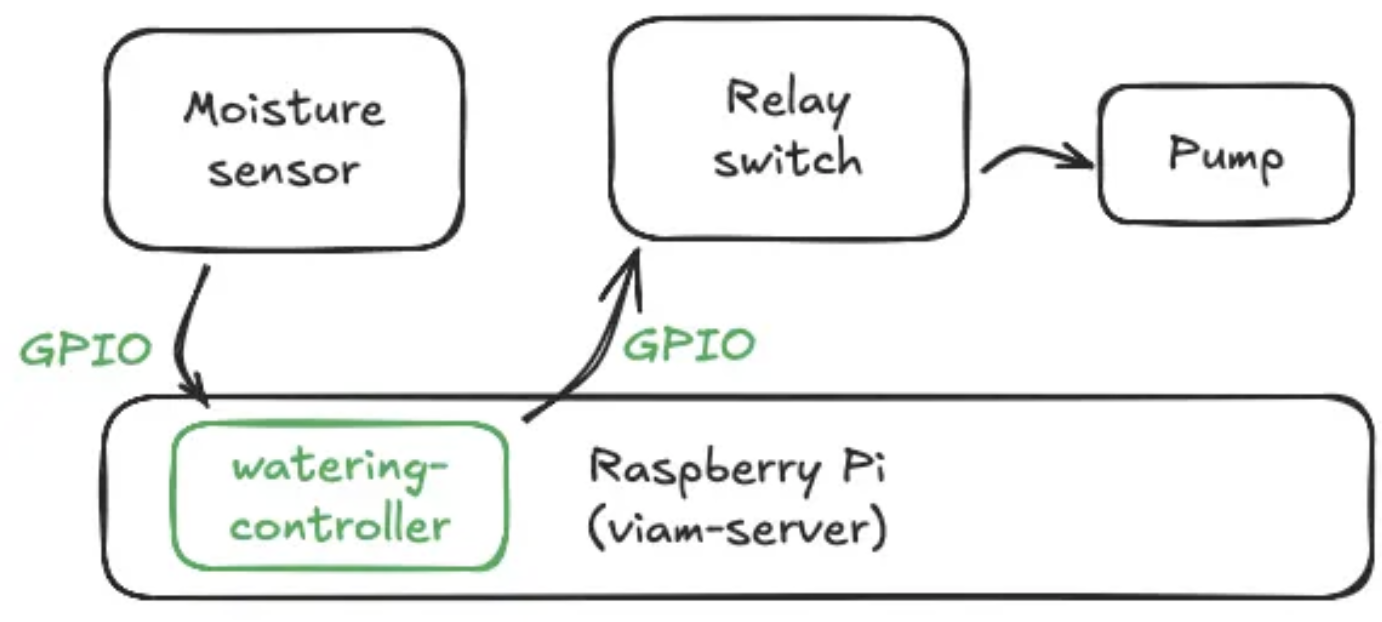
To do this, you'll write a control module that checks sensor data and triggers actions automatically. For example, in the automatic plant watering workshop, the control module is the brains behind the real-world robot that orchestrates activities between sensors and actuators.
In this codelab, you'll learn how to build and deploy control logic in a module running directly on the machine, for this or any other use case.
What You'll Build
- A control logic module that runs on a Raspberry Pi
Prerequisites
- A computer with MacOS or Linux to flash your Raspberry Pi and configure the device's components using the Viam app
- Hardware and supplies requirements
- 1 - Raspberry Pi 5
- Follow the Raspberry Pi setup guide to make sure your Pi is flashed with a Viam-compatible operating system, and that you are able to SSH into it.
- 1 - microSD card or USB storage to use with your Pi
- 1 - power supply for your Pi
- Optional: additional peripherals. To follow the example scenario, you will need:
- 1 - Kasa smart plug (supported Kasa models: EP10, EP25, HS100, HS103, HS105, HS110, KP100, KP105, KP115, KP125, KP125M, KP401)
- 1 - USB web camera
- 1 - Raspberry Pi 5
What You'll Need
- All the hardware components listed in prerequisites.
- Sign up for a free GitHub account
- Create a repository to contain your module source code and enable the cloud build functionality
- You will also set up a GitHub action later on in this codelab
- Sign up for a free Viam account
What You'll Learn
- How to generate, develop, and upload a module using Viam
- How to customize control logic within a module
- How to require and validate dependencies within a custom module
- How to configure and use a module
Watch the Video
Follow along in this how-to video.
Configure your machine
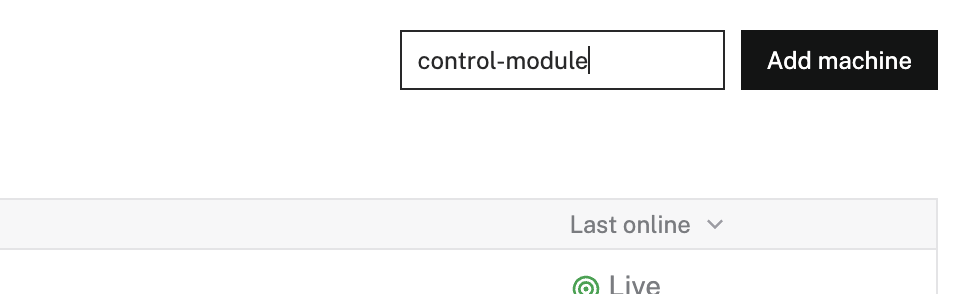
- In the Viam app under the LOCATIONS tab, create a machine by typing in a name and clicking Add machine.
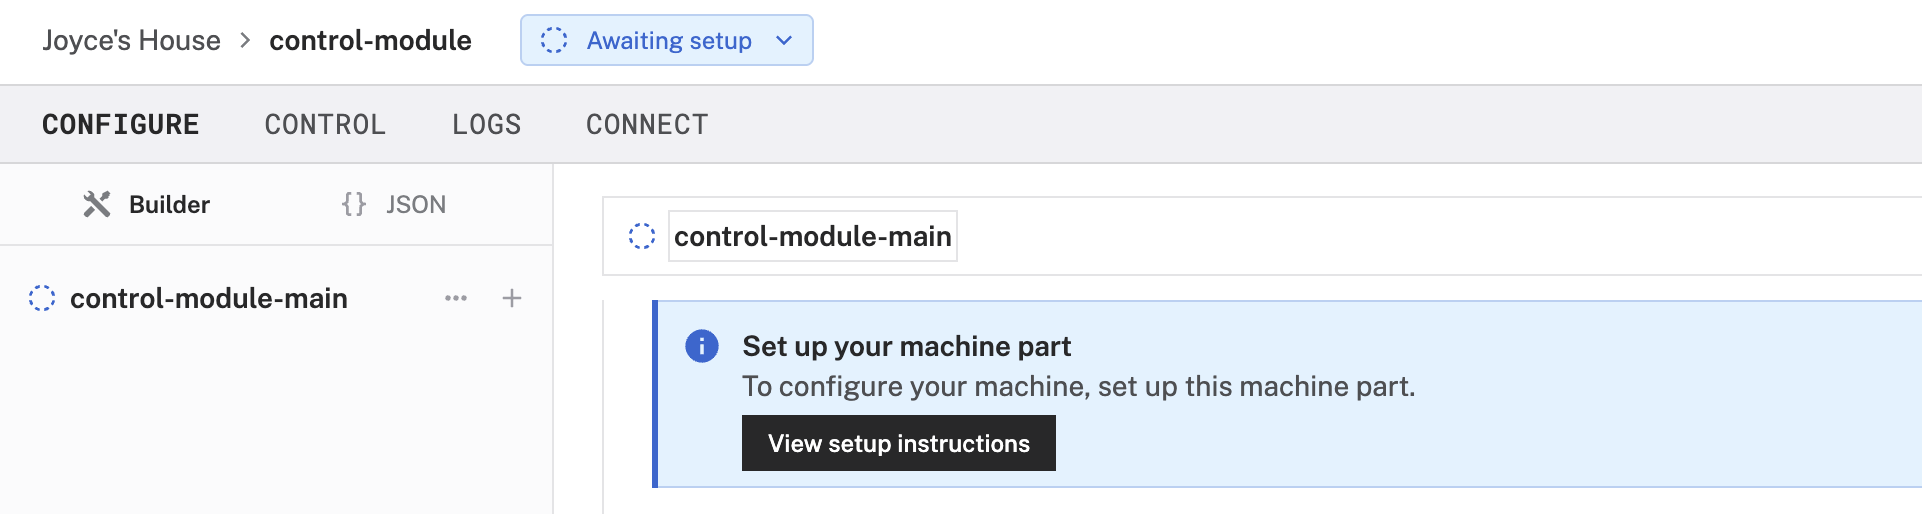
- Click View setup instructions.
- To install
viam-serveron the Raspberry Pi device that you want to use to communicate with and control your webcam, select theLinux / Aarch64platform for the Raspberry Pi, and leave your installation method asviam-agent.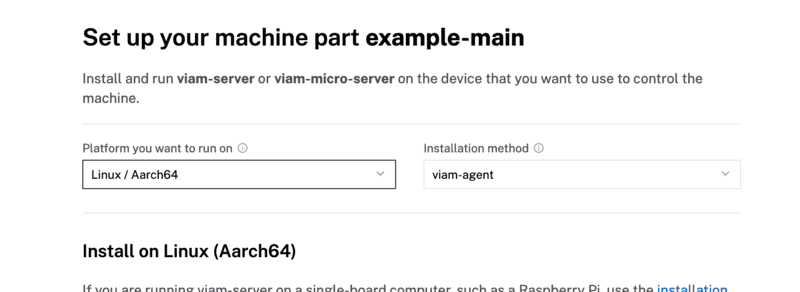
- From the terminal window, run the following command to SSH (Secure Shell) into your board, where the text in
<>should be replaced (including the<and>symbols themselves) with theuserandhostnameyou configured when you set up your machine.ssh <USERNAME>@<REMOTE-HOSTNAME>.local - Use the
viam-agentto download and installviam-serveron your Raspberry Pi. Follow the instructions to run the command provided in the setup instructions from the SSH prompt of your Raspberry Pi.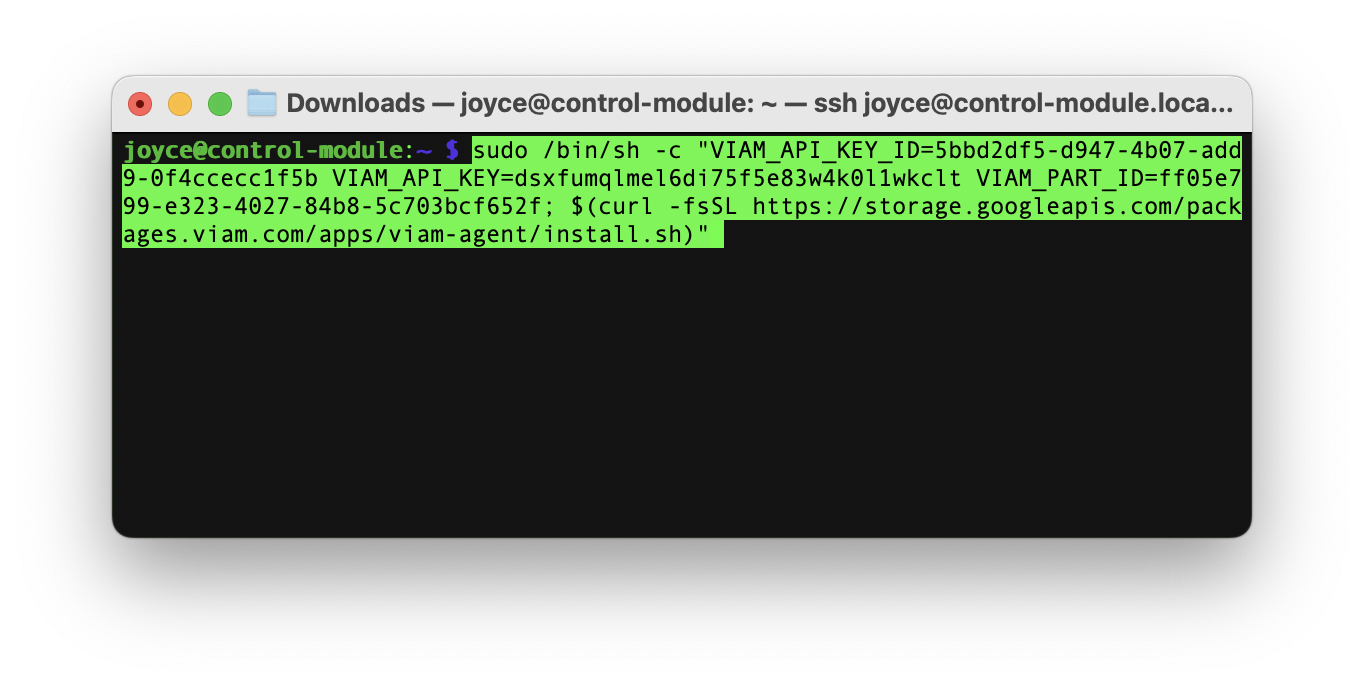
- The setup page will indicate when the machine is successfully connected.

Configure your peripherals
- Optional: Now that you set up a machine, configure any hardware and software resources that you will use with your machine and that you want to drive with your control logic. For example, you could use this same pattern to turn on a fan when a temperature sensor crosses a threshold, or trigger a motor when an object is detected.Or you can skip this step and proceed to the next section.
In this section, let's learn how to create a module and deploy the control logic to our machine.
Generate stub files
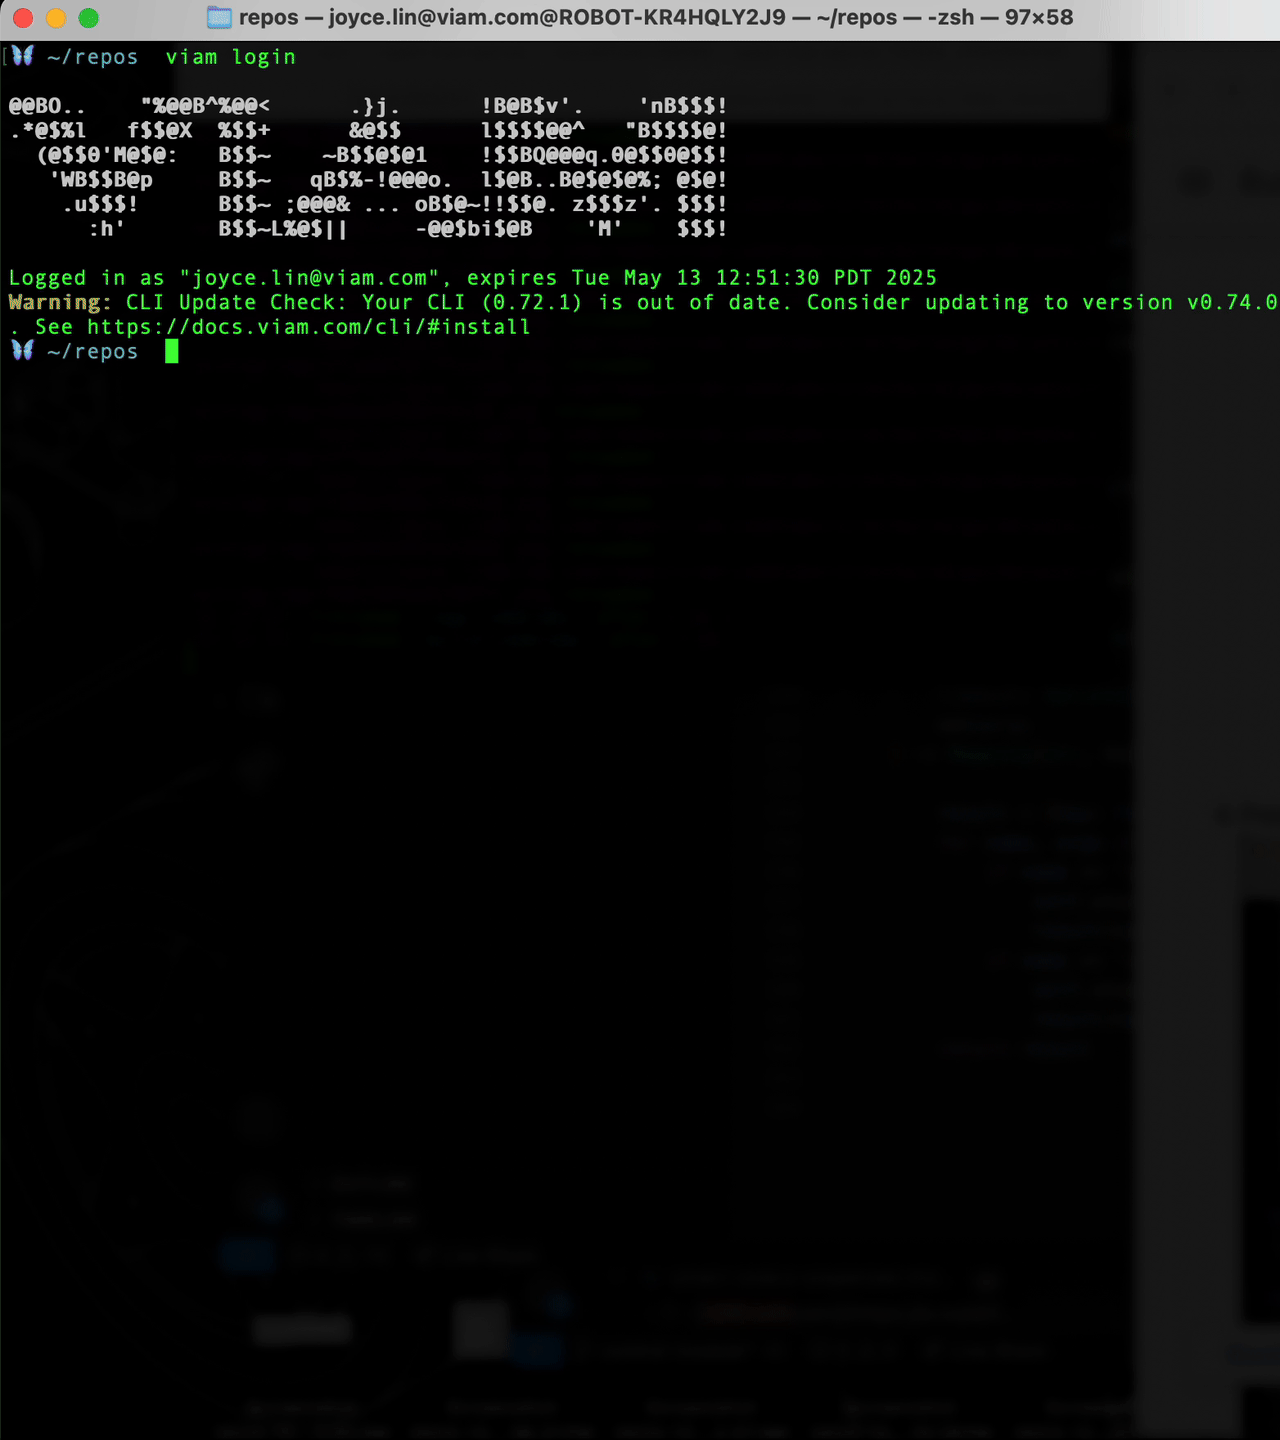
- On your working computer, open your terminal window, and make sure you are still logged in to the Viam CLI
viam login - Run the command to generate a Viam module.
viam module generate - Follow the prompts, selecting the following options:
- Module name:
control-lamp-alarm- This can be anything you choose to identify your control logic module.
- Language:
Python - Visibility:
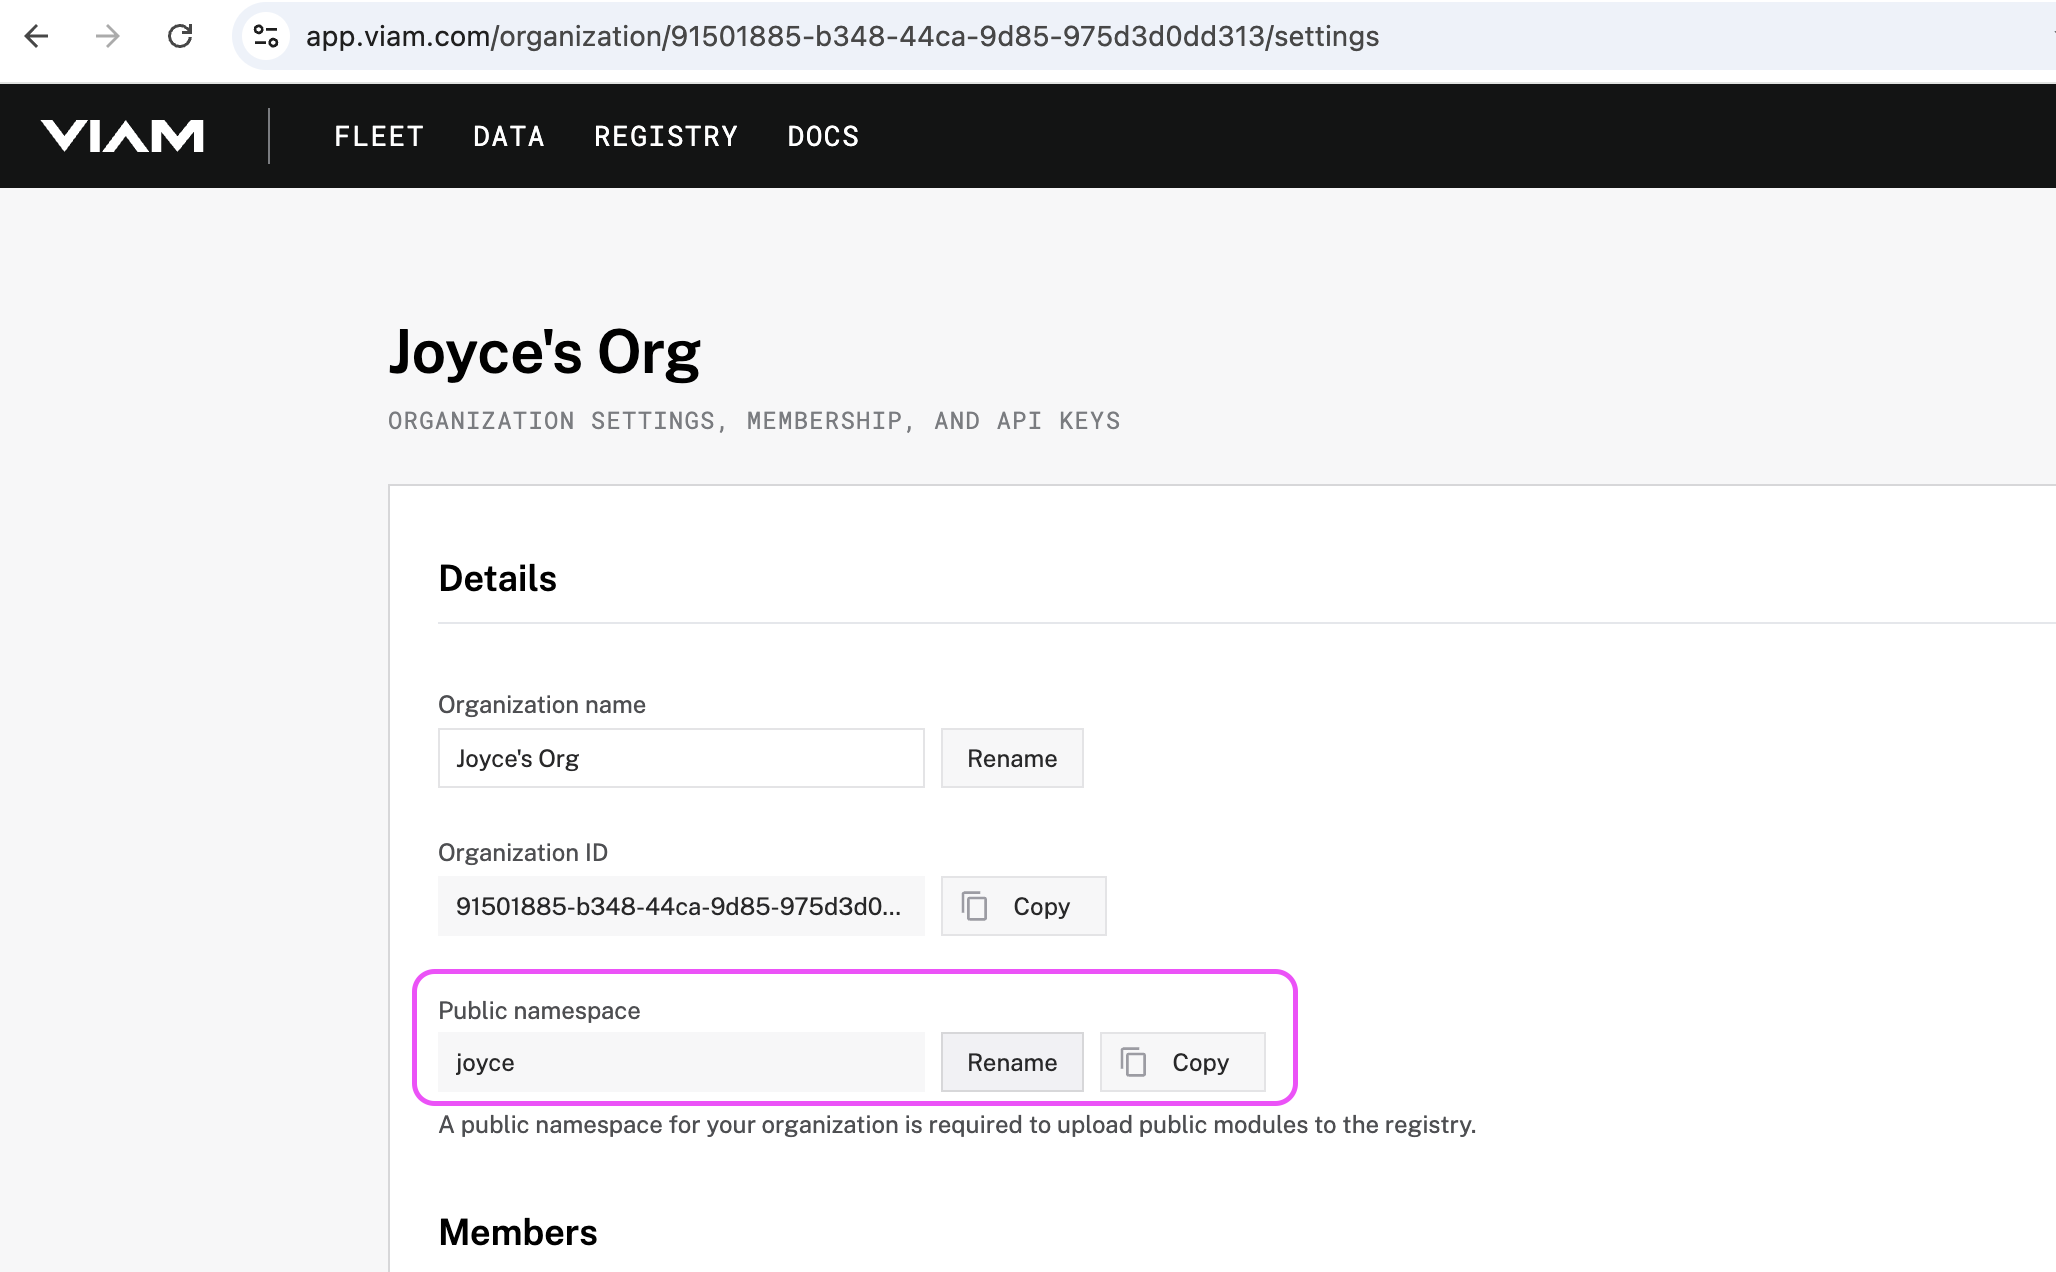
Private - Namespace/Organization ID: In the Viam app, navigate to your organization settings through the menu in upper right corner of the page. Find the Public namespace and copy that string.
- Resource to be added to the module:
Generic Service- This is a Generic Service. If you choose a different resource type to add your control logic to, you must implement any required API methods for the chosen component.
- Model name:
lamp-alarm- This can be anything you choose to identify your control logic model.
- Enable cloud build:
Yes- This enables Viam to build your module via GitHub action.
- Register module:
Yes- This lets Viam know that the module exists.
- Module name:
- Press the Enter key and the generator will create a folder for your control logic component.
- Open the code files using your preferred IDE. Find the Python file within the
src/models/directory with the same name as your model name,lamp_alarm.pyshown here. This is where we can add our control logic.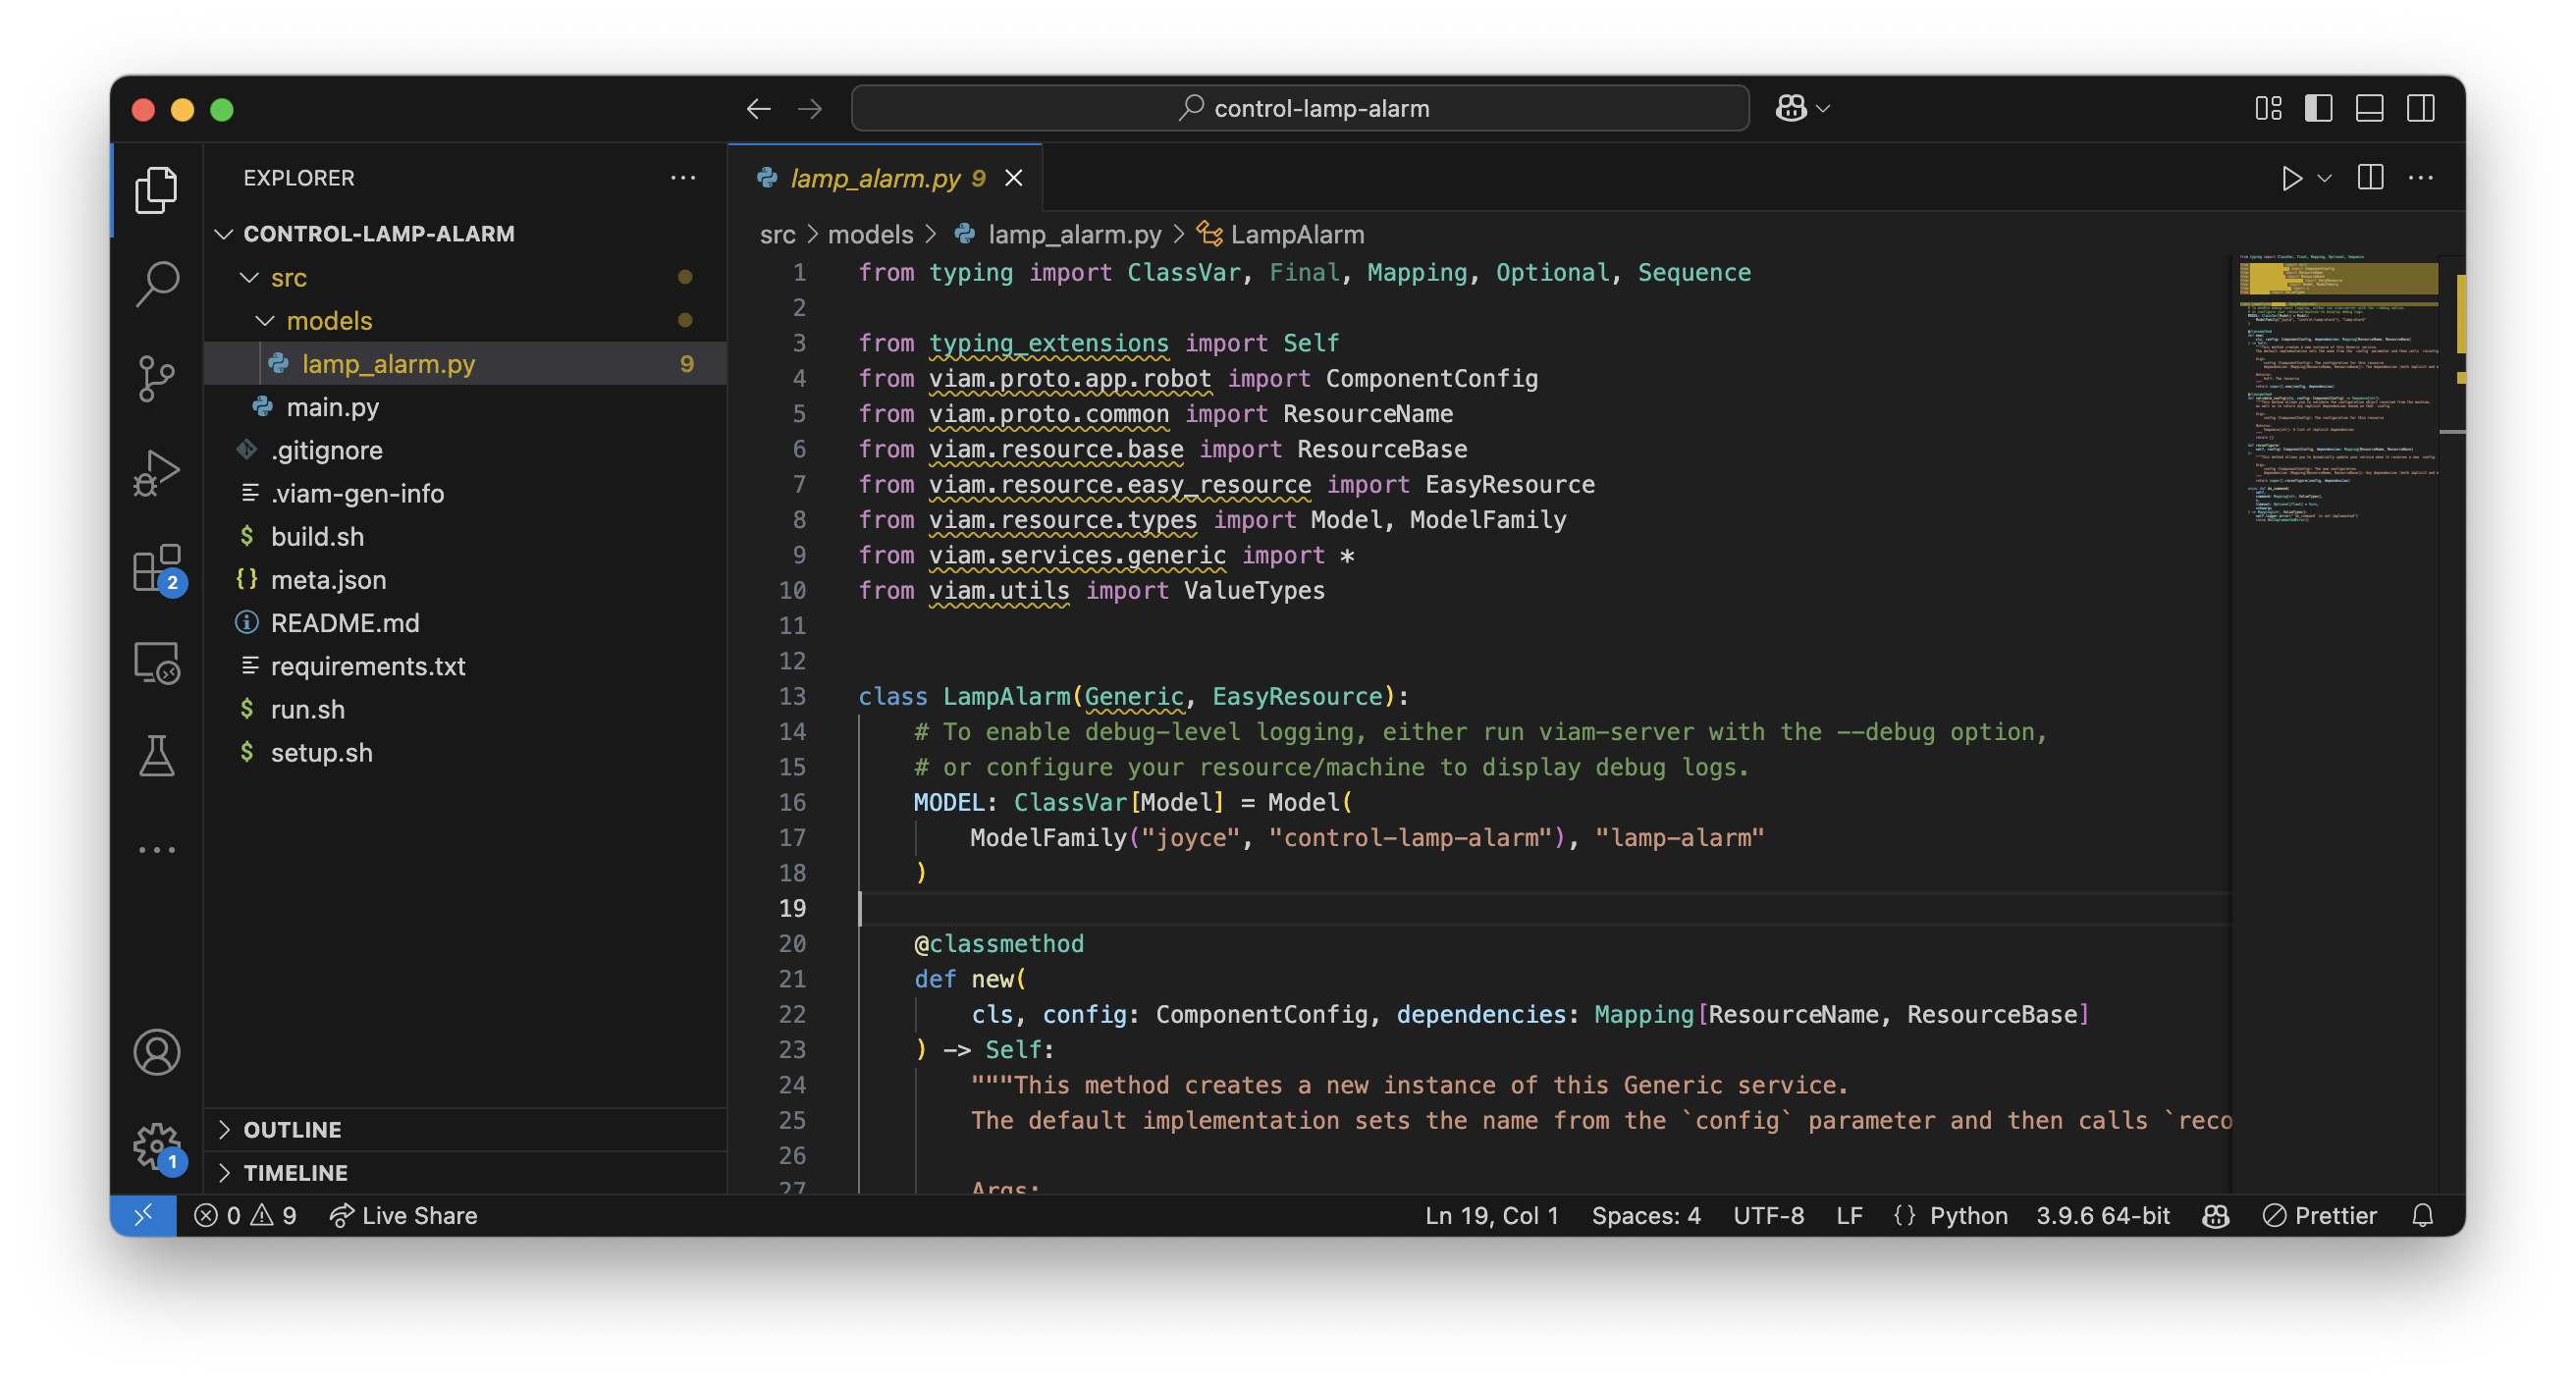
Next, let's add our control logic.
Now that you created the initial module, let's add our control logic, and deploy it to our Raspberry Pi.
Final code sample: You can refer to the sample code to see how everything fits together. In this section, let's break it down step-by-step to learn how the module works.
Update the module code
- Review scaffolding: Let's take a closer look at the generated files, and find the Python file within the
src/models/directory with the same name as your model name,lamp_alarm.pyshown here.- Review the other generated files within the project directory
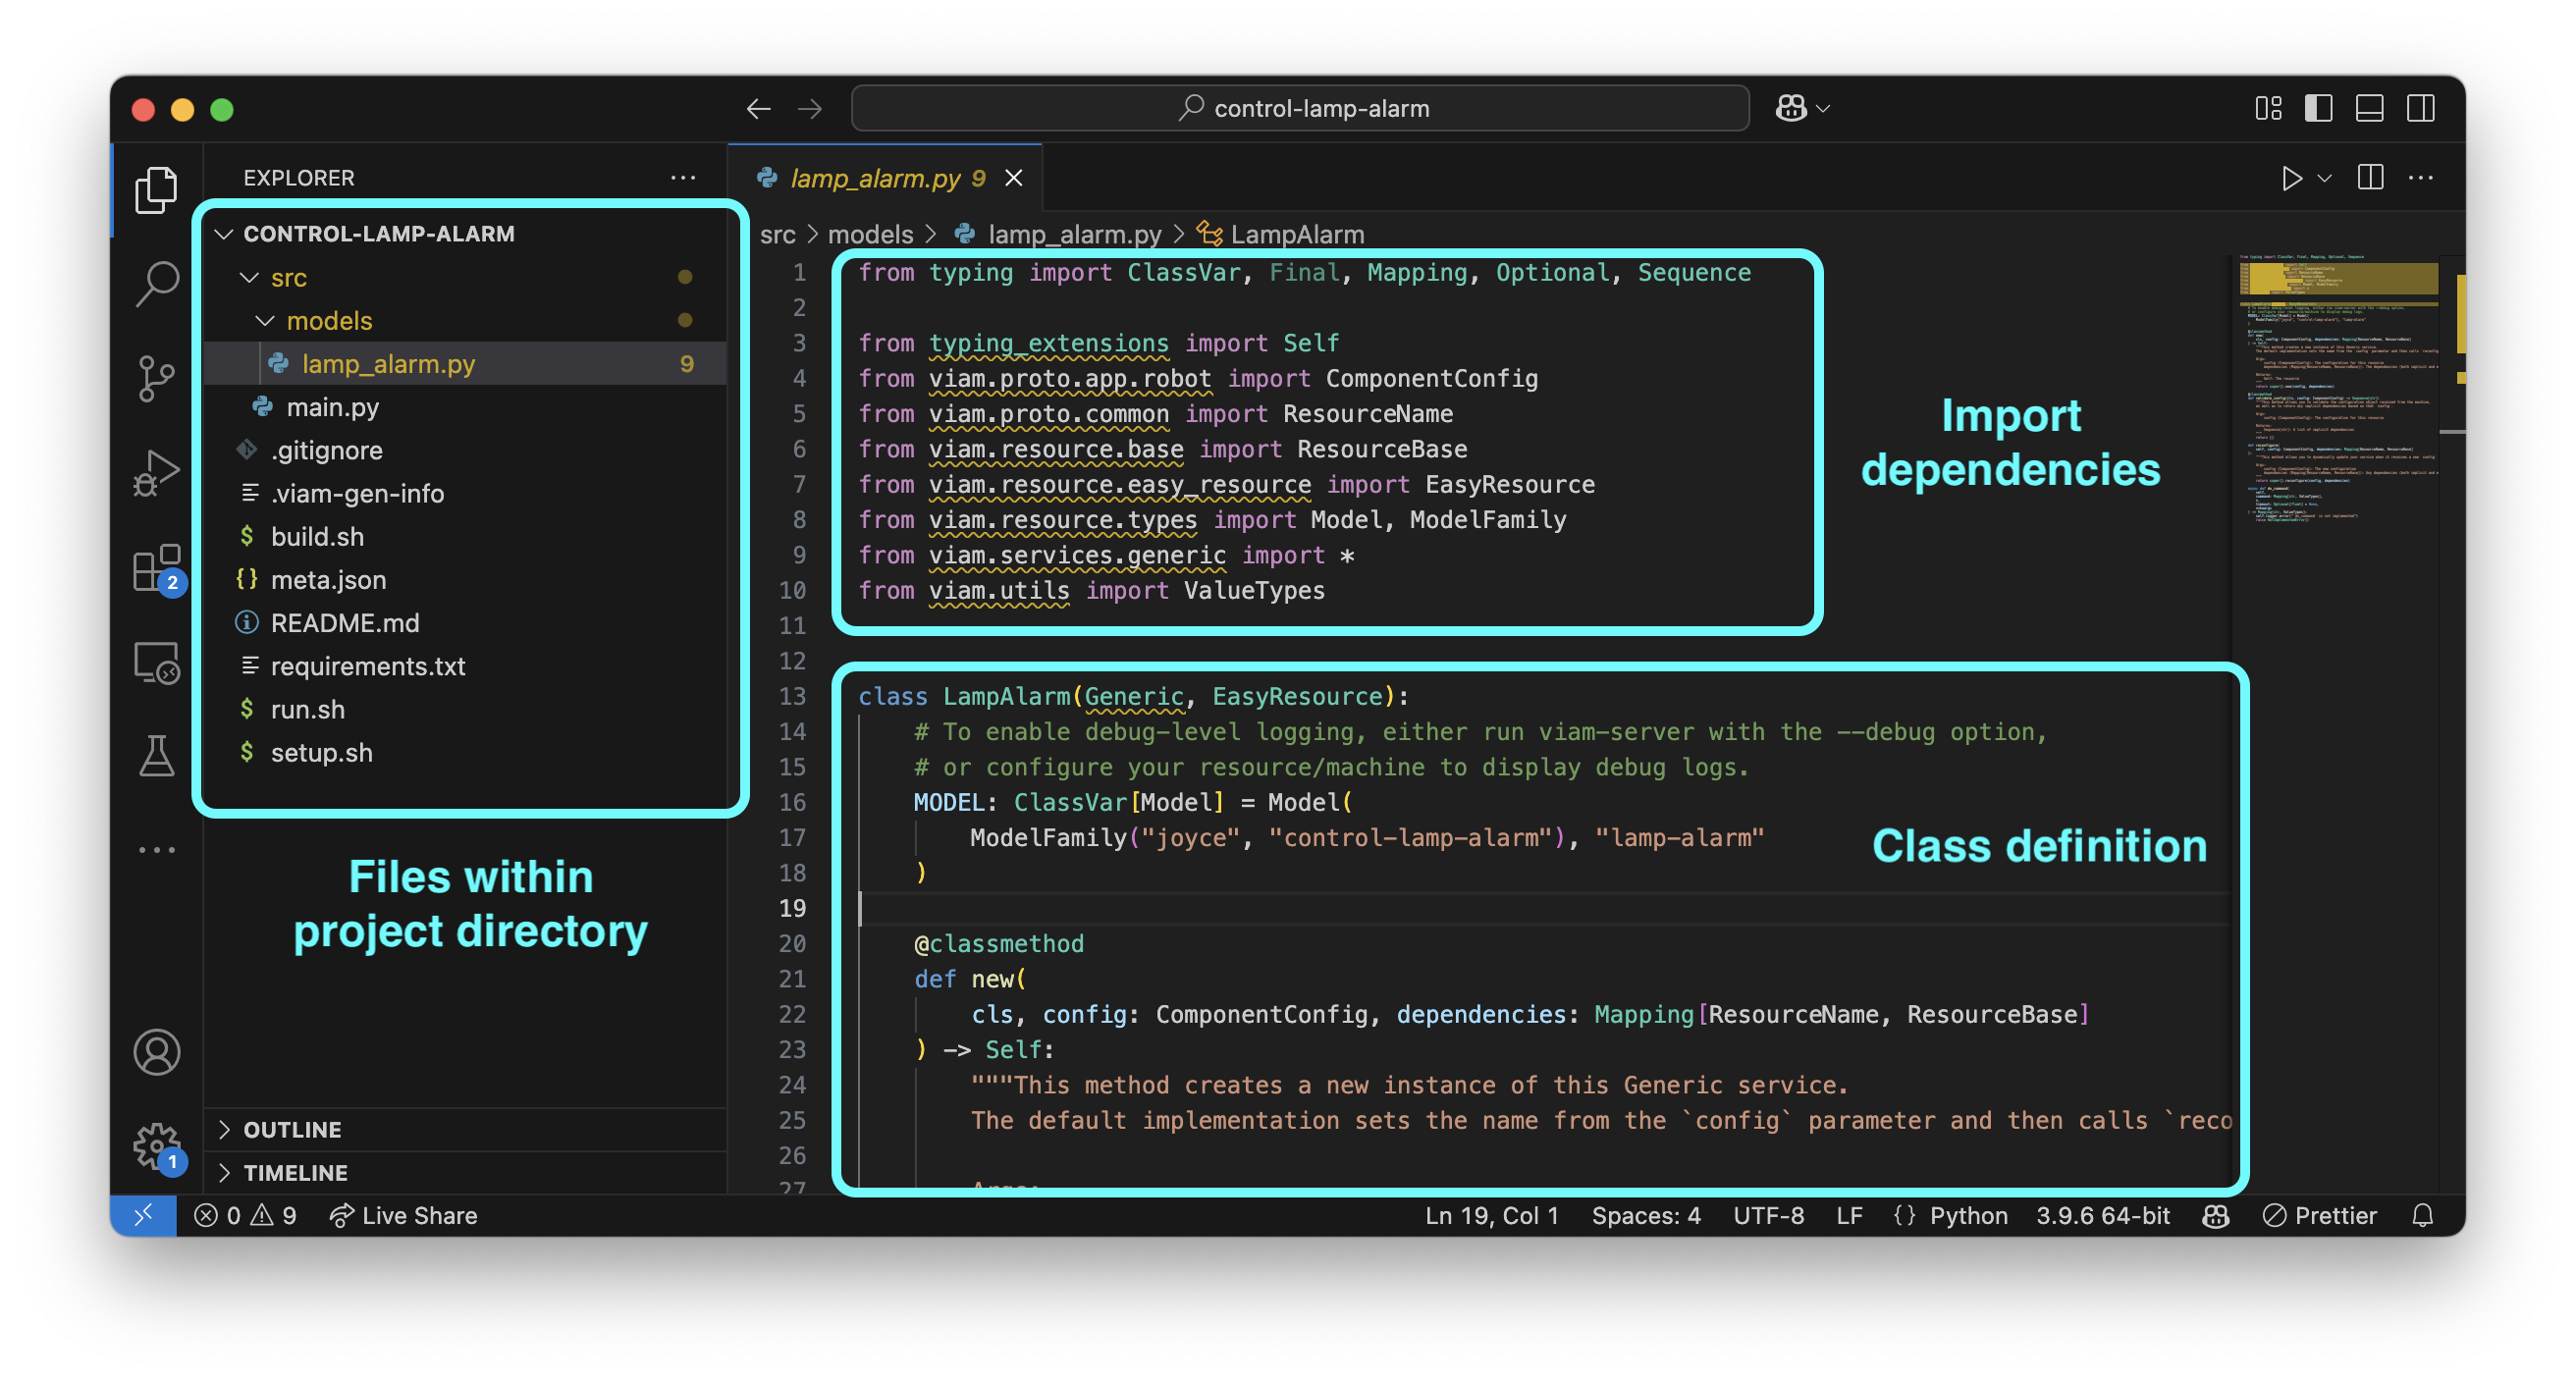
- Review the imports within
lamp_alarm.py - Review the class definition within
lamp_alarm.py- It includes the public namespace, module name, and model name that you specified in the module generation prompts (
joyce,control-lamp-alarm, andlamp-alarmshown here). - It also includes four default class methods
new(),validate_config(),reconfigure(), anddo_command().
- It includes the public namespace, module name, and model name that you specified in the module generation prompts (
- Add dependencies: Add these imports near the top of the file to support our control loop and provide more visibility during debugging. If your control logic requires external dependencies, be sure to also update the
requirements.txtfile.import asyncio from threading import Event from viam.logging import getLogger - Initialize helper elements: Initialize the Viam logger after the imports so that we have more visibility during development. The name of the logger is the model name,
lamp-alarmshown here.LOGGER = getLogger("lamp-alarm") - Initialize variables in the class: At the beginning of the class definition, initialize some variables to support the control loop.
running = None task = None event = Event() - Add helper functions: Within the class definition, add some functions to support the control loop.
def start(self): loop = asyncio.get_event_loop() self.task = loop.create_task(self.control_loop()) self.event.clear() def stop(self): self.event.set() if self.task is not None: self.task.cancel() async def control_loop(self): while not self.event.is_set(): await self.on_loop() await asyncio.sleep(0) async def on_loop(self): try: self.logger.info("Executing control logic") # TODO: ADD CONTROL LOGIC except Exception as err: self.logger.error(err) await asyncio.sleep(10) def __del__(self): self.stop() async def close(self): self.stop() - Add control logic: Within your newly defined
on_loop()method, you can add custom control logic. Swap in your own logic here! Replace the examplevisionandlampcontrol with your own sensor and actuator. If your goal is a working version that does nothing, proceed to the next step. - Validate configuration: In the
validate_config()method, you can ensure the user correctly provides the required dependencies, formatted as expected. Refer to the docs for more details about module dependencies. If your goal is a working version that validates nothing, proceed to the next step. - Initialize required resources: In the
reconfigure()method, initialize any required resources if your control logic relies on other parts of the machine (like sensors or services). This method is called when your model is first added to the machine, and again whenever the machine configuration is updated. - Start the control loop: In the
reconfigure()method, start the control logic to run in a background loop.def reconfigure( self, config: ComponentConfig, dependencies: Mapping[ResourceName, ResourceBase] ): # starts automatically if self.running is None: self.start() self.running = True else: LOGGER.info("Already running control logic.") - Add Do Command for manual testing: Replace the
do_command()method with the following code, so that we can manually test the control loop withstopandstart.async def do_command( self, command: Mapping[str, ValueTypes], *, timeout: Optional[float] = None, **kwargs ) -> Mapping[str, ValueTypes]: result = {key: False for key in command.keys()} for name, args in command.items(): if name == "action" and args == "start": self.start() result[name] = True if name == "action" and args == "stop": self.stop() result[name] = True return result
Now that you've added control logic to the module, let's test it locally on our device.
Configure hot reloading
- Create reloading script: Since we enabled cloud build during the module generation, we can create a hot reloading script to bundle and run our code. Create a reloading script file called
reload.shin the project root directory.touch reload.sh - Copy and paste the following code into the new file.
#!/usr/bin/env bash # bash safe mode. look at `set --help` to see what these are doing set -euxo pipefail cd $(dirname $0) MODULE_DIR=$(dirname $0) VIRTUAL_ENV=$MODULE_DIR/venv PYTHON=$VIRTUAL_ENV/bin/python ./setup.sh # Be sure to use `exec` so that termination signals reach the python process, # or handle forwarding termination signals manually exec $PYTHON src/main.py $@ - Grant permissions: Make the reload script executable by running the following command.
chmod 755 reload.sh - Set up virtual environment: Create a virtual Python environment with the necessary packages by running the
setup.shfile.sh setup.sh - Point to reload script: In the
meta.jsonfile, replace the path forentrypoint,build, andpath."entrypoint": "reload.sh", "first_run": "", "build": { "build": "rm -f module.tar.gz && tar czf module.tar.gz requirements.txt src/*.py src/models/*.py meta.json setup.sh reload.sh", "setup": "./setup.sh", "path": "module.tar.gz", "arch": [ "linux/amd64", "linux/arm64" ] } - Get Part ID: To run the module code on a different machine besides the computer that you are working on, Raspberry Pi in this example, you'll need the part ID of the remote machine. Go to the machine status dropdown in the Viam app, and copy the part ID to your clipboard.

- Add module to the device: From the command line, bundle and move the module code to the target machine with
viam module reloadand include the-part-idflag and replace the placeholder with your own part ID from the previous step. Doing this also registers and restarts the module.viam module reload --part-id ff05e799-e323-4027-84b8-5c703bcf652f - Once the script completes, you can see two new elements in the Viam app under the CONFIGURE tab.
- A
shellservice for Viam to connect to your target device. - Your local module called
control-lamp-alarm.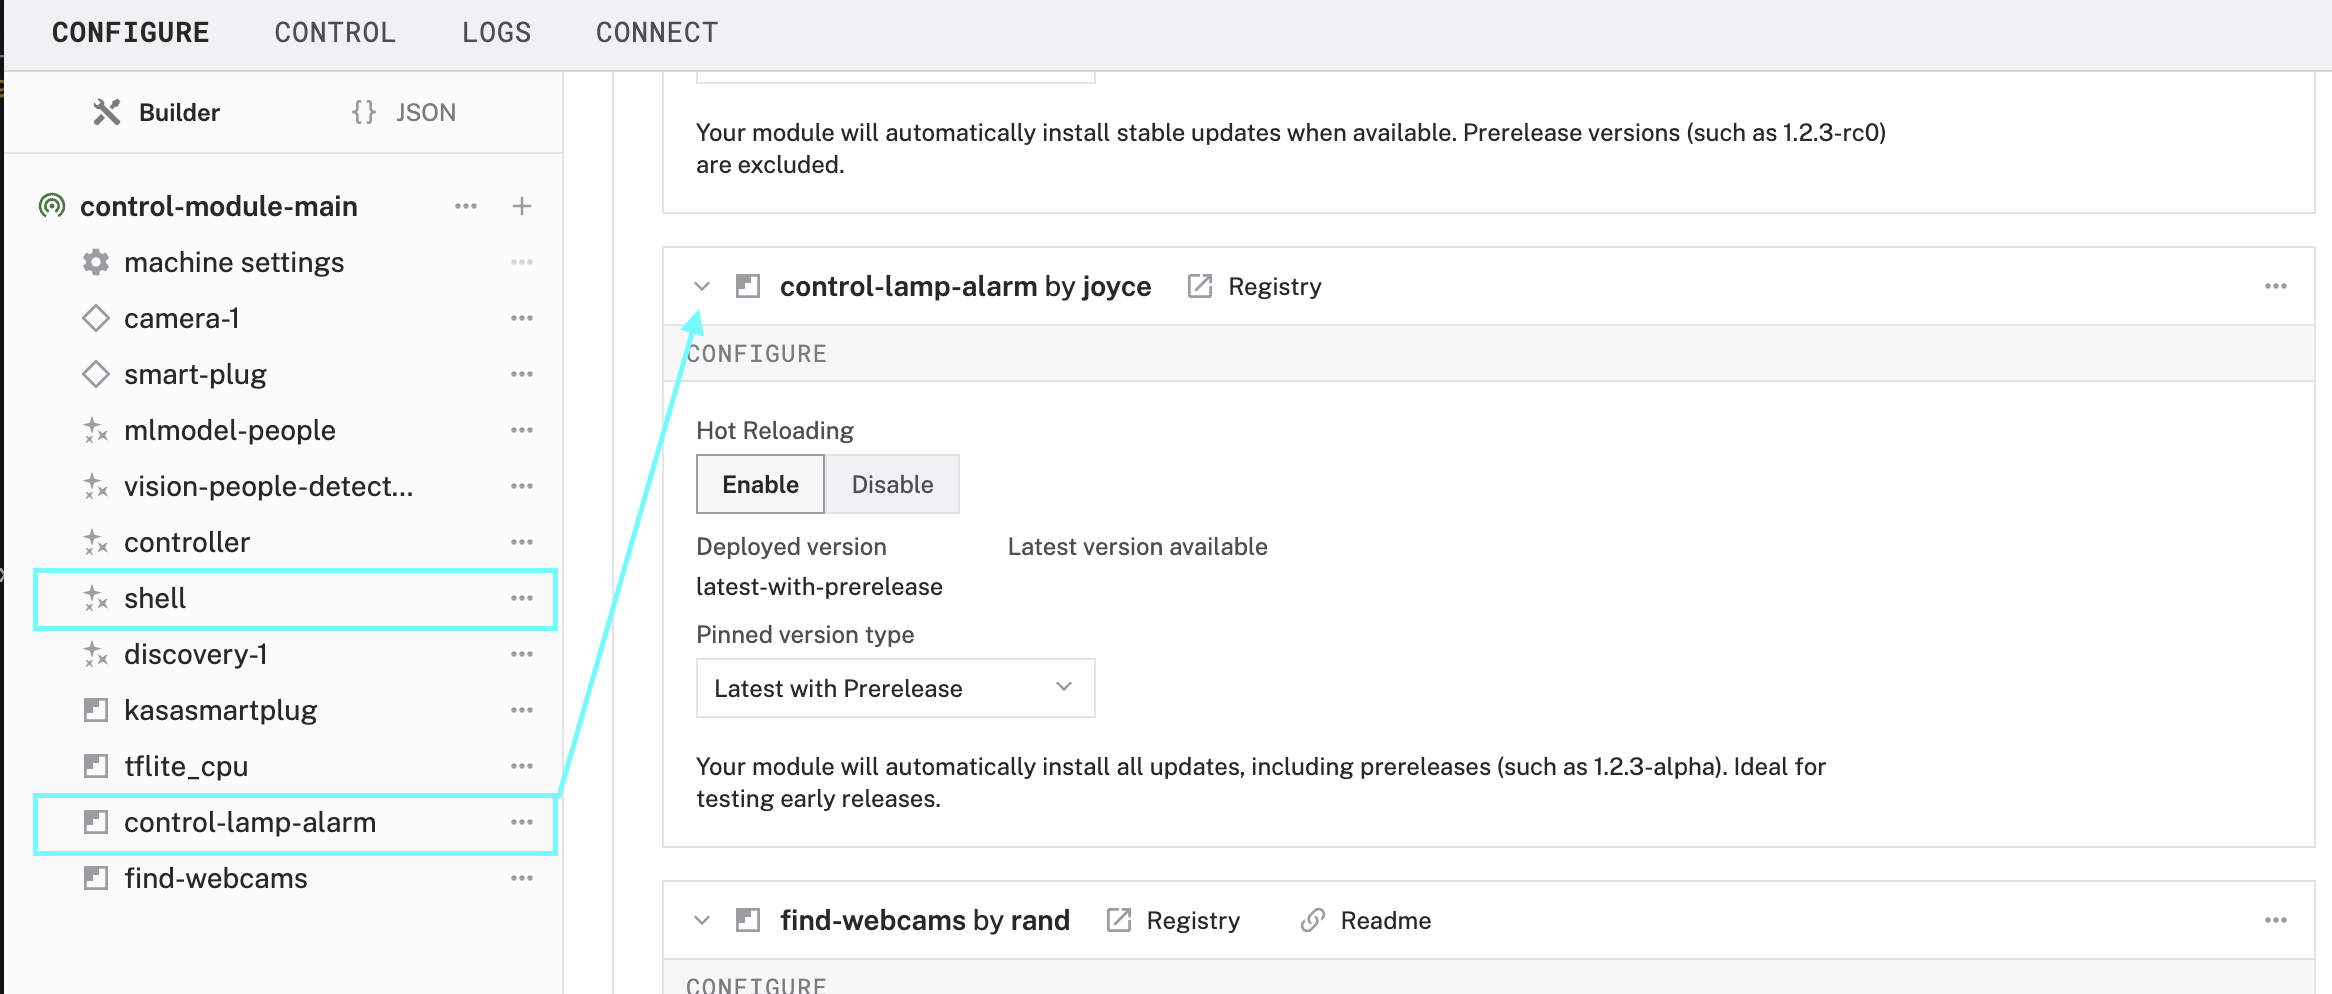
- A
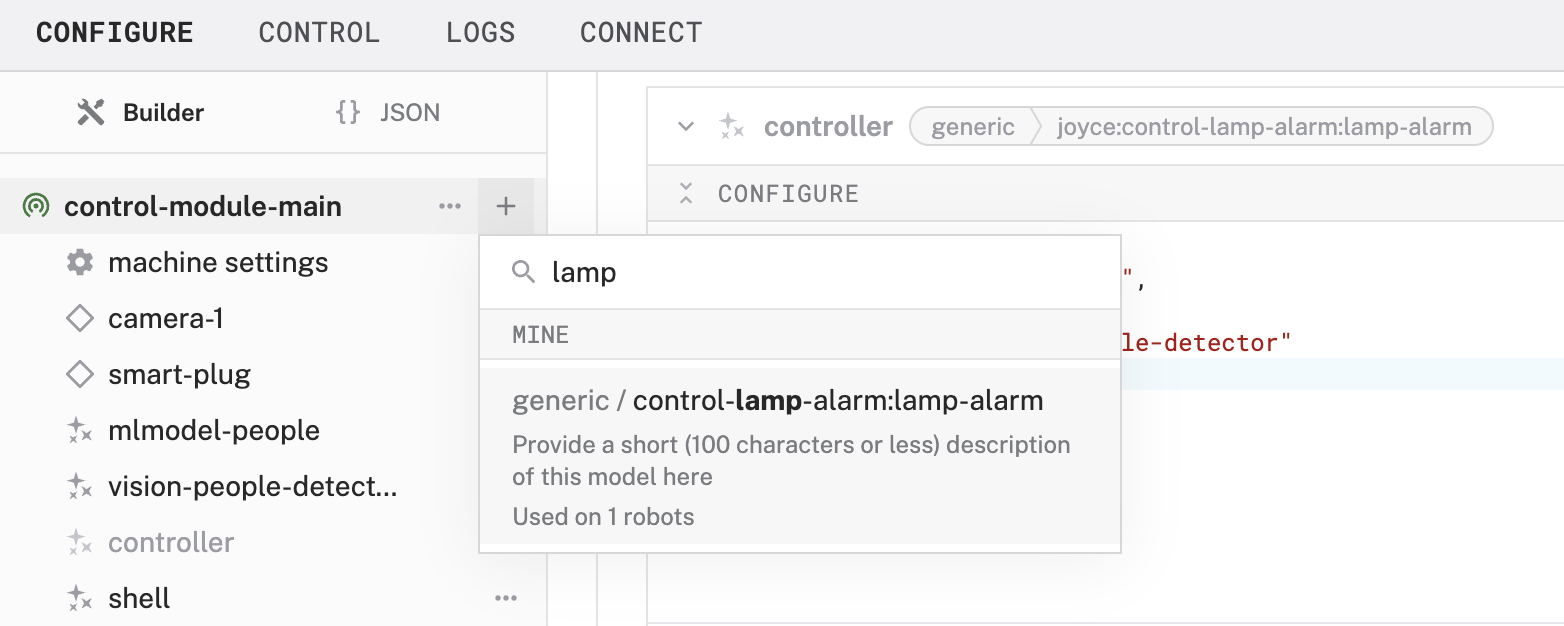
- Click the + icon in the left-hand menu and select Local module and then Local service to create a new local service called
controller.- Enter the model namespace triplet, for example
joyce:control-lamp-alarm:lamp-alarm. You can find the triplet in themodelfield of yourmeta.jsonfile. - Select Type:
generic - Enter the module Name:
controller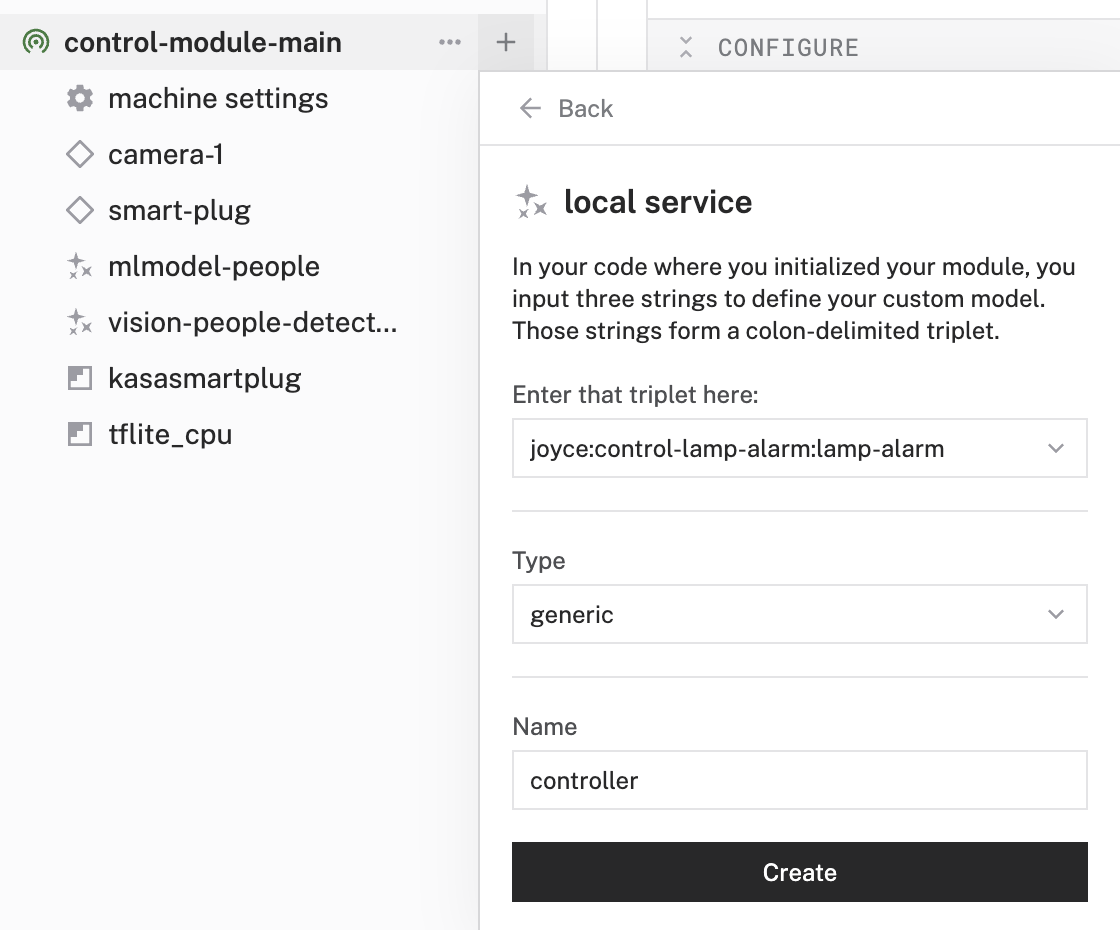
- Enter the model namespace triplet, for example
- Configure dependencies: Configure any required dependencies using proper JSON syntax.
- Save your changes in the top right and wait a few moments for the configuration changes to take effect.
Continue refining the control logic
As you continue debugging and making updates to your control logic, use viam module reload for Viam to rebuild the module and restart the instance on your machine with the latest code, again using your part ID.
viam module reload --part-id ff05e799-e323-4027-84b8-5c703bcf652f
Now that your module is working the way you want, upload it to the Viam registry so that it can be re-used by your future self, your team, or the general public.
Publish the module
- Update README: Update the
README.mdfile, following the suggested template. This provides details to your future self and others about what your module does and how to use it. - Add GitHub repository link: If you haven't already, set up the GitHub repository where you plan to commit the module source code. Add a link to that GitHub repository as the
urlin themeta.jsonfile. This is required for the cloud build to work.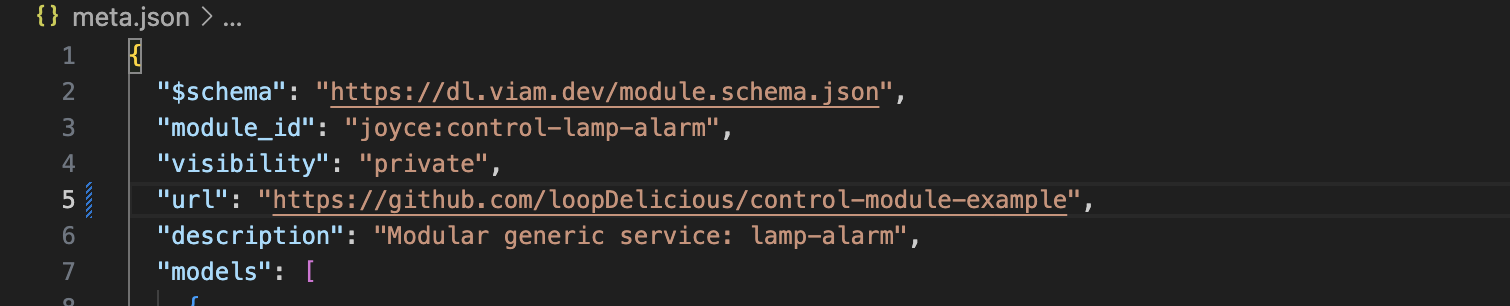
- Update metadata: Make any final edits to the
meta.jsonfile such as including adescriptionor updating the visibility topublicif you want the module to be visible to all Viam users. - Package and upload: Revert the edits you made in the
meta.jsonfor local testing, so the values forentrypoint,build, andpathare in the original state as shown below."entrypoint": "dist/main", "first_run": "", "build": { "build": "./build.sh", "setup": "./setup.sh", "path": "dist/archive.tar.gz", "arch": [ "linux/amd64", "linux/arm64" ] } - Update module: From the CLI, run
viam module update, which is required when you make changes to themeta.json.viam module update - Commit and push your updates to GitHub: Commit and push your latest updates to your remote GitHub repository.
- Set up GitHub action: The
viam module generatecommand already generated thebuild-actionfile in your.github/workflowsfolder, so you just need to set up authentication in GitHub, and then create a new release to trigger the action. In your terminal, run the following command to view your organization ID.viam organizations list - Create API key: Create an API key for your organization, using your organization ID and a name for the API key.
viam organization api-key create --org-id YOUR_ORG_UUID --name descriptive-key-name - Add new repository secrets: In the GitHub repository for your project, go to Settings → Secrets and variables → Actions.
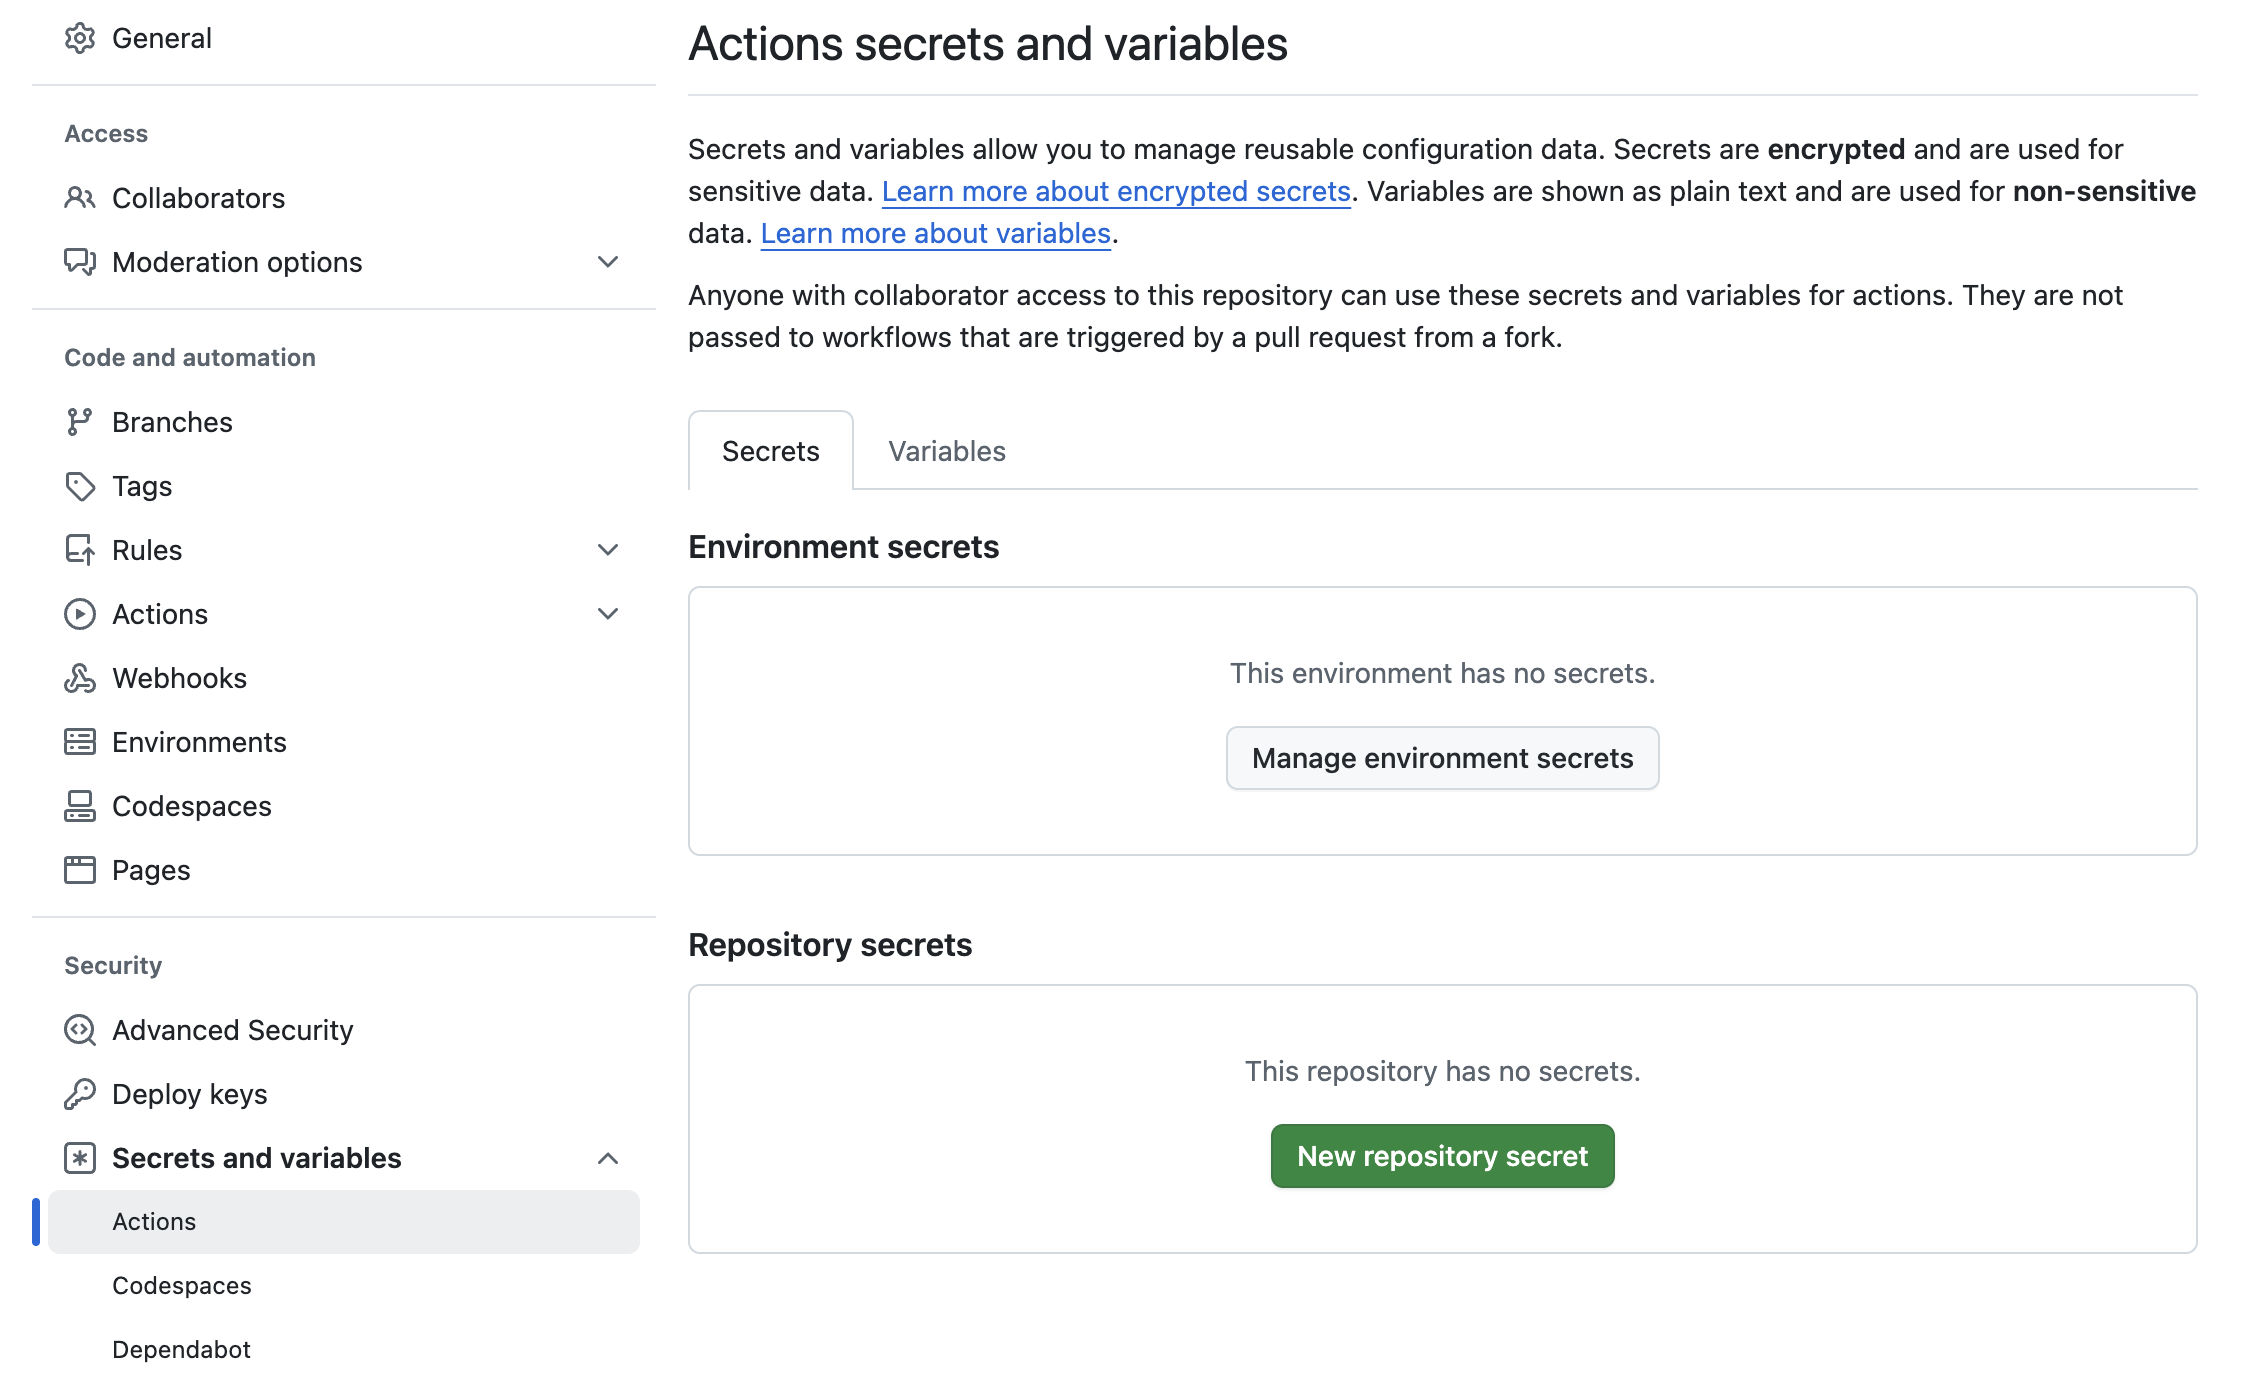
- Create new secrets: Create two new secrets using the New repository secret button:
VIAM_KEY_IDwith the UUID fromKey IDin your terminalVIAM_KEY_VALUEwith the string fromKey Valuein your terminal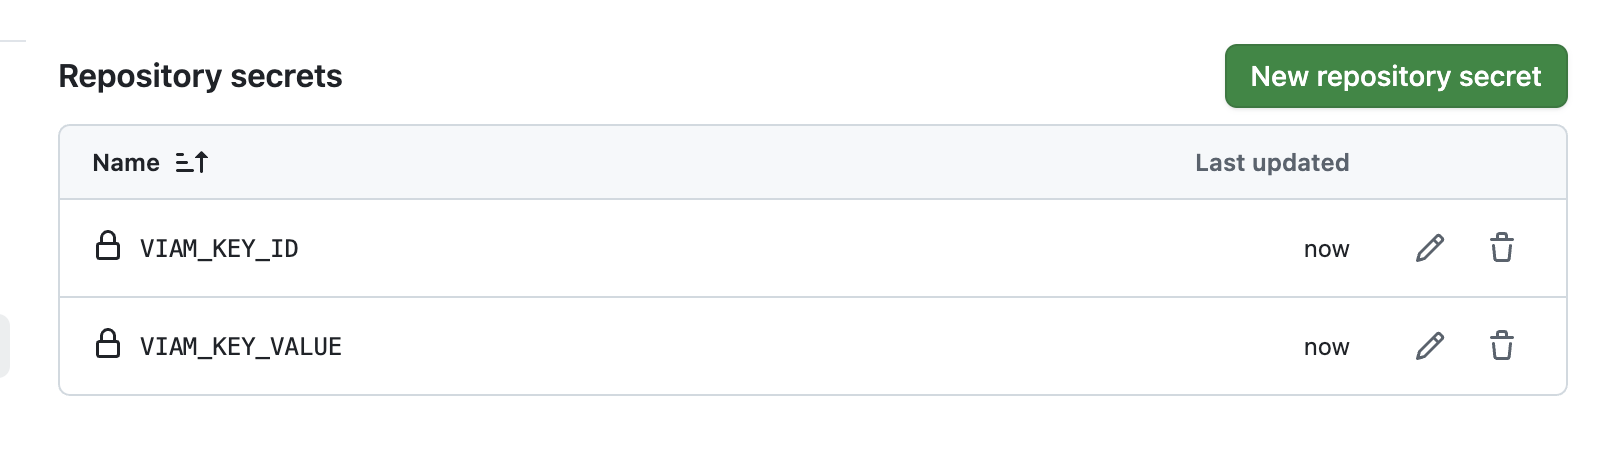
- Create a new release: From the main code page of your GitHub repo, find Releases in the right side menu and click Create a new release.

- Add a release tag: In the Choose a tag dropdown, create a new tag such as
1.0.0. Do not prepend the tag withvor the GitHub action will not trigger. For details about versioning, see Module versioning.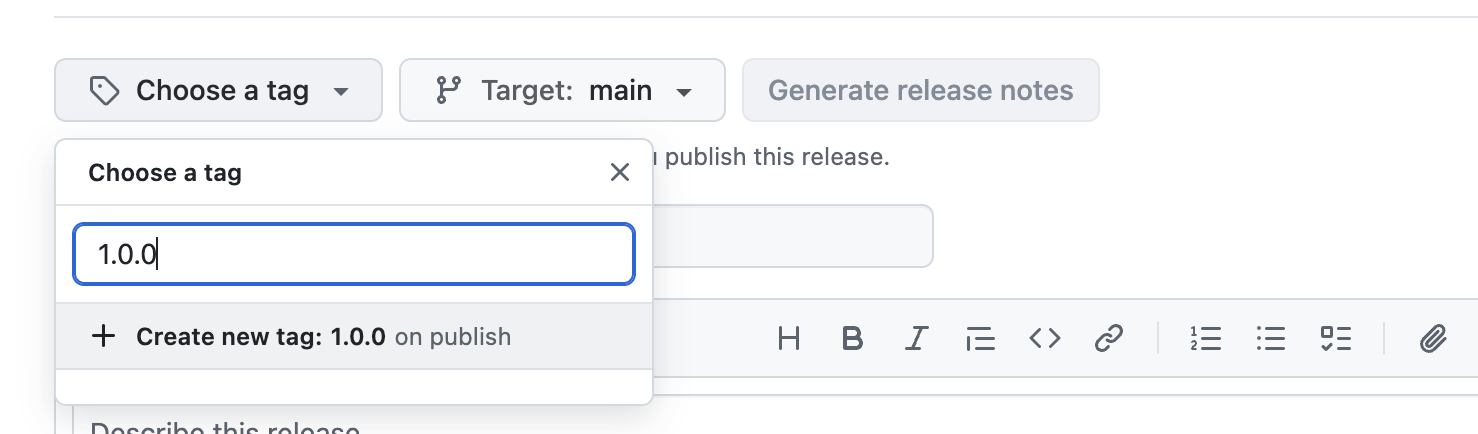
- Publish release: Click Publish release. The cloud build action will begin building the new module version for each architecture listed in your
meta.json.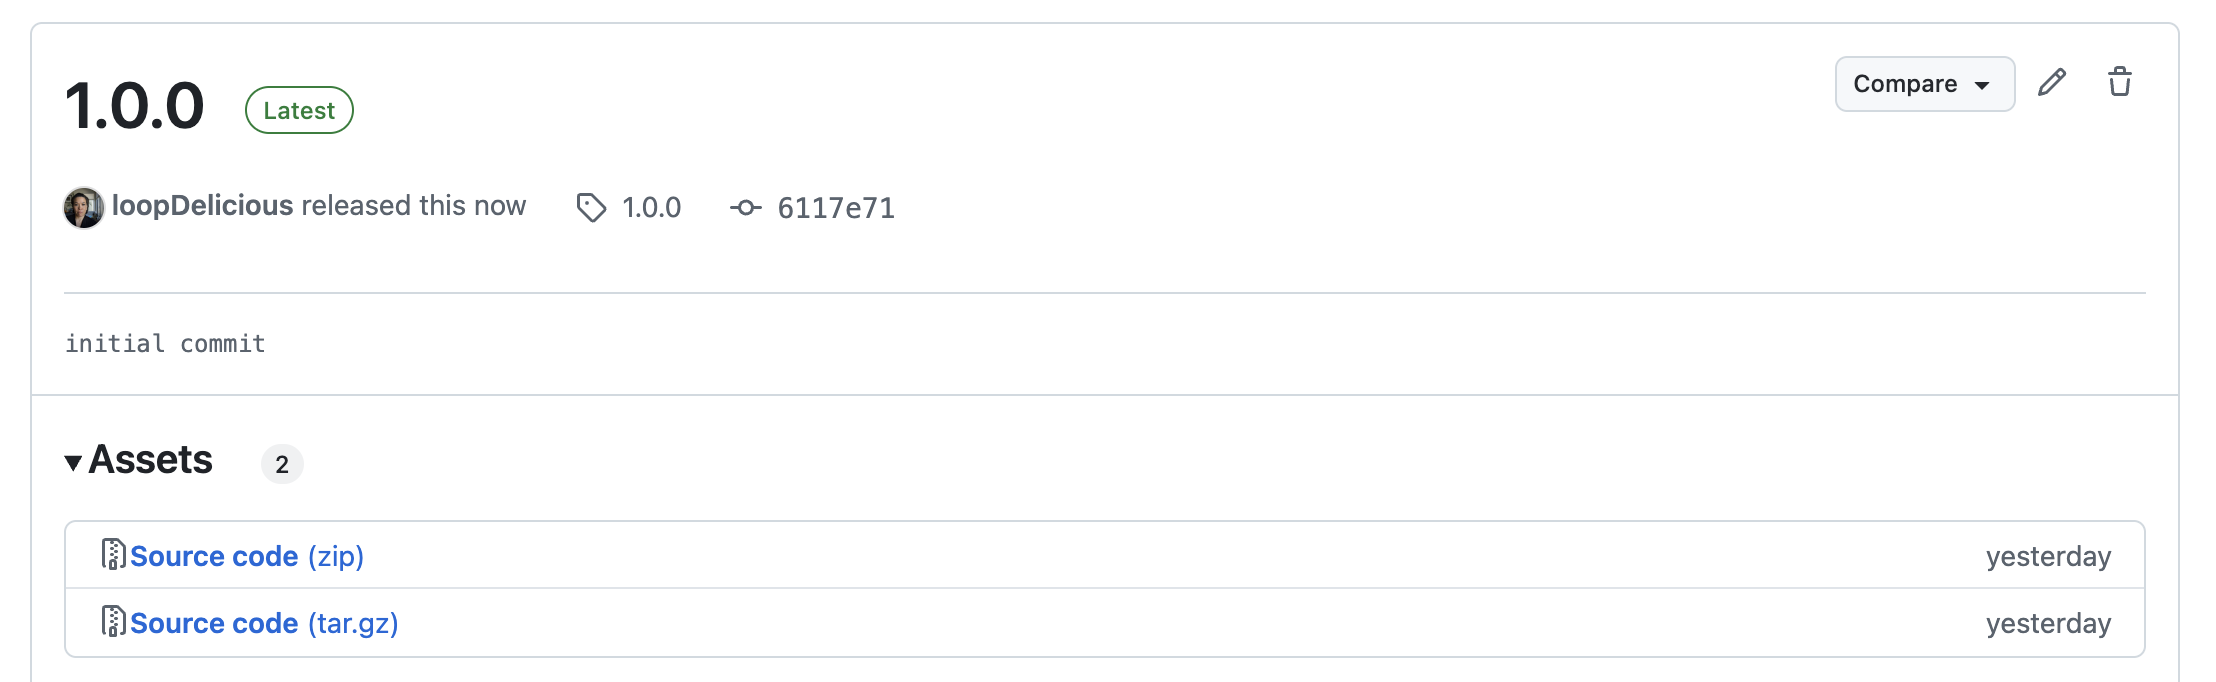
Add your new modular resource to your machines
Now that your module is in the registry, you can configure the component you added on your machines just as you would configure other components and services.
- Delete local module configuration: In the Viam app under your machine's CONFIGURE tab, delete the resource. There's no more need for local module configuration since it is primarily for testing purposes. In our example, the local module configuration was called
controller. - Delete local module: For the same reasons, delete the local module. In our example, the local module was called
control-lamp-alarm.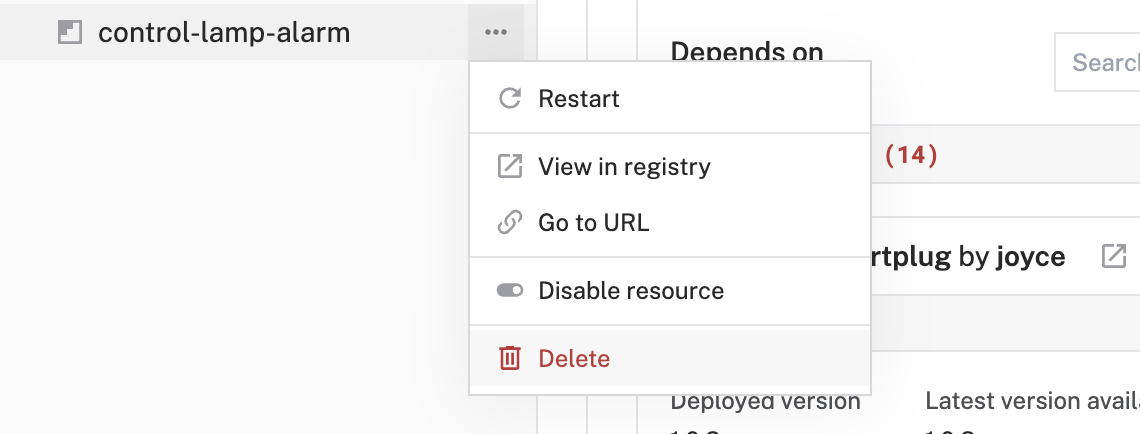
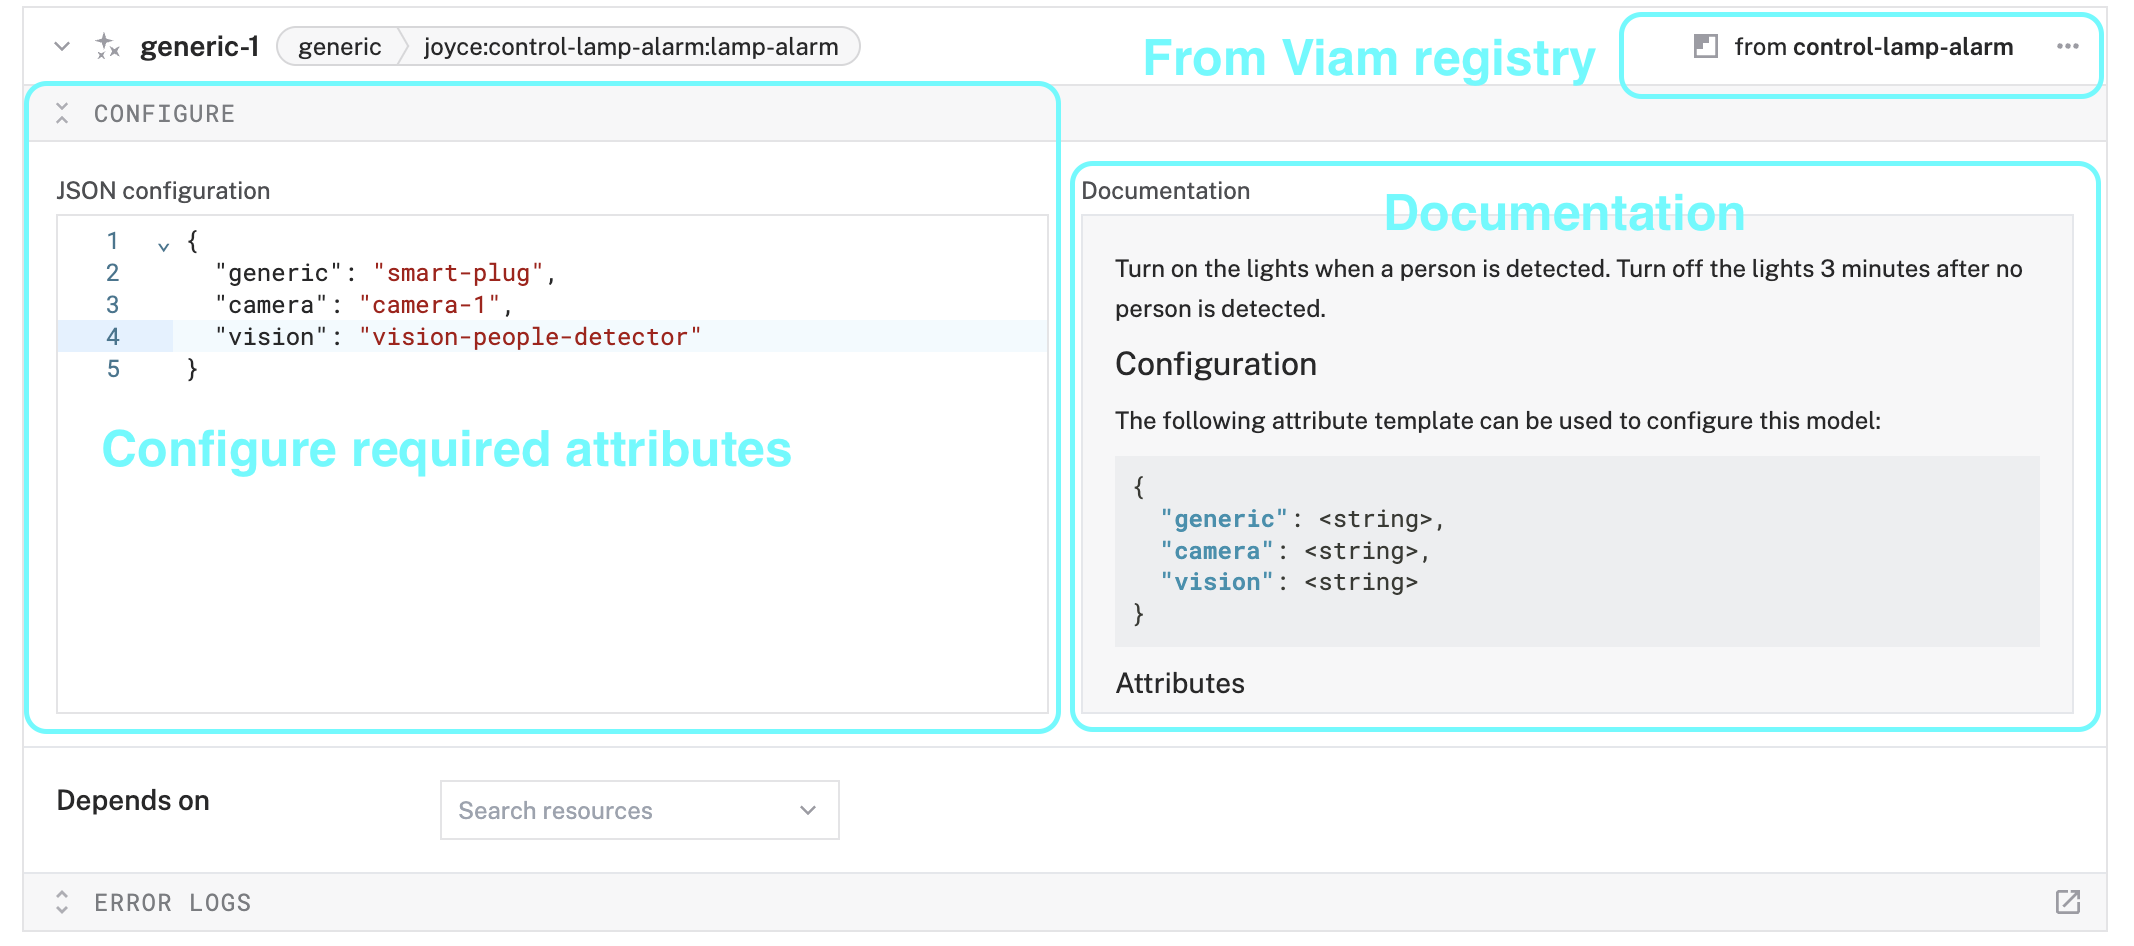
- Add modular resource: Click the + button, select "Component or service", and search for your model name to add your new modular resource.
- Configure the modular resource with the required attributes. Notice the beautiful documentation that you impressively added to your module, and the label in the top right corner of the resource panel indicating the module comes from the Viam registry.
- Save your changes in the top right and wait a few moments for the configuration changes to take effect.
What you learned
- How to generate, develop, and upload a module using Viam
- How to customize control logic within a module
- How to require and validate dependencies within a custom module
- How to configure and use a module
Advanced scenarios for Viam modules
At this point, you have created and tested your own control logic module. See other examples that implement control logic:
You can also create your own module to integrate custom functionality for other components and services.

More about the Viam Registry
Modules are a very important part of the Viam platform. They enable robots to be built in a composable and versatile manner. Browse more modules in the Viam registry.
- How the modular registry works blog
- Viam registry marketing landing page