An ESP32 board is a lightweight, cost-effective solution for projects requiring basic control, real-time processing, and wireless communication. It's ideal for simpler robotics or IoT applications where the full power of a single-board computer (SBC) like a Raspberry Pi isn't necessary.
Learn how to install the lightweight viam-micro-server which can run on resource-limited embedded systems, like the ESP32, that cannot run the fully-featured viam-server. The viam-micro-server is built from the micro-RDK.
Prerequisites
- Sign up for a free Viam account, and then sign in to the Viam app
What You'll Learn
- How to install the
viam-micro-serveron a microcontroller
What You'll Need
- A computer running Mac, Windows, or Linux
- ESP32 development board - check the Viam docs for specific resource requirements
- USB data cable - make sure the cable is capable of data transfer (not just charging); refer to this resource for How To Tell If A USB Cable Is For Charging Or Data Transfer
What You'll Build
- Flash a build of the
viam-micro-server, along with your machine's credentials and your wifi information, to your ESP32 development board. Then configure and control your ESP32 using Viam.
Watch the Video
Follow along with the step-by-step video.
- Connect your ESP32 board to your computer with a data cable. Make sure the cable is capable of data transfer (not just charging).
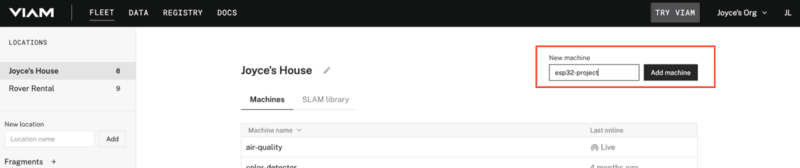
- In the Viam app under the LOCATIONS tab, enter a name for a new machine, and Add machine.
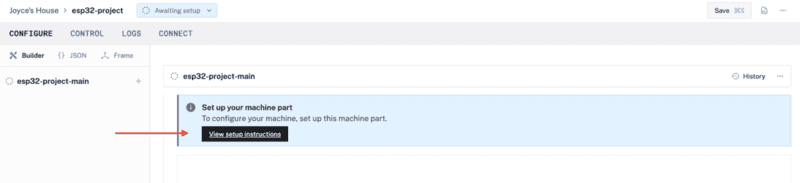
- Under the CONFIGURE tab, click the View setup instructions button.
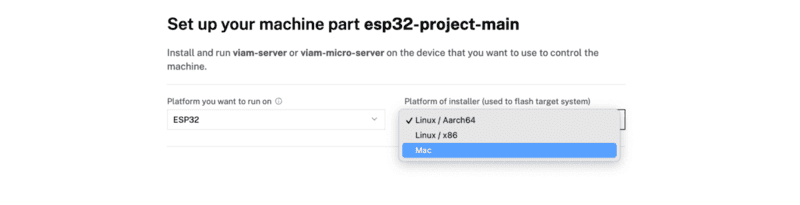
- Select the platform you want to run on, ESP32.

- Select the platform of the computer you're using to flash the ESP32. The example shown below will be for a Mac, but the steps to follow for other operating systems is similar.
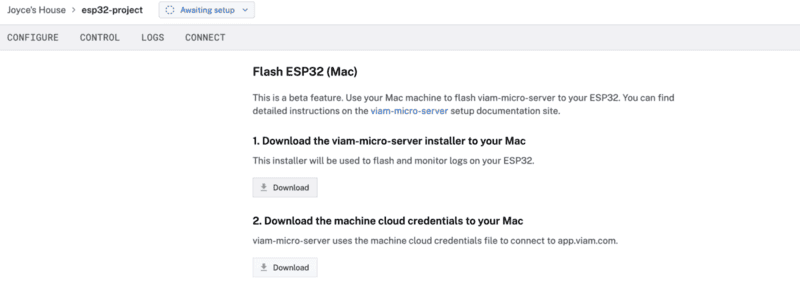
- Download the file for the
viam-micro-serverinstaller used to flash and monitor logs on your ESP32. - Download the file for the machine credentials used to connect the ESP32 to the Viam app.
- In the terminal window, navigate to the directory where the previous files downloaded. In the example shown below, files were downloaded to the
~/Downloadsdirectory of the computer.$ cd ~/Downloads - Copy the installation command from the setup instructions in the Viam app.
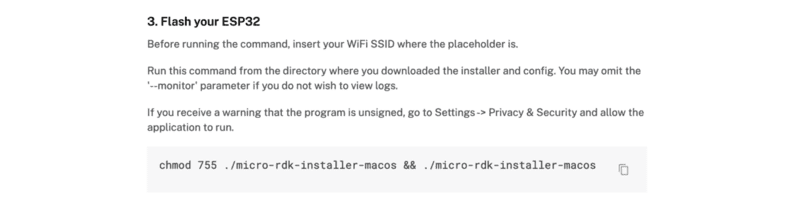
- Paste it into your terminal window at the command line prompt. Replace the
<WIFI-SSID>placeholder (including the angle brackets<and>) with your own SSID.$ chmod 755 ./micro-rdk-installer-macos && ./micro-rdk-installer-macos write-flash --app-config viam-esp32-project-main.json --monitor --wifi-ssid "<WIFI-SSID>"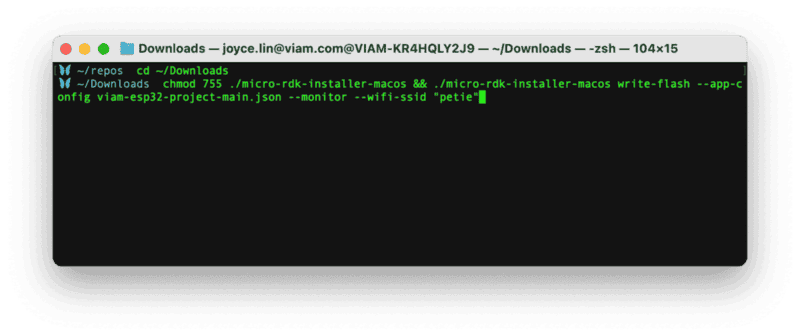
- Run the command. Enter your WiFi password when prompted. If you receive a warning that the program is unsigned, go to Settings -> Privacy & Security and allow the application to run.
- When prompted to select your connection type, select
/dev/cu.*. In most cases, including flashing firmware on the ESP32, you'll typically usecu(call-up) instead oftty(teletype).
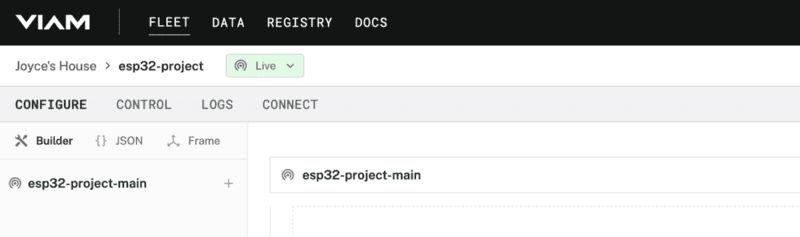
- In the Viam app, wait for confirmation that your machine has successfully connected, and status is "Live". This might take a few minutes to complete depending on your connection.
- Once the machine is connected, you can begin adding resources to control. For example, under the CONFIGURE tab, click the + icon in the left-hand menu and select Component. Select
board, and find theesp32module, and Create. This adds the module for working with the ESP32 board's GPIO pins. Leave the default nameboard-1for now.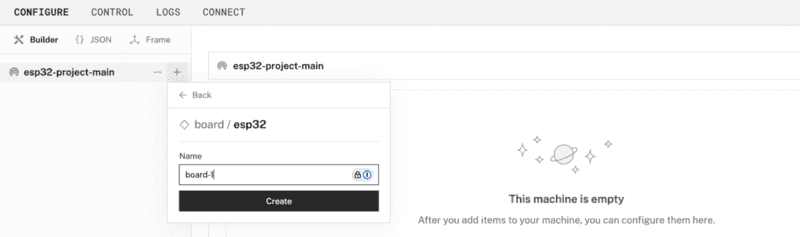
- Notice adding this module adds the board hardware component called
board-1. The collapsible card on the right corresponds to the part listed in the left sidebar.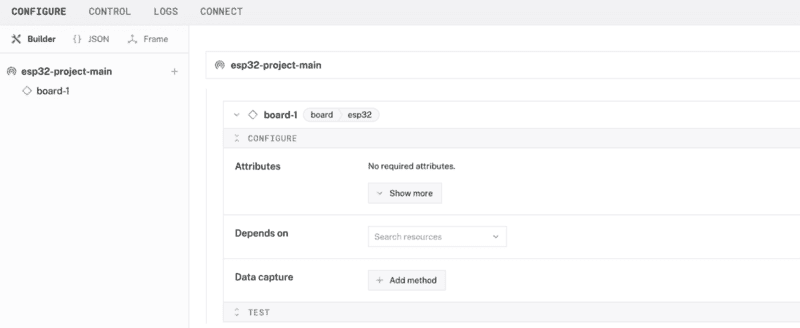
- Within the
board-1card, expand the Attributes dropdown to see options to configure the board. Input12and Enter to configure GPIO pin 12. - Click Save in the top right to save and apply your configuration changes.
- Under the CONTROL tab, you can see one hardware component called
board-1that you configured on the CONFIGURE tab. Enter12into thePinfield, select the Read mode, so you canGetinformation about that pin.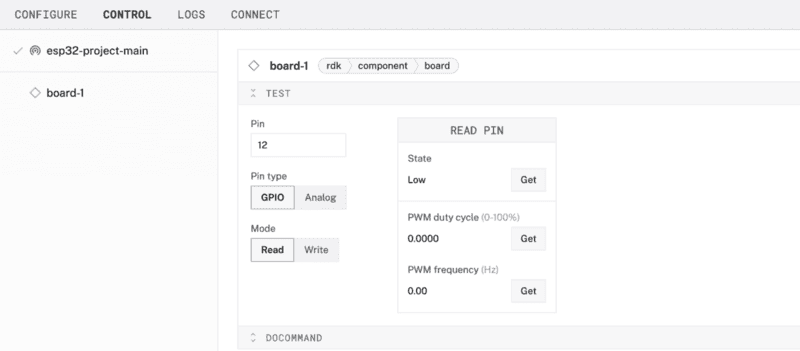
What You Learned
- How to install the
viam-micro-serveron a microcontroller
Develop custom firmware
Once viam-micro-server is installed, you can check that your device is connected to Viam and try out the free_heap_sensor or one of the other included modules. Then, to use other hardware or software with your ESP32, follow the guide to build and flash custom firmware. You can build firmware that includes pre-existing modules, or include modules you create yourself.
Related projects
You can also learn how to install viam-server on single-board computers and other devices.