Why would you want to build your own QR code scanner? QR codes can encode a wide variety of information, including website URLs, contact details, or text and binary data. Using a QR code scanner, you can build custom applications to provide instructions to autonomous vehicles, permit security access to physical spaces, and many more use cases.
In this codelab, you'll learn how to use a QR code scanner to detect and decode QR codes using a Viam module. We'll leverage the pyzbar and OpenCV Python libraries to process images from a camera and extract information encoded in QR codes. By the end, you'll have a working solution that can identify QR codes in real-time to trigger customizable actions.
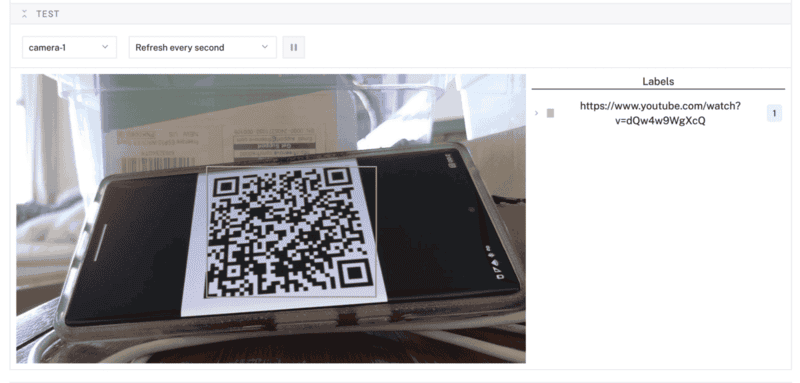
What You'll Build
- A camera that can detect and decode QR codes
Prerequisites
- A computer with MacOS, Windows, or Linux to flash your Raspberry Pi and configure the device's components using the Viam app
- Hardware and supplies requirements
- 1 - Raspberry Pi 5
- Follow the Raspberry Pi setup guide to make sure your Pi is flashed with a Viam-compatible operating system, and that you are able to SSH into it.
- 1 - microSD card to use with your Pi
- 1 - power supply for your Pi
- 1 - USB web camera
- 1 - Raspberry Pi 5
What You'll Need
- All the hardware components listed in prerequisites.
- Sign up for a free Viam account, and then sign in to the Viam app
What You'll Learn
- How to use a webcam to scan and detect QR codes
- How to configure and test a device's components using Viam
- How to use a vision service in Viam
Watch the Video
See a demonstration and overview of the QR scanner in this video.
Configure your machine
- In the Viam app under the LOCATIONS tab, create a machine by typing in a name and clicking Add machine.

- Click View setup instructions.
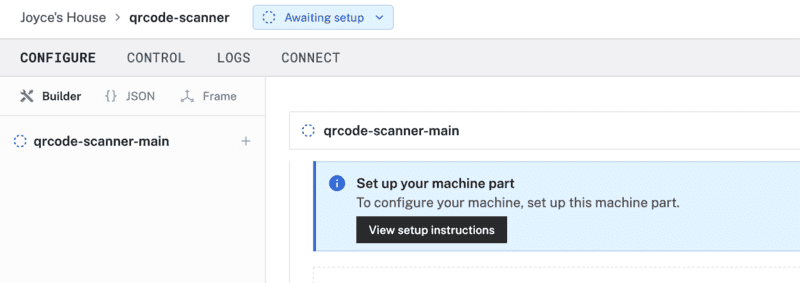
- To install
viam-serveron the Raspberry Pi device that you want to use to communicate with and control your webcam, select theLinux / Aarch64platform for the Raspberry Pi, and leave your installation method asviam-agent.
- Use the
viam-agentto download and installviam-serveron your Raspberry Pi. Follow the instructions to run the command provided in the setup instructions from the SSH prompt of your Raspberry Pi.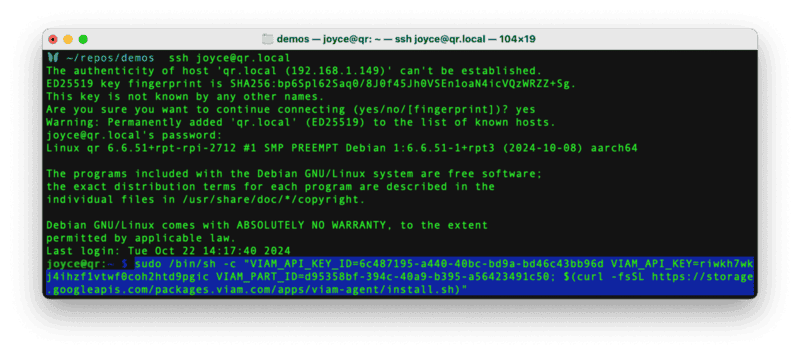
- The setup page will indicate when the machine is successfully connected.

Add your USB webcam
- Connect the USB webcam to the Raspberry Pi.
- In the Viam app, find the CONFIGURE tab. It's time to configure your hardware.
- Click the + icon in the left-hand menu and select Component.
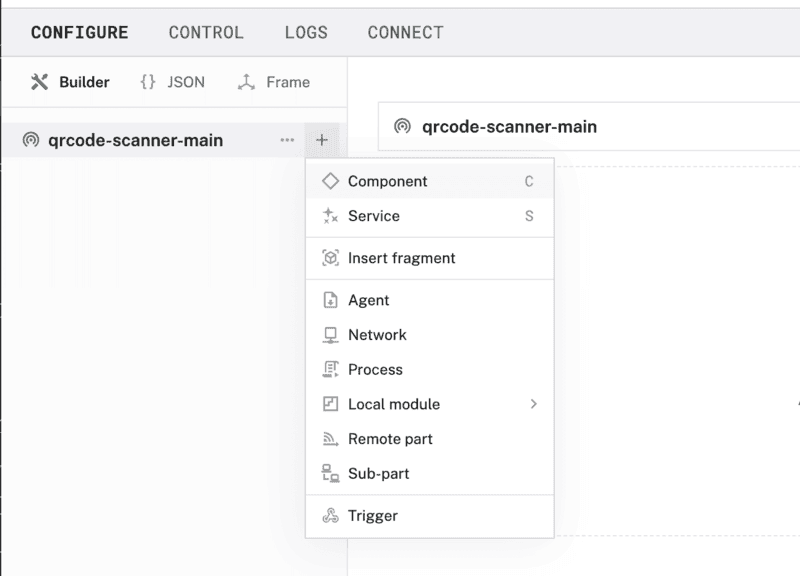
- Select
camera, and find thewebcammodule. This adds the module for working with a USB webcam. Leave the default namecamera-1for now.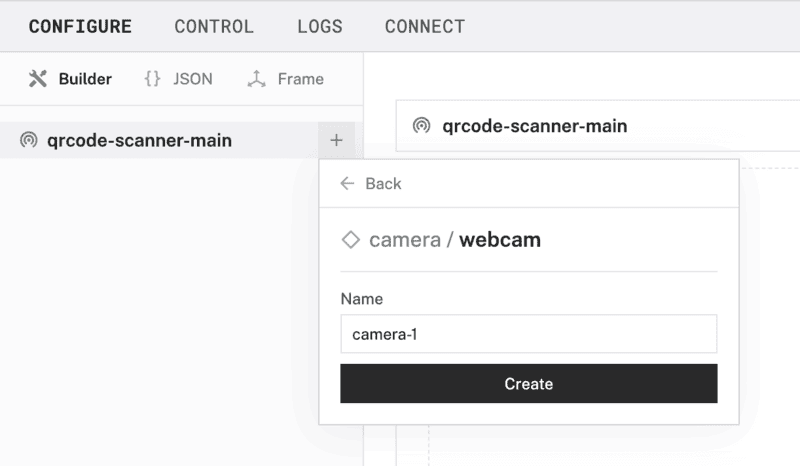
- Notice adding this component adds the webcam hardware component called
camera-1. The collapsible panel on the right corresponds to the part listed in the left sidebar. From the Attributes section of the panel, select avideo_path.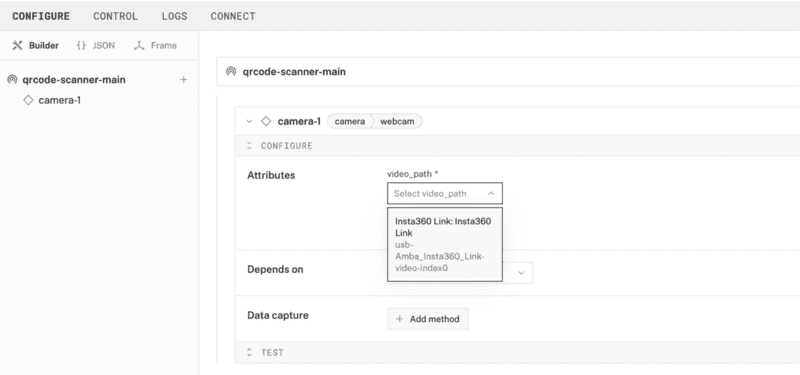
- Click Save in the top right to save and apply your configuration changes.
- At the bottom of the
camera-1panel, expand the TEST section to ensure you have configured the camera properly.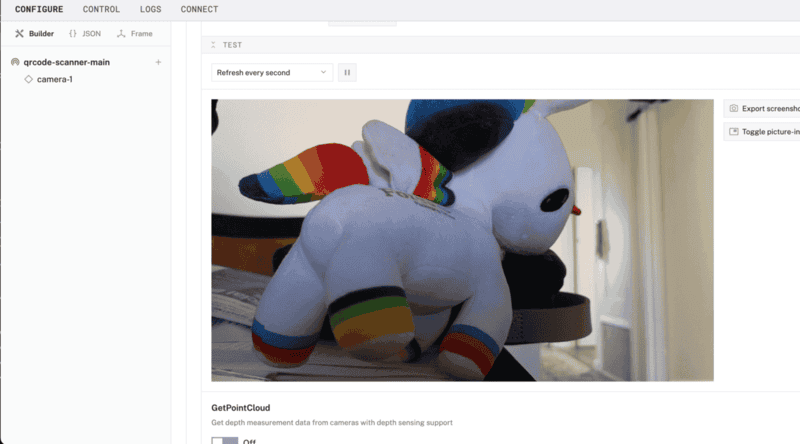
Now that your hardware is working the way you want it, it's time to add a vision service to detect and decode a QR code.
- In the Viam app, click the + icon in the left-hand menu and select Service, and then
vision.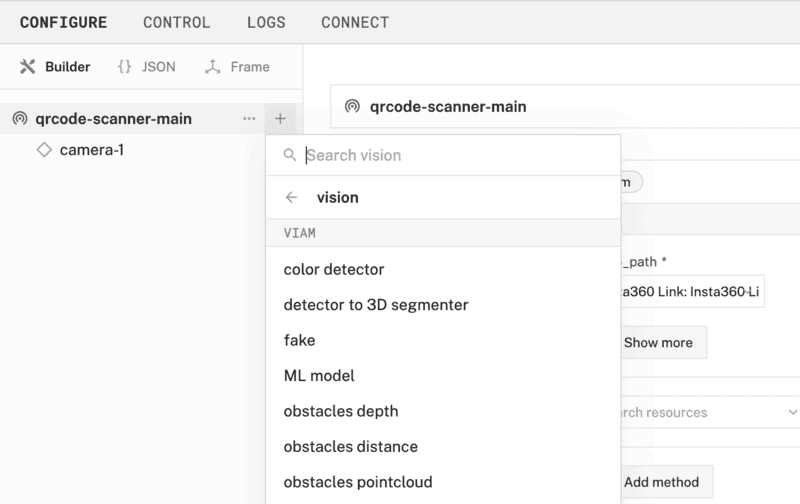
- Search for a module called
pyzbar. Then click Add module, and Create a new vision service calledvision-1.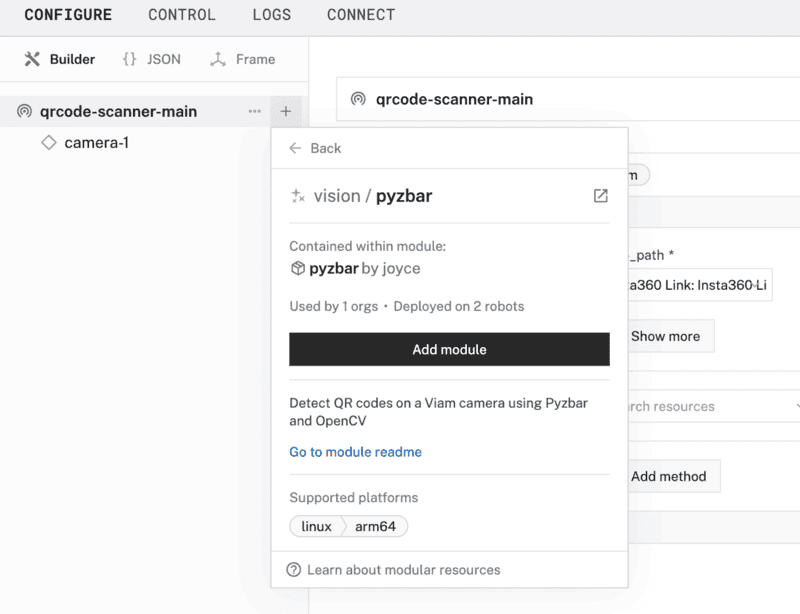
- Notice this creates two new items in the left sidebar. The first is your new vision service called
vision-1, and the second is your newpyzbarmodule. - In the
vision-1panel under the Depends on section, check thecamera-1resource. This configures the vision service to depend on data coming in from the webcam. - Save your changes in the top right and wait a few moments for the configuration changes to take effect.
- At the bottom of the
vision-1panel, expand the TEST section to ensure you have configured the vision service properly. Point the webcam towards a QR code to see if the camera detects it. - If the scanner detects a QR code, a bounding box will highlight the QR code in the video feed, decode the data, and display it on the right under Labels. In the example shown here, the URL decoded was
viam.com.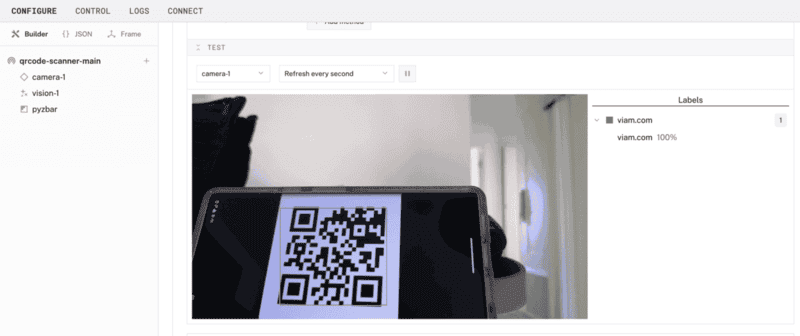
At this point, you have configured and tested your machine and webcam to detect and decode QR codes, but nothing else is happening automatically. In the next section, create an automatic process to run on your machine to trigger an action when a QR code is detected.
Create an automation script
- To configure the machine to automatically run a command to execute a script, use a Viam process. Create a new file on your computer called
process.py.$ touch process.py - Copy and paste this sample code into the new file
process.py. This code will allow your Raspberry Pi to connect to your vision service and execute our logic. - Now it's time to move your control code to your Raspberry Pi device. From the terminal window, run the following command to SSH (Secure Shell) into your board, where the text in
<>should be replaced (including the<and>symbols themselves) with theuserandhostnameyou configured when you set up your machine.ssh <USERNAME>@<REMOTE-HOSTNAME>.local - From the SSH prompt on your Raspberry Pi, install the Python package manager.
$ sudo apt install -y python3-pip - Install the Viam Python SDK into a new directory called
process.$ pip3 install --target=process viam-sdk - Display the full path of the current directory you are working in on your Raspberry Pi with the
pwdcommand. Make a note of this output for the next steps.$ pwd - Find the executable path of Python3 to run
process.pyon your Raspberry Pi withwhich python3. Again, make a note of this output for the next steps.$ which python3 - Run the following command from your computer (not the SSH prompt to your Raspberry Pi) to copy the code from your computer to your Raspberry Pi. In the command, you will copy
process.pyover to your Raspberry Pi, with the section following the colon:indicating where your file should be copied to on the Raspberry Pi (the path of the directory you are working in on your Raspberry Pi, along with the filename).$ scp process.py user@host.local:/home/myboard/process/process.py
Configure a Viam process
- Now let's allow
viam-serverto run the process as the root user on your Raspberry Pi by configuring a Viam process. In the Viam app under the CONFIGURE tab, click the + icon in the left-hand menu and select Process. - Find the corresponding card to
process-1. Enter the executable path of Python3 running on your Raspberry Pi that you output from a previous step. Add an argument of theprocess.pyfile to run on your Raspberry Pi. Enter the working directory where you want the process to execute.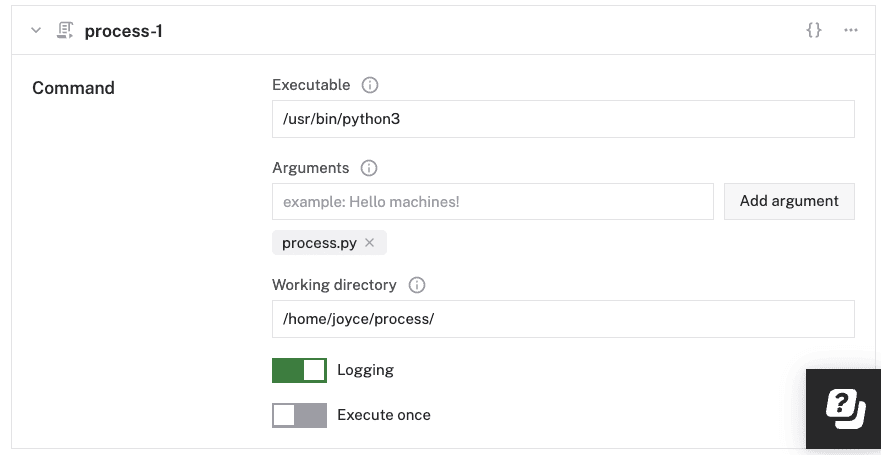
- Still within the
process-1card, select the advanced settings icon near the top right corner to review the configuration JSON. Create a newenvproperty, and add your environment variables within the new property, formatted like the following with your own credentials."env": { "ROBOT_API_KEY": "your-api-key", "ROBOT_API_KEY_ID": "your-api-key-id", "ROBOT_ADDRESS": "your-robot-address", "CAMERA_NAME": "camera-1", "VISION_NAME": "vision-1" },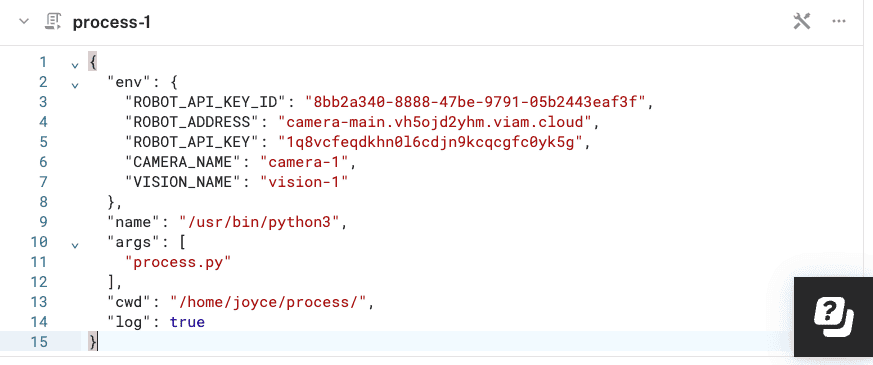
- Save your updates.
- You can test the process by generating an example QR code, and displaying it in front of your webcam.
The process running in this example parses a website URL and opens a browser. However you can trigger any kind of sequence of actuation, upon detecting and decoding a QR code. Keep reading for more inspiration and ideas.
Now that you have a camera that detects and decodes QR codes, you can do the following to enhance your Viam project:
- train and deploy a custom vision model to detect and classify other items besides QR codes
- extend the pyzbar module in the Viam registry to add custom functionality or trigger specific actions
- add more components and services to enhance the functionality of your machine
Additional project ideas for scanning QR codes
- Provide instructions or labels for roving bots that move around an office, home, or outdoor space
- Permit security access to disable alarms or raise a barrier when the correctly encoded QR is shown
- Read aloud the linked digital menus through a text-to-speech (TTS) module for people who can't view them normally due to vision impairment