The TurtleBot 4 Lite is a powerful ROS2-based mobile robot platform that's perfect for learning robotics, research, and development. By integrating Viam with your TurtleBot, you can unlock powerful remote control capabilities, cloud-based data management, and seamless integration with modern robotics workflows.
In this codelab, we'll transform your TurtleBot 4 Lite into a cloud-connected robot that you can control from anywhere and automatically capture sensor data for analysis and machine learning applications.
What You'll Build
- A remotely controllable TurtleBot 4 Lite accessible from the Viam web interface, mobile app, and SDKs
- Automated data capture and syncing from camera and status sensors
- Real-time streaming of robot logs
Prerequisites
- A TurtleBot 4 Lite with ROS2 pre-installed (Humble or Jazzy)
- SSH access to the TurtleBot's onboard Raspberry Pi 4
- Basic familiarity with ROS2 concepts (topics, nodes, messages)
- A computer with network access to your TurtleBot
- Sign up for a free Viam account, and then sign in to the Viam app
What You'll Learn
- How to prepare a TurtleBot 4 Lite for Viam integration
- How to configure the viam-ros2-integration module for TurtleBot components
- How to control through the Viam web interface
- How to configure automated data capture and cloud sync
- How to monitor robot logs
What You'll Need
- All the hardware components listed in prerequisites
- Network connectivity between your computer and TurtleBot
Watch the Video
See a demonstration of controlling the ROS2 Turtlebot using Viam.
Before integrating Viam with your TurtleBot, we need to configure the ROS2 environment and ensure proper network connectivity.
Connect to your TurtleBot
- Power on your TurtleBot 4 Lite and wait for it to fully boot up.
- Connect to your TurtleBot via SSH. Replace
<TURTLEBOT_IP>with your robot's IP address:ssh ubuntu@<TURTLEBOT_IP>
Update system packages
- Update the package lists and upgrade existing packages:
sudo apt update sudo apt upgrade -y - Install Python virtual environment support (required for the Viam module):
sudo apt install -y python3-venv - Install the ROS2
cv_bridgepackage for camera integration:# For ROS2 Humble sudo apt install -y ros-humble-cv-bridge # For ROS2 Jazzy (if applicable) sudo apt install -y ros-jazzy-cv-bridge
Configure FastDDS for UDP-only mode
Viam requires UDP-only communication, so we need to disable shared memory.
- Create the FastDDS configuration file:
sudo nano /etc/turtlebot4/fastdds_rpi.xml - Add the following XML configuration:
<?xml version="1.0" encoding="UTF-8" ?> <dds> <profiles xmlns="http://www.eprosima.com/XMLSchemas/fastRTPS_Profiles" > <transport_descriptors> <transport_descriptor> <transport_id>CustomUdpTransport</transport_id> <type>UDPv4</type> </transport_descriptor> </transport_descriptors> <participant profile_name="turtlebot4_default_profile" is_default_profile="true"> <rtps> <userTransports> <transport_id>CustomUdpTransport</transport_id> </userTransports> <useBuiltinTransports>false</useBuiltinTransports> </rtps> </participant> </profiles> </dds> - Save and exit the file (Ctrl+X, then Y, then Enter).
Configure the ROS2 namespace
To avoid conflicts with existing ROS2 nodes, we'll set up a dedicated namespace for Viam.
- Edit the TurtleBot setup file to add our namespace and point to the FastDDS configuration:
sudo nano /etc/turtlebot4/setup.bash - Add the following lines at the end of the file:
export ROBOT_NAMESPACE=/viamrostwo export FASTRTPS_DEFAULT_PROFILES_FILE=/etc/turtlebot4/fastdds_rpi.xml - Save and exit the file (Ctrl + X, then Y, then Enter).
Verify ROS2 functionality
- Source the ROS2 environment:
source /opt/ros/humble/setup.bash # or /opt/ros/jazzy/setup.bash source /etc/turtlebot4/setup.bash - Check that ROS2 topics are available:
You should see topics likeros2 topic list/viamrostwo/cmd_vel,/viamrostwo/scan, etc.
Your TurtleBot is now ready for Viam integration!
Create your machine in Viam
- In the Viam app under the LOCATIONS tab, create a machine by typing in a name like "ros-two" and clicking Add machine.

- Click View setup instructions.
- Select the
Linux / Aarch64platform for the Raspberry Pi, and leave your installation method asviam-agent.
- Use the
viam-agentto download and installviam-serveron your TurtleBot. Follow the instructions to run the command provided in the setup instructions from the SSH prompt of your TurtleBot.
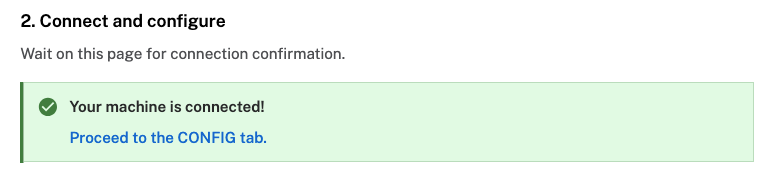
- The setup page will indicate when the machine is successfully connected.
Now we'll configure the individual components that make up your TurtleBot system.
Configure the base component
The base component will allow you to control the TurtleBot's movement.
- Click the + icon in the left-hand menu and select Component or service.
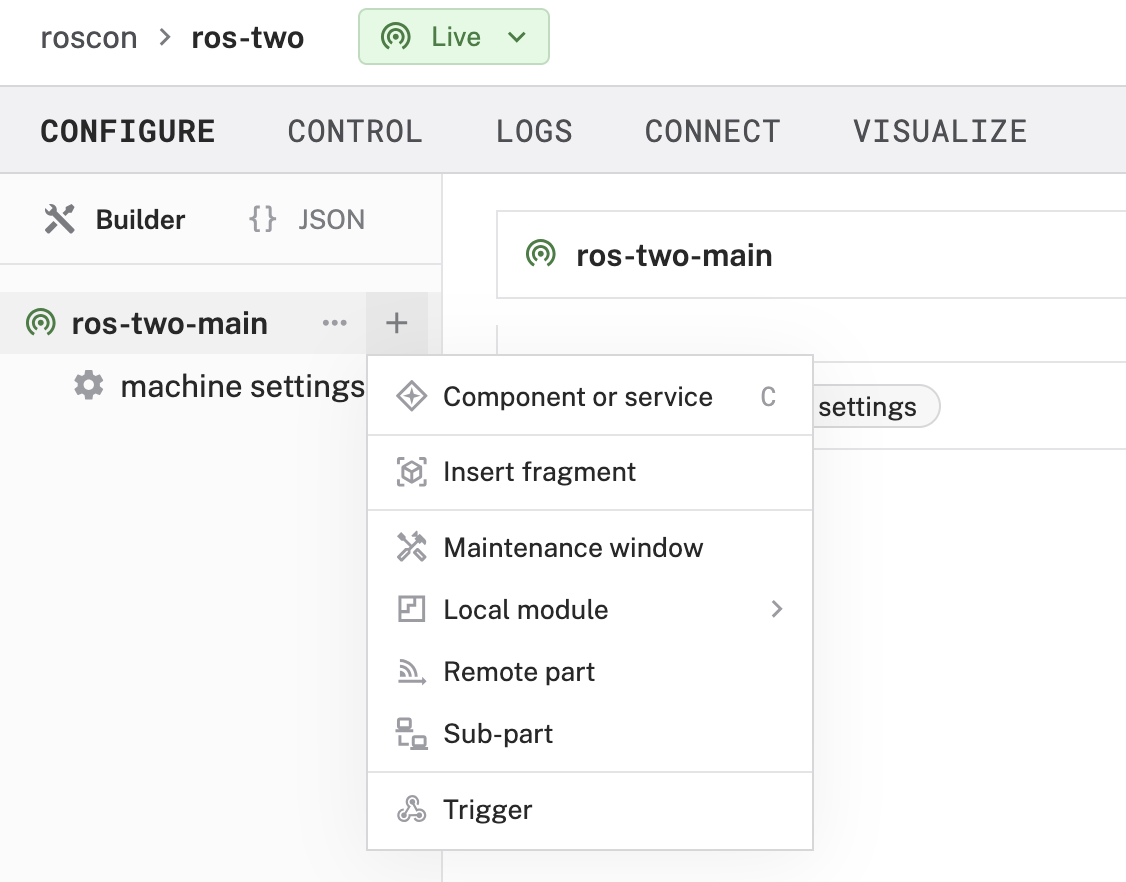
- Select
base, then search for "ros" and select theviam-soleng:ros2:basemodel.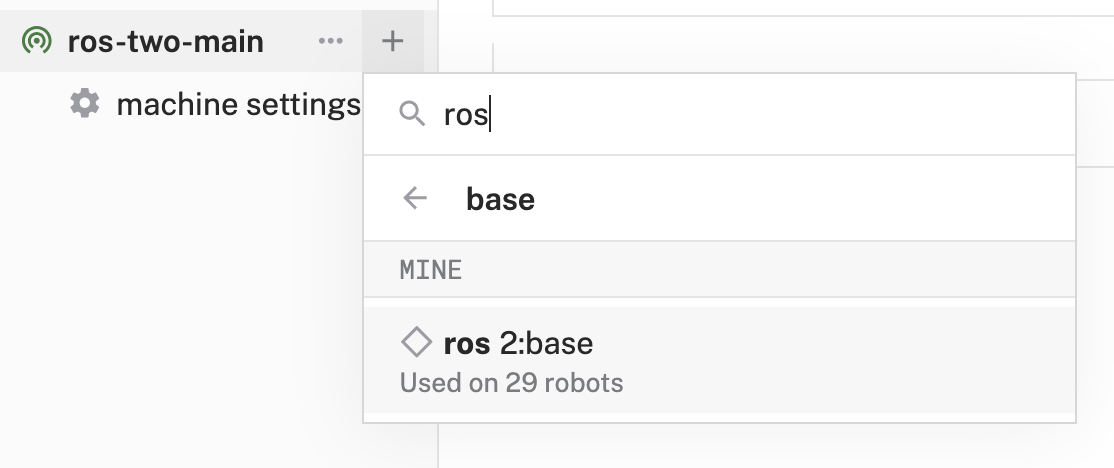
- When prompted for the
viam-soleng:viam-ros2-integrationmodule, click Add module.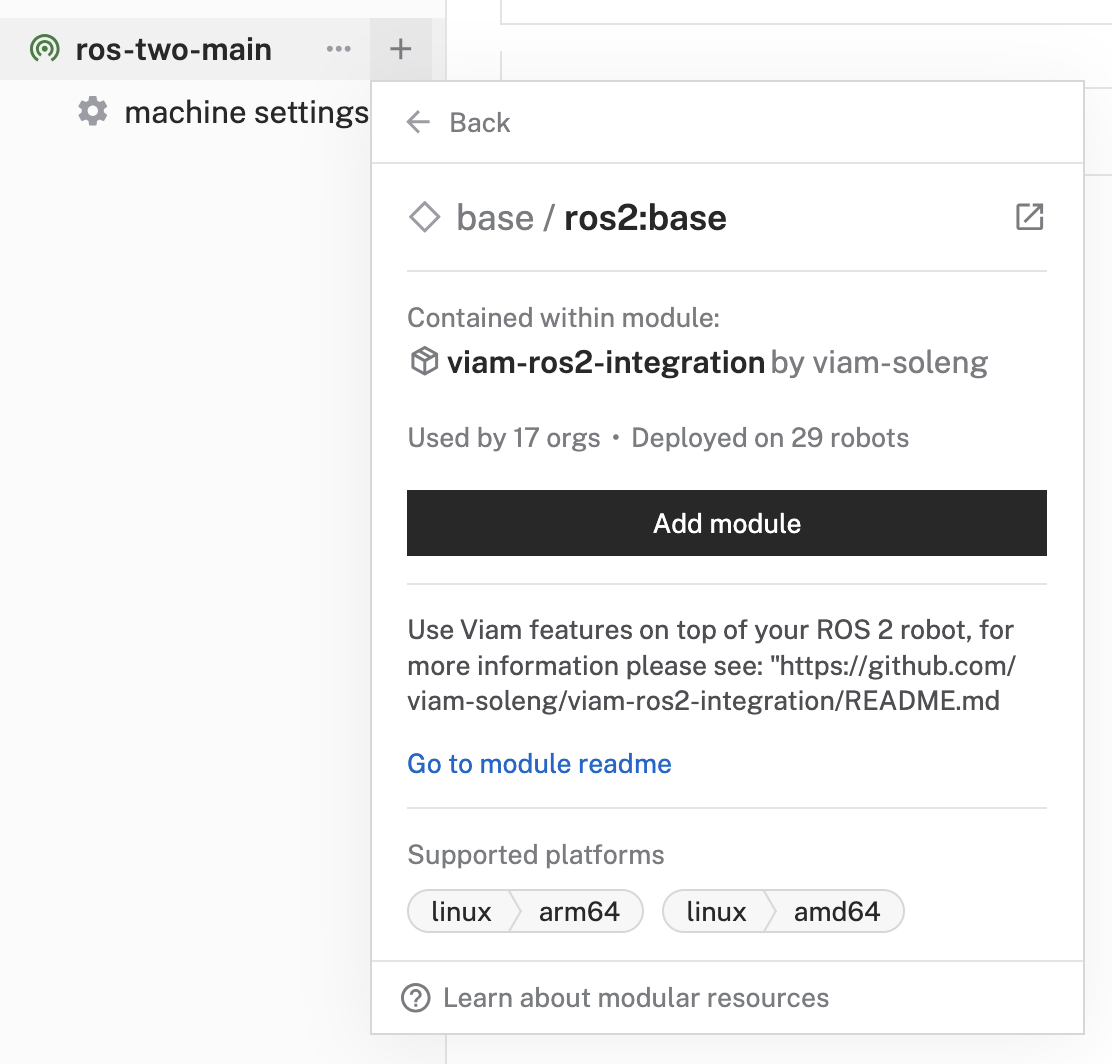
- Name it
rosbaseand click Create.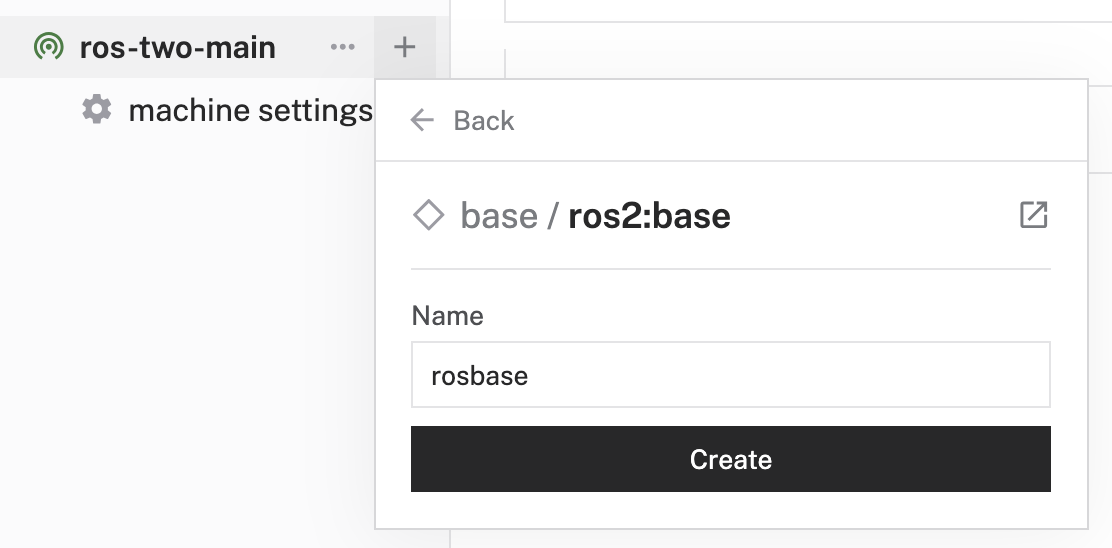
- In the Attributes section, configure:
{
  "ros_topic": "/viamrostwo/cmd_vel",
  "publish_rate": "0.1"
}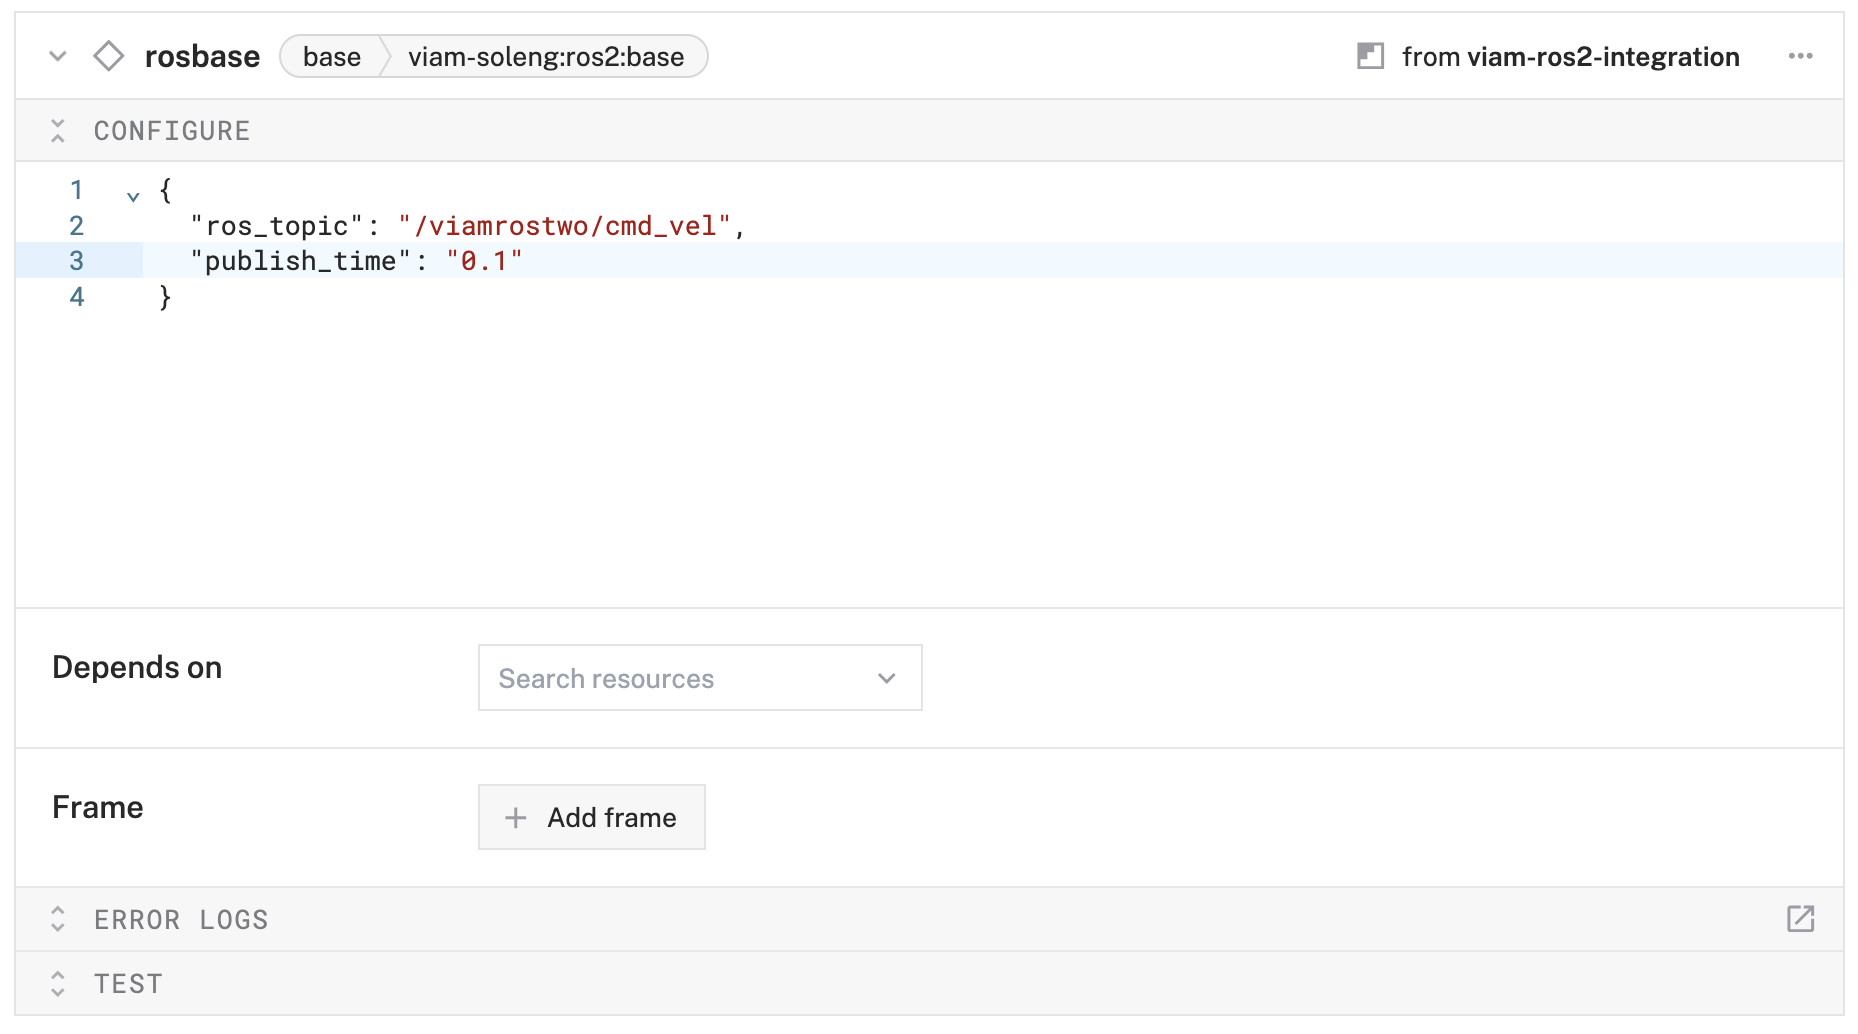
- Click on the JSON tab in the left sidebar above your machine name to display the full configuration JSON for your machine.
- Configure the
viam-soleng:viam-ros2-integrationmodule environment variables by adding anenvfield with the relevant config, which should look like the following:{ "type": "registry", "name": "viam-soleng_viam-ros2-integration", "module_id": "viam-soleng:viam-ros2-integration", "version": "latest", "env": { "ROS_ENV": "/opt/ros/humble/setup.bash", "OVERLAYS": "/etc/turtlebot4/setup.bash", "VIAM_ROS_NAMESPACE": "/viamrostwo", "FASTRTPS_DEFAULT_PROFILES_FILE": "/etc/turtlebot4/fastdds_rpi.xml" } } - Click Save in the top right to save your configuration.
Configure the camera component
- Click the + icon in the left-hand menu and select Component or service.
- Select
camera, then search for and select theviam-soleng:ros2:cameramodel. - Name it
roscameraand click Create. - In the Attributes section, configure:
{
  "ros_topic": "/viamrostwo/oakd/rgb/preview/image_raw",
  "encoding": "rgb8"
}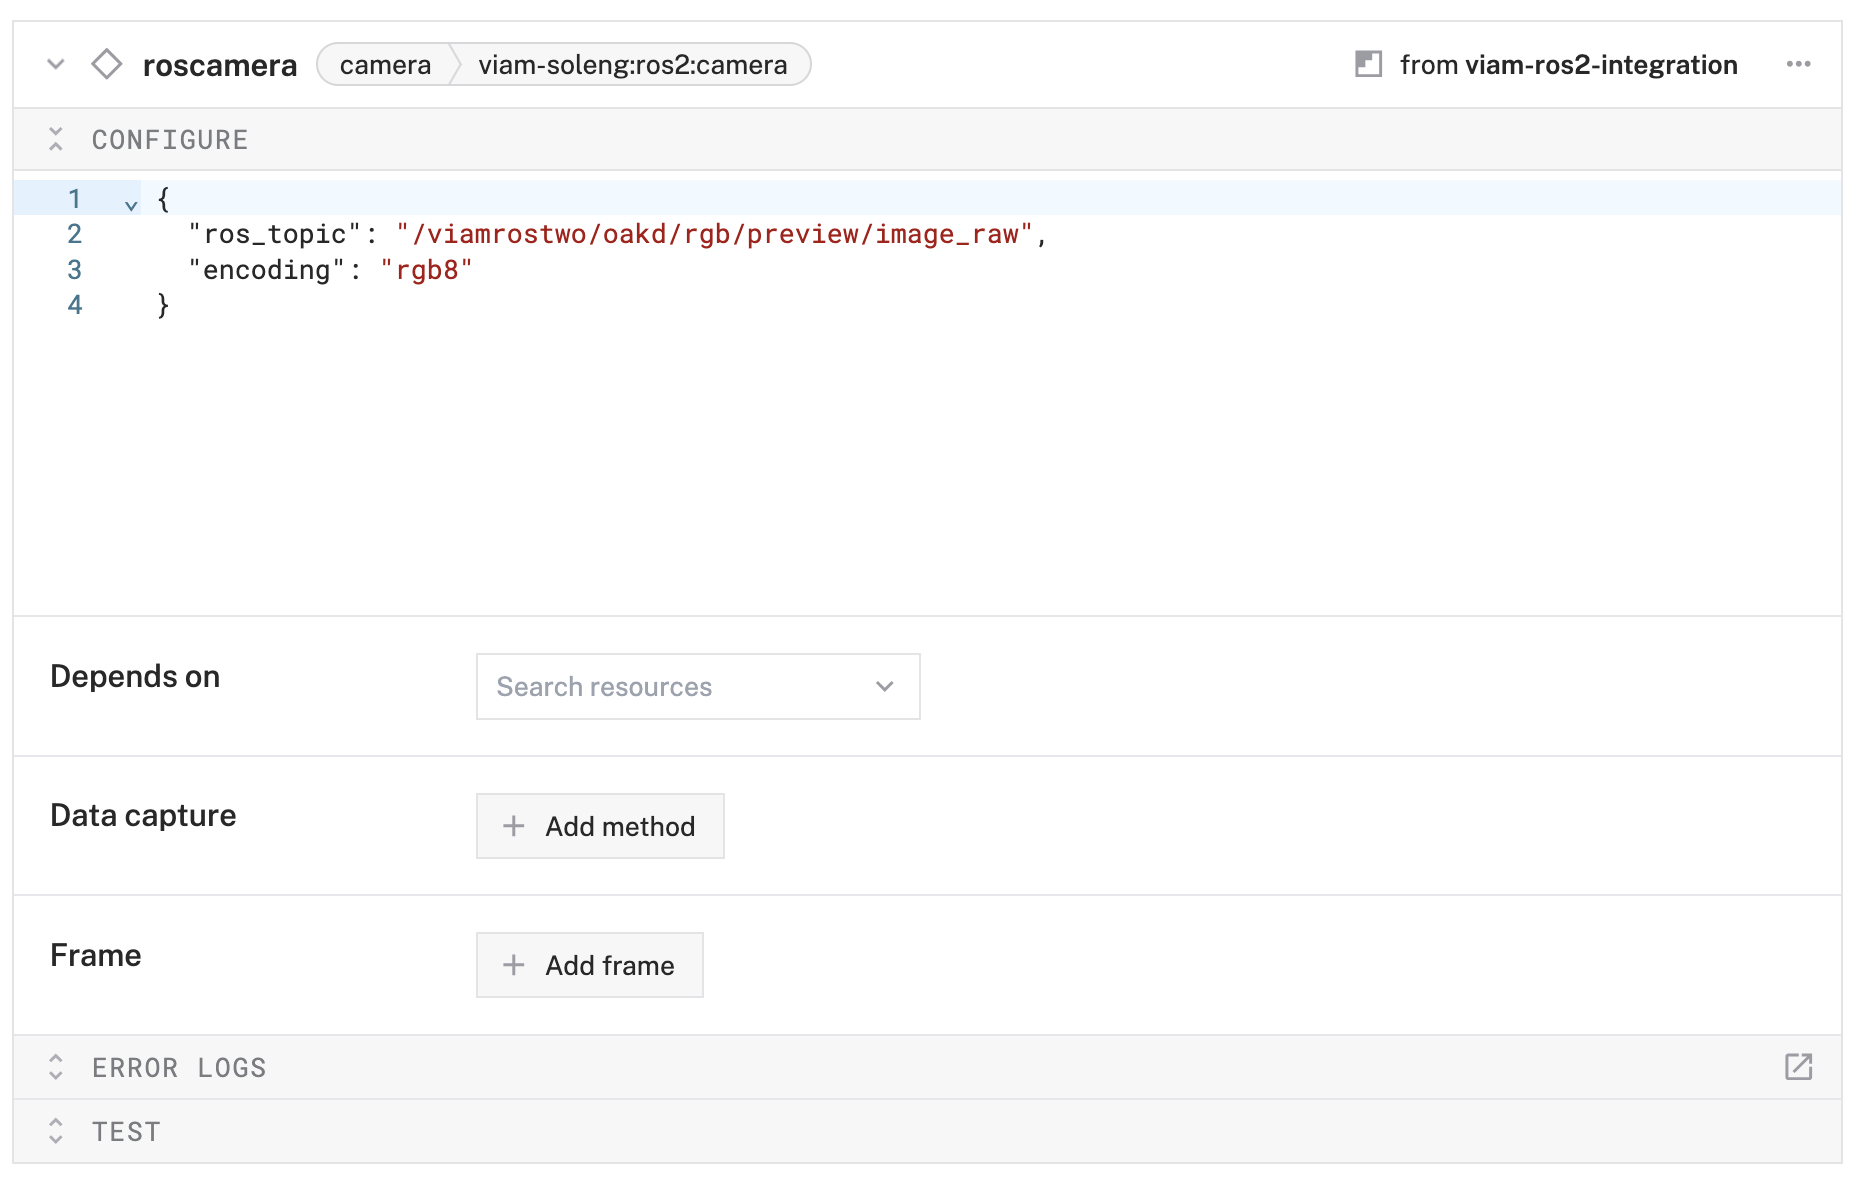
Configure the battery status sensor
- Click the + icon in the left-hand menu and select Component or service.
- Select
sensor, then search for and select theviam-soleng:ros2:sensormodel. - Name it
battery_stateand click Create. - In the Attributes section, configure:
{
  "ros_topic": "/viamrostwo/battery_state",
  "ros_msg_package": "sensor_msgs.msg",
  "ros_msg_type": "BatteryState"
}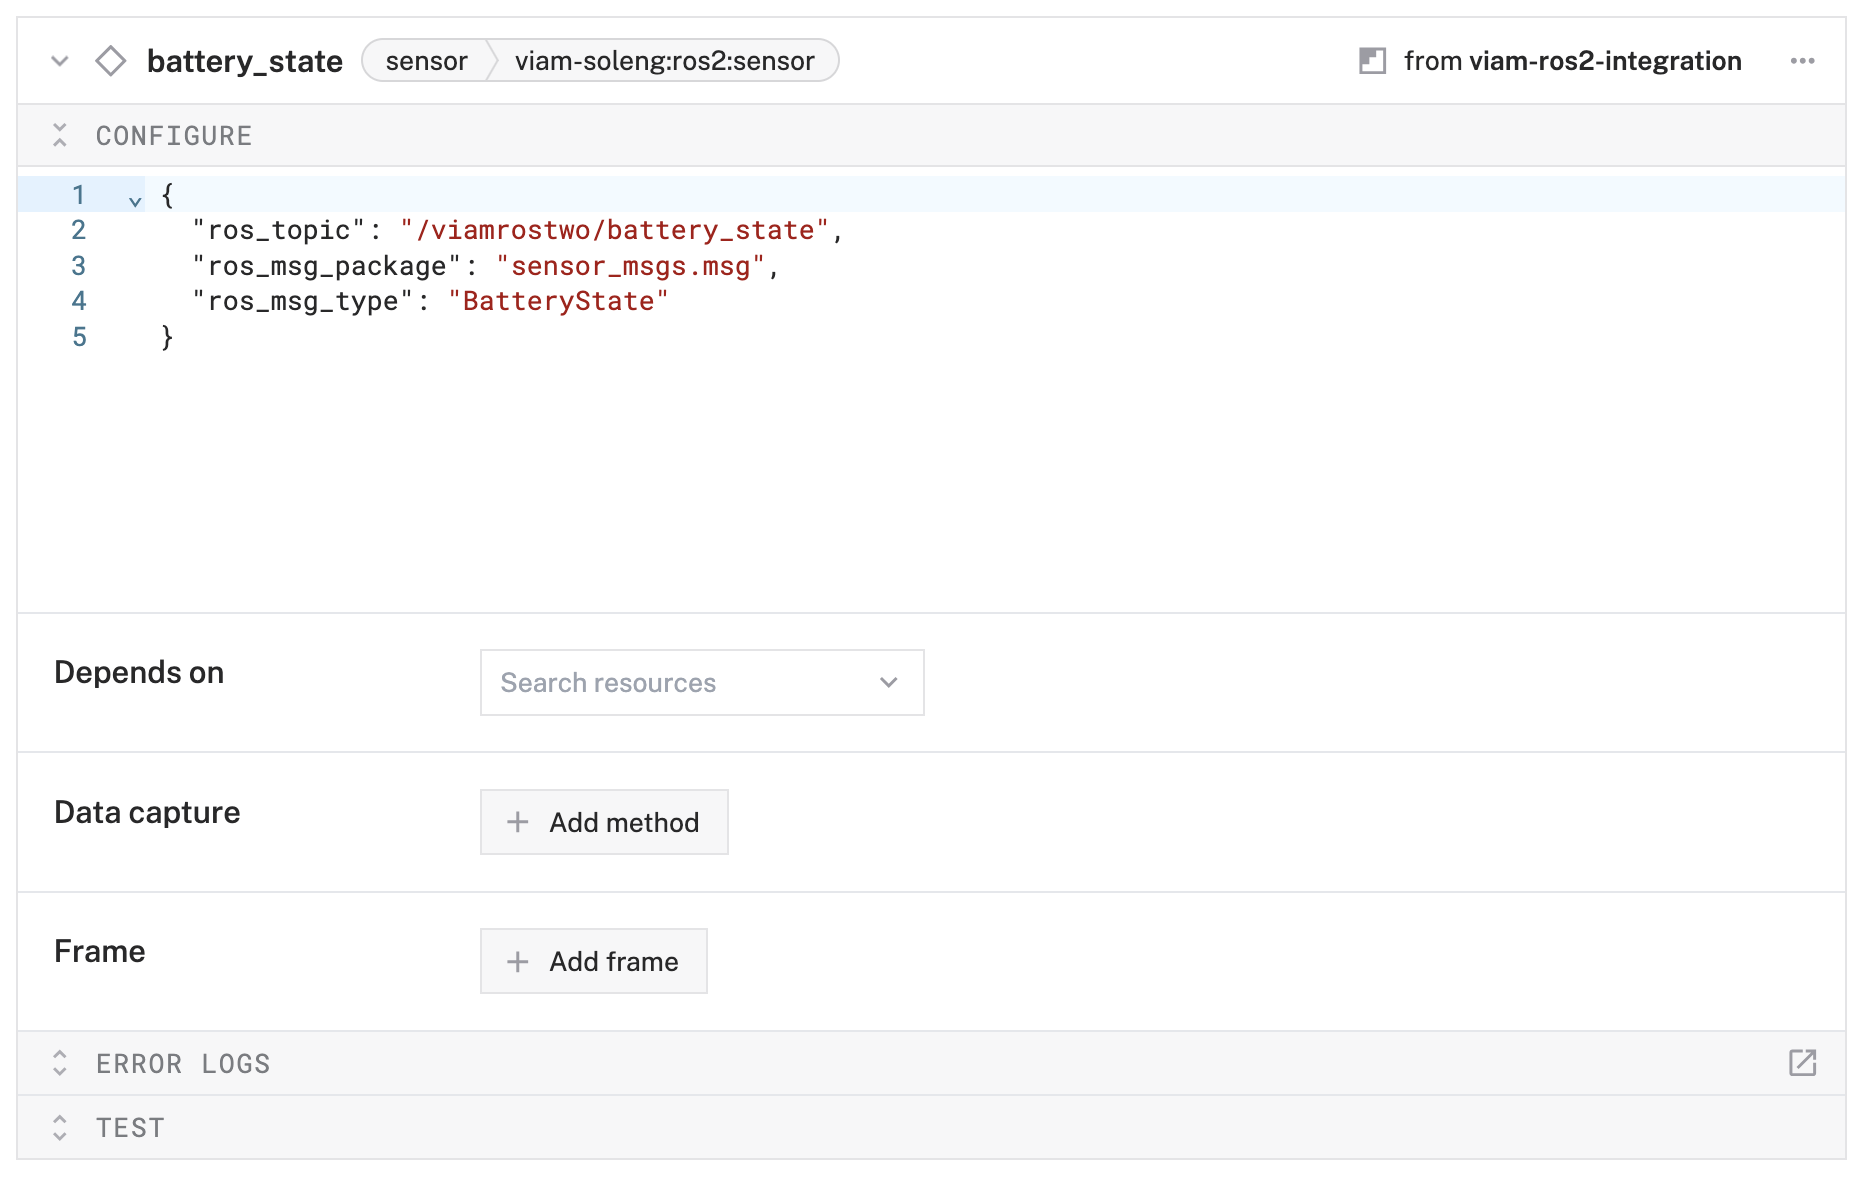
Configure the dock status sensor
- Click the + icon in the left-hand menu and select Component or service.
- Select
sensor, then search for and select theviam-soleng:ros2:sensormodel. - Name it
dock_statusand click Create. - In the Attributes section, configure:
{
  "ros_topic": "/viamrostwo/dock_status",
  "ros_msg_package": "irobot_create_msgs.msg",
  "ros_msg_type": "DockStatus"
}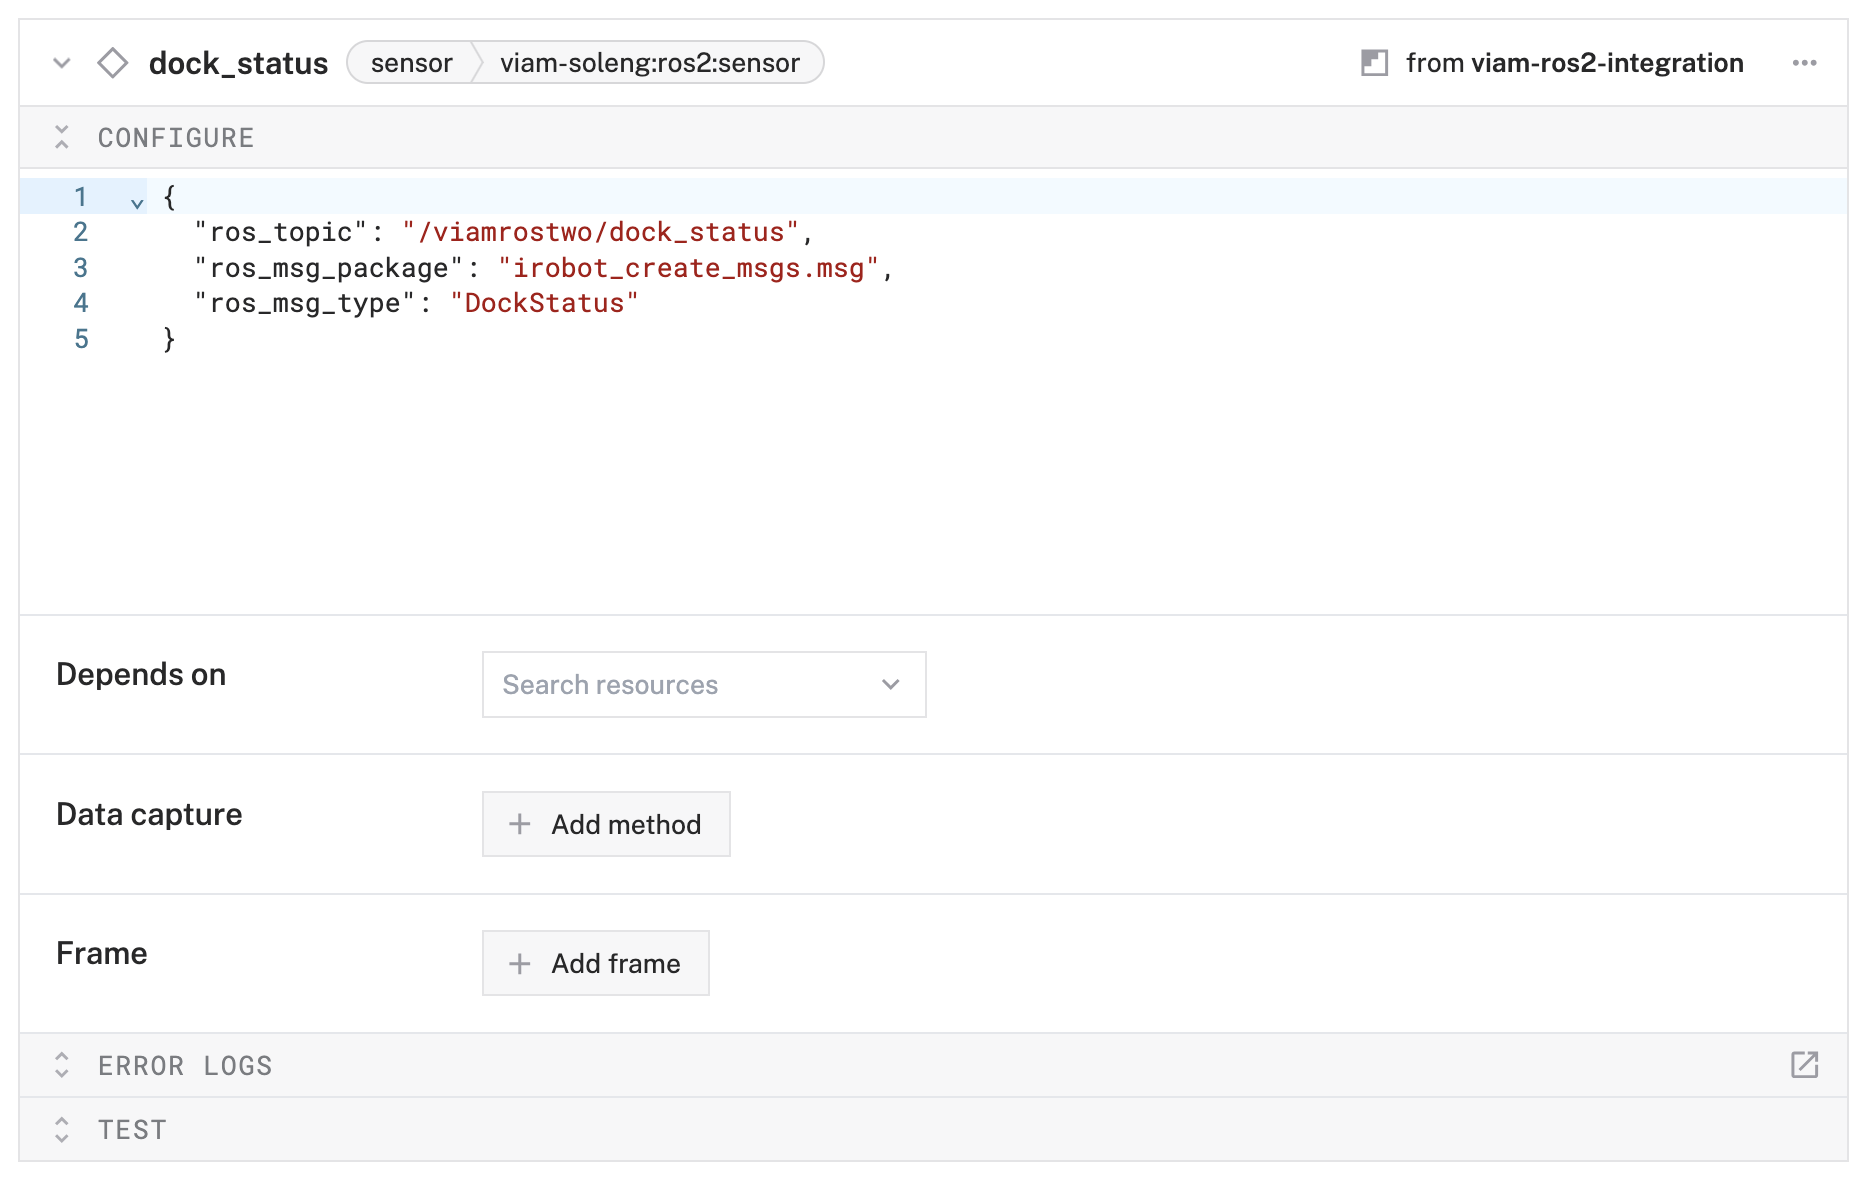
Configure the wheel status sensor
- Click the + icon in the left-hand menu and select Component or service.
- Select
sensor, then search for and select theviam-soleng:ros2:sensormodel. - Name it
wheel_statusand click Create. - In the Attributes section, configure:
{
  "ros_topic": "/viamrostwo/wheel_status",
  "ros_msg_package": "irobot_create_msgs.msg",
  "ros_msg_type": "WheelStatus"
}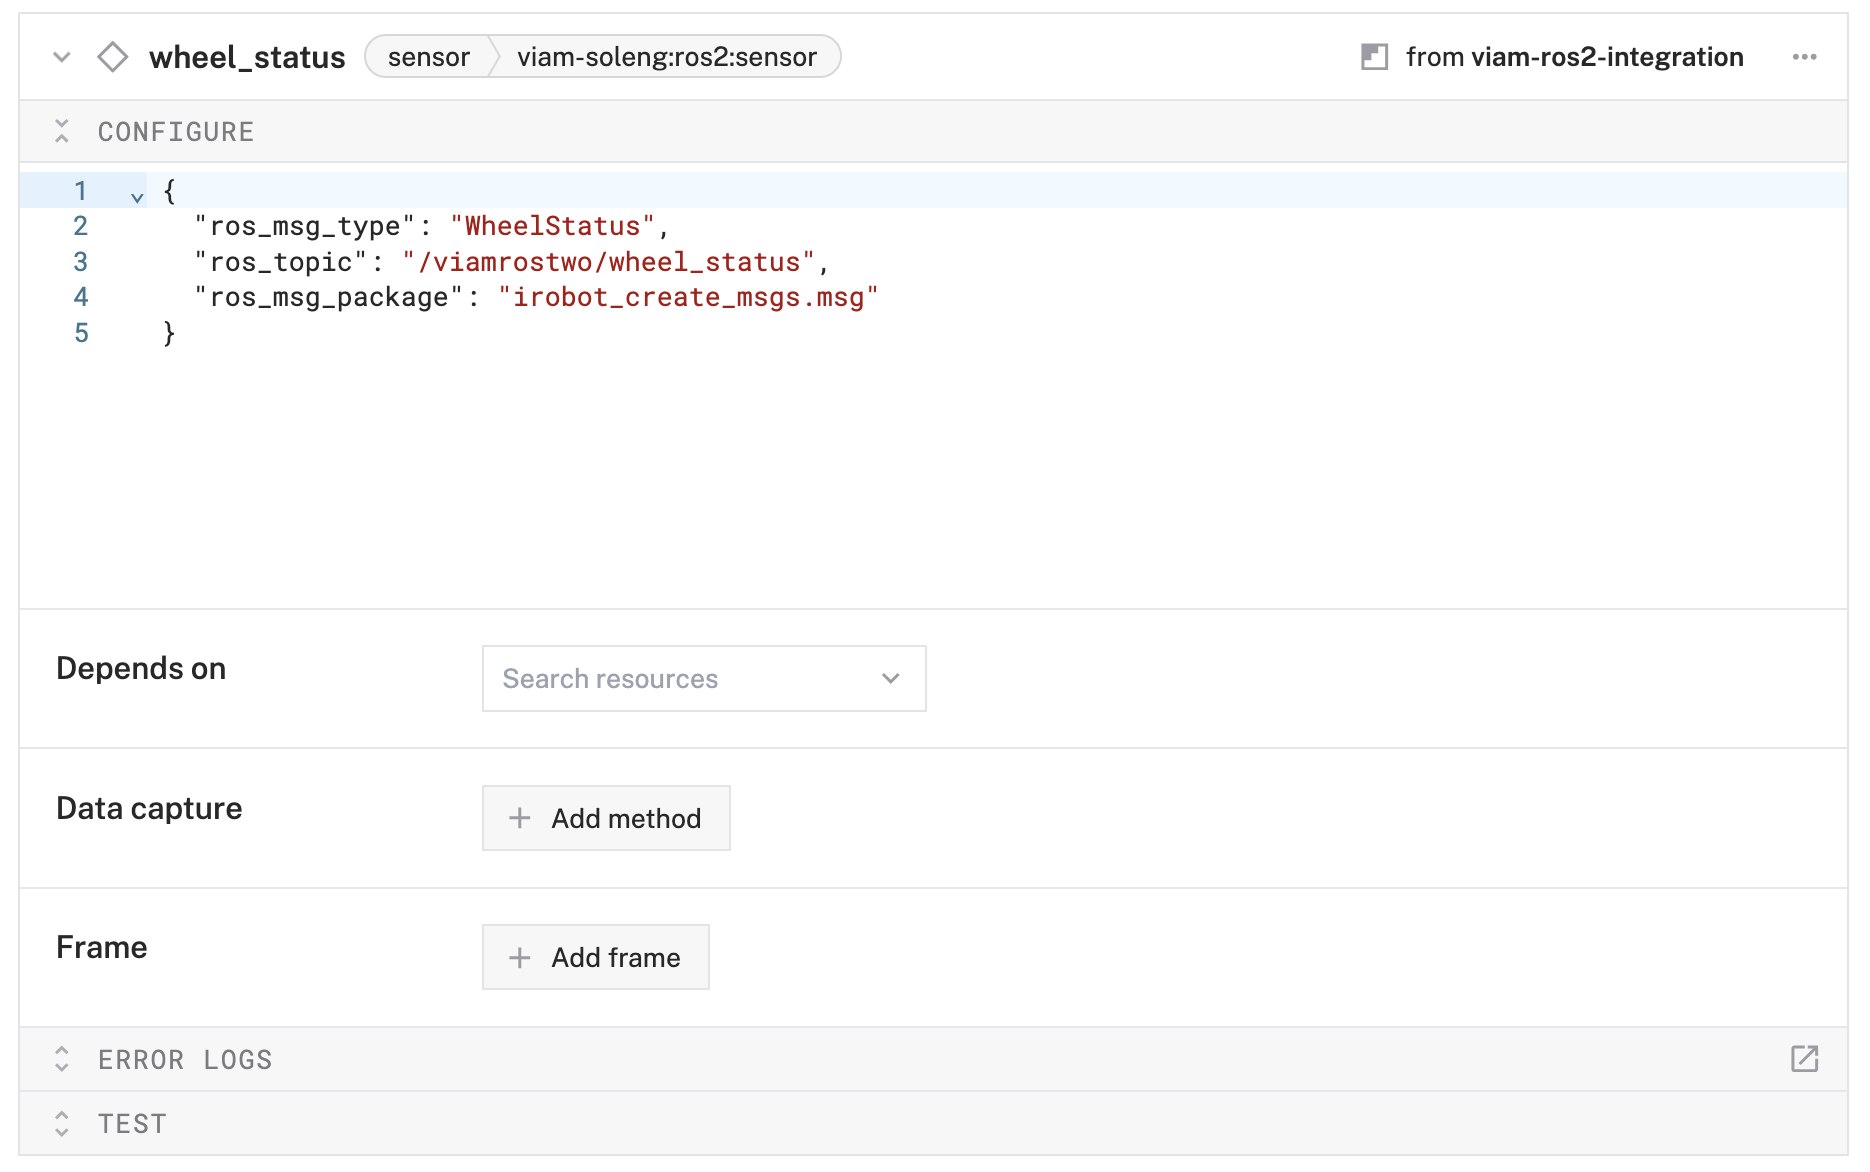
Click Save to apply all your component configurations.
Your Viam machine is now configured with ROS2 integration capabilities!
Now we'll set up automated data capture for your robot's sensors and camera, with automatic sync to the Viam cloud.
Add the data management service
- In the Viam app, click the + icon in the left-hand menu and select Component or service, and then
data management. - Create a new Data Management service called
datacapture. - Notice adding this service adds the data manager service called
datacapture. It will default to the "Capturing" and "Syncing" toggles as enabled. - In the "Additional paths" field of the Cloud sync section, type
/opt/rosbagsand hit the Enter key to also sync your rosbag files.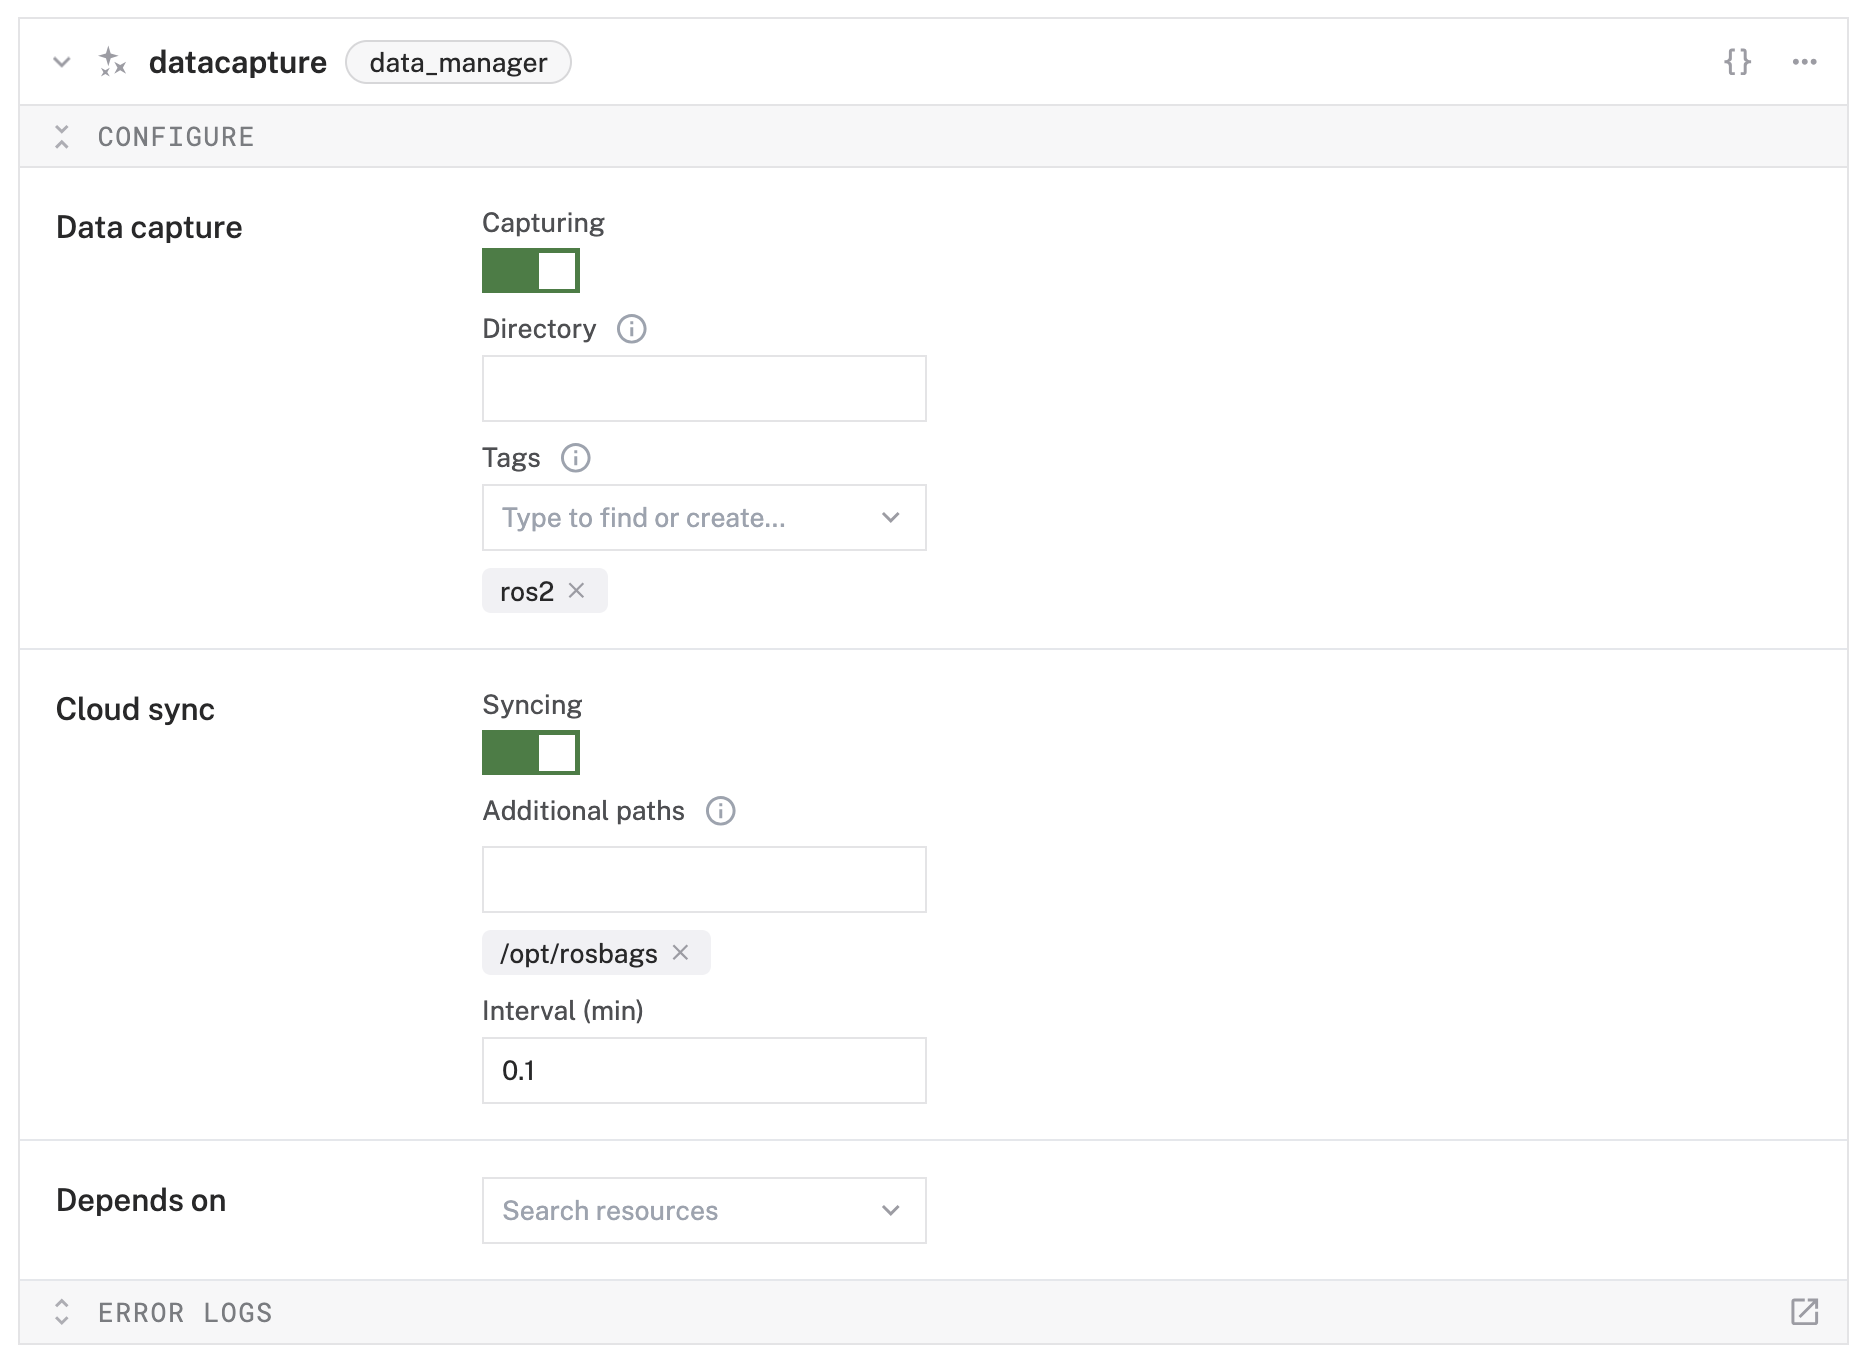
- Click Save in the top right. This may take a moment to apply your configuration changes.
Configure camera data capture
- Navigate to your
roscameracomponent. - In the Data capture section, click Add method.
- Configure the capture settings:
- Method:
GetImage - Frequency (hz):
0.1(capture one image every 10 seconds) - MIME type:
image/jpeg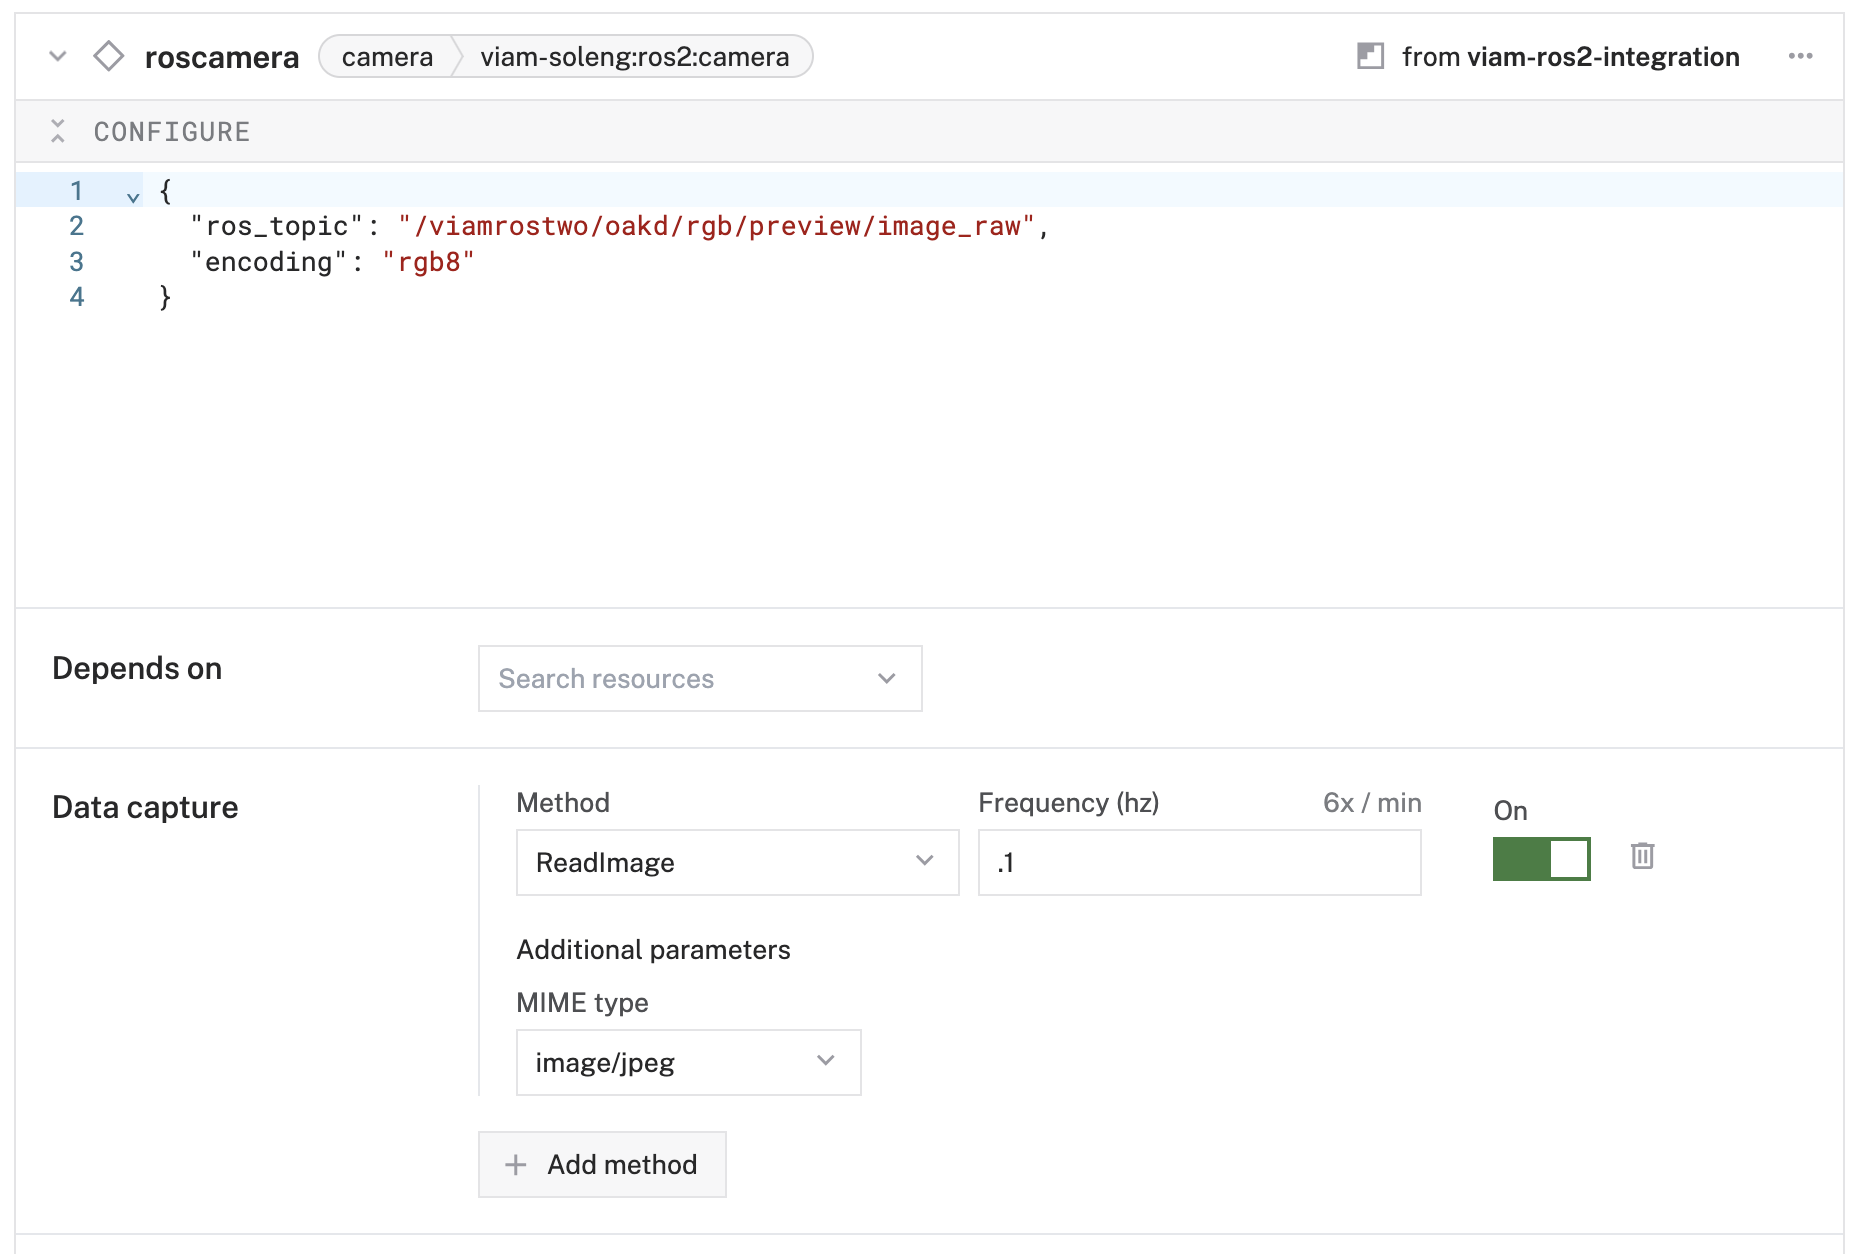
- Method:
Configure sensor data capture
- Navigate to your
battery_statecomponent. - In the Data capture section, click Add method.
- Configure:
- Method:
Readings - Frequency (hz):
0.5(capture every 30 seconds)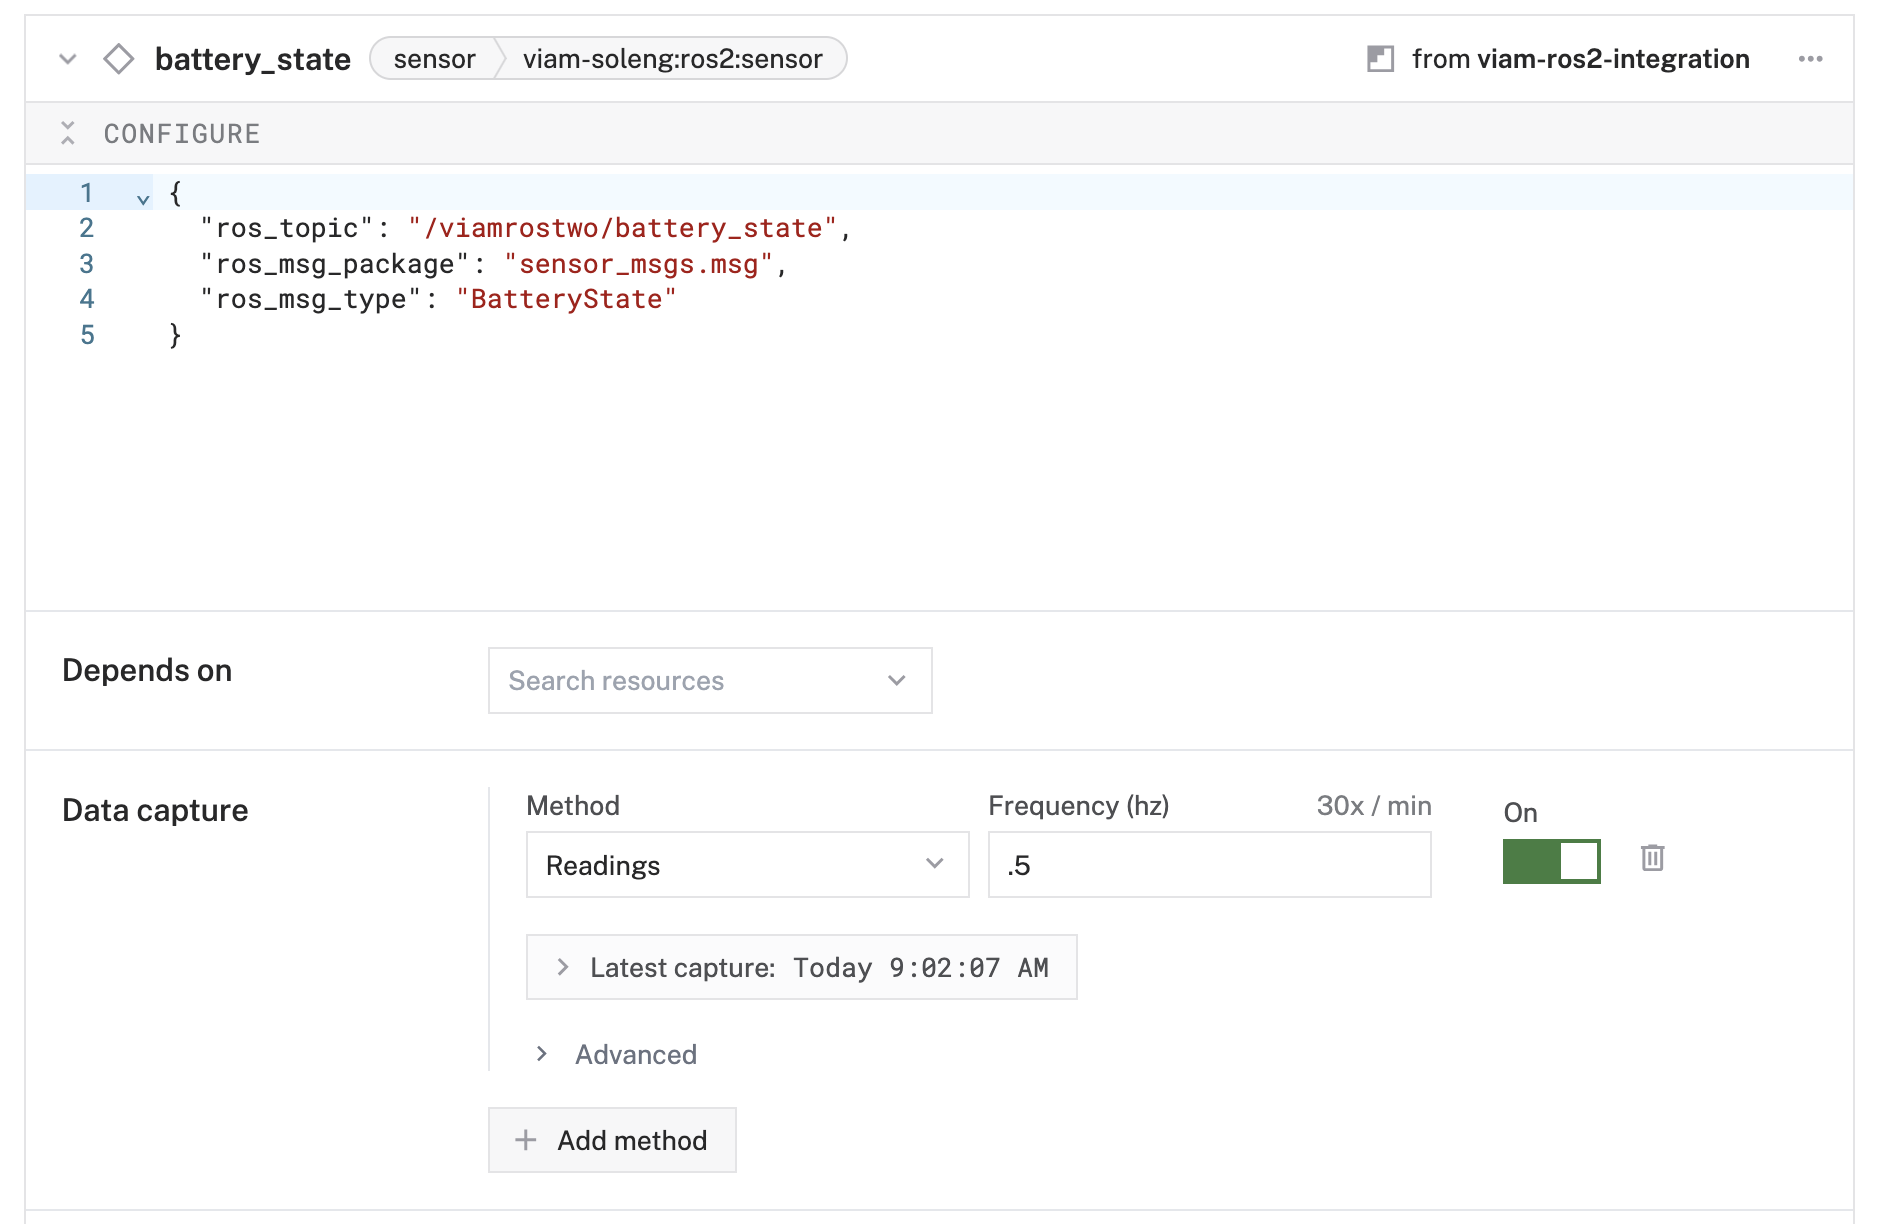
- Method:
- Repeat the same process for
dock_statusandwheel_statussensors with the same frequency.
Verify data capture configuration
- Click Save to apply all configurations.
- Navigate to the CONTROL tab to verify all components are working.
- Check that your camera shows a live feed and sensors display current readings.
Your TurtleBot will now automatically capture and sync data to the Viam cloud!
The ROS2 logger service will stream your robot's debug logs directly to Viam for real-time monitoring.
Add the ROS2 logger service
- Click the + icon in the left-hand menu and select Component or Service.
- Search for
ros2_loggerand select theviam-soleng:ros2:loggermodel. - Name it
ros2_loggerand click Create. - In the Attributes section, configure:
{
  "ros_topic": "/rosout",
  "log_level": "debug"
}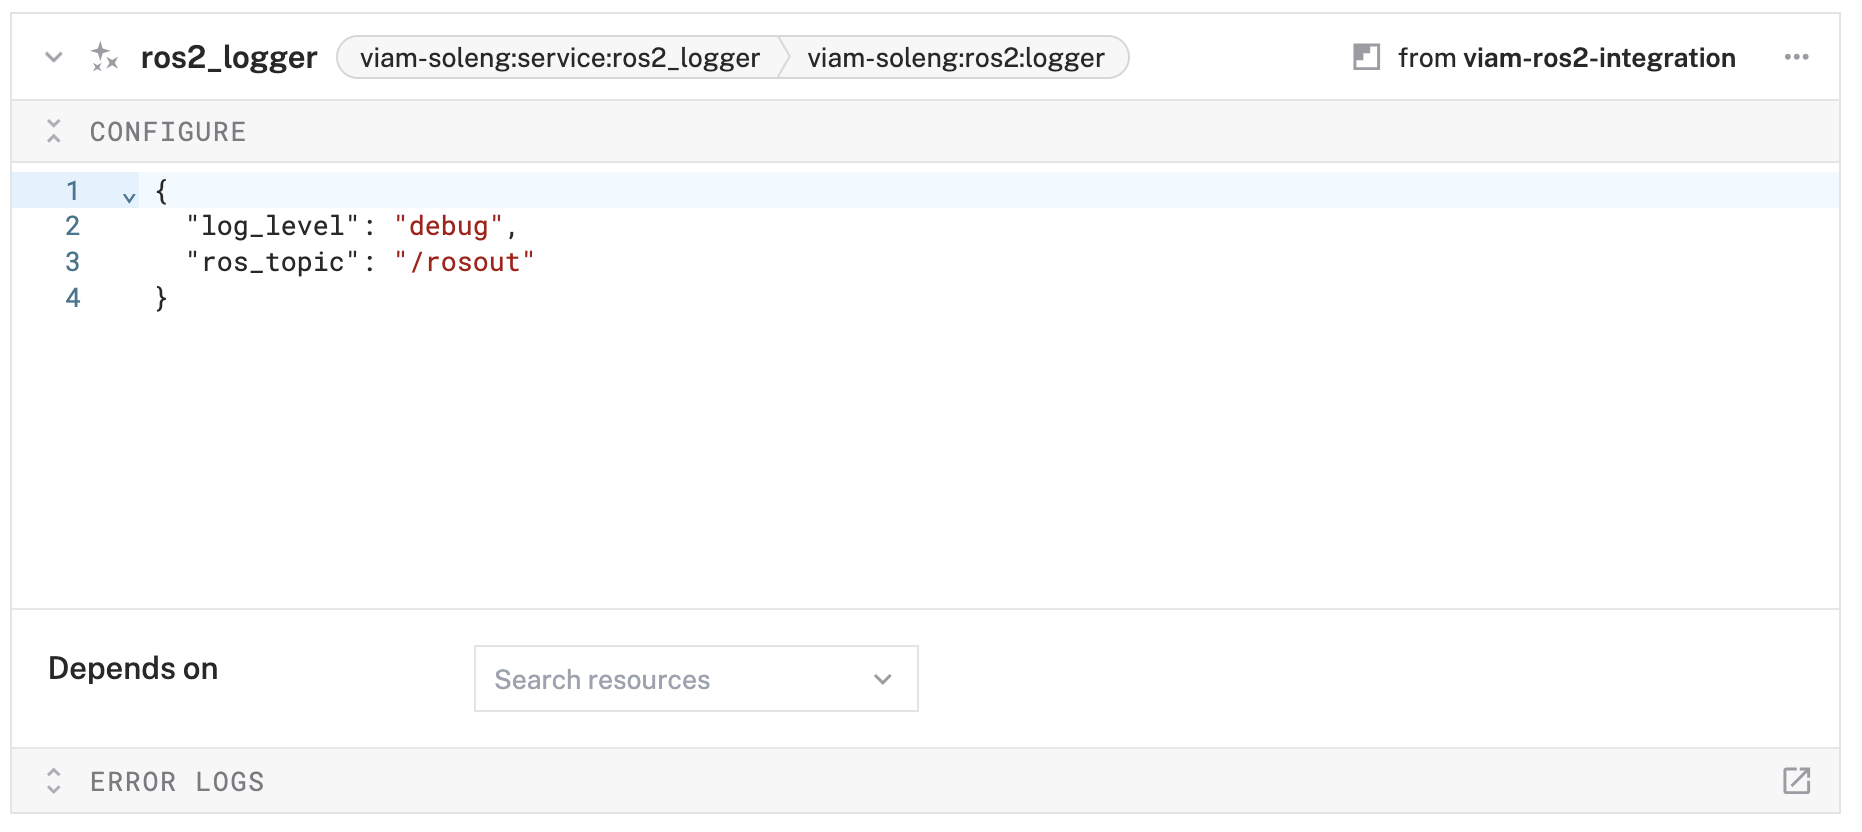
Test the logger service
- Click Save to apply the configuration.
- Navigate to the LOGS tab in the Viam app.
- You should start seeing ROS2 log messages appearing in the Viam logs interface.
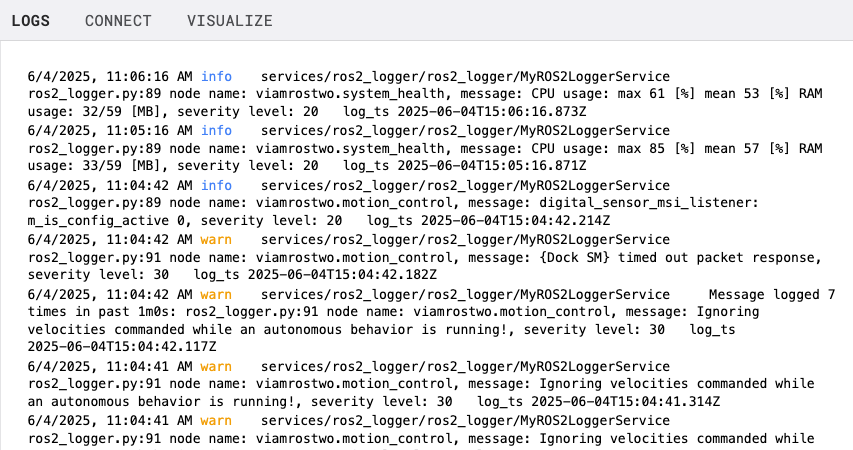
The logger service will now stream all ROS2 system messages with "debug" level and above directly to Viam for easy monitoring and debugging.
Now comes the exciting part - controlling your TurtleBot from anywhere using the Viam web interface!
Test basic movement
- Navigate to the CONTROL tab in the Viam app.
- Find your
rosbasecomponent card. - Use the Quick move buttons to test basic movements:
- Click Forward to move the robot forward
- Click Backward to move the robot backward
- Click Left and Right to turn the robot
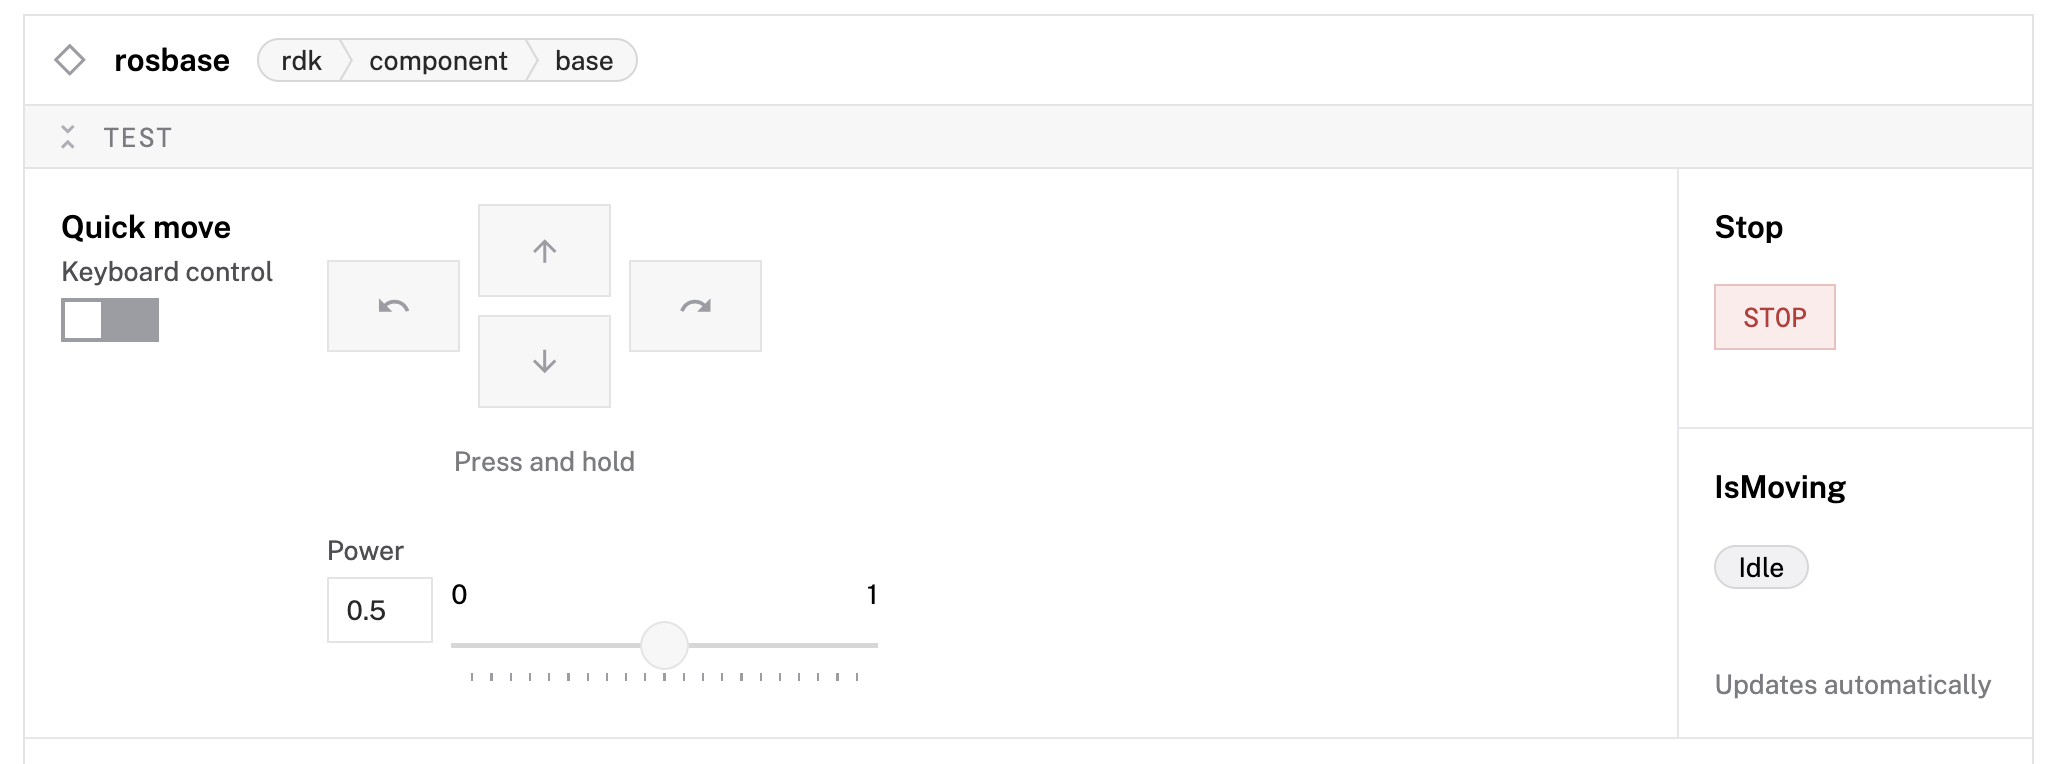
Enable keyboard control
- In the base component control card, toggle Keyboard control to ON.
- Now you can use your computer's keyboard to drive the TurtleBot:
- W or ↑: Move forward
- S or ↓: Move backward
- A or ←: Turn left
- D or →: Turn right
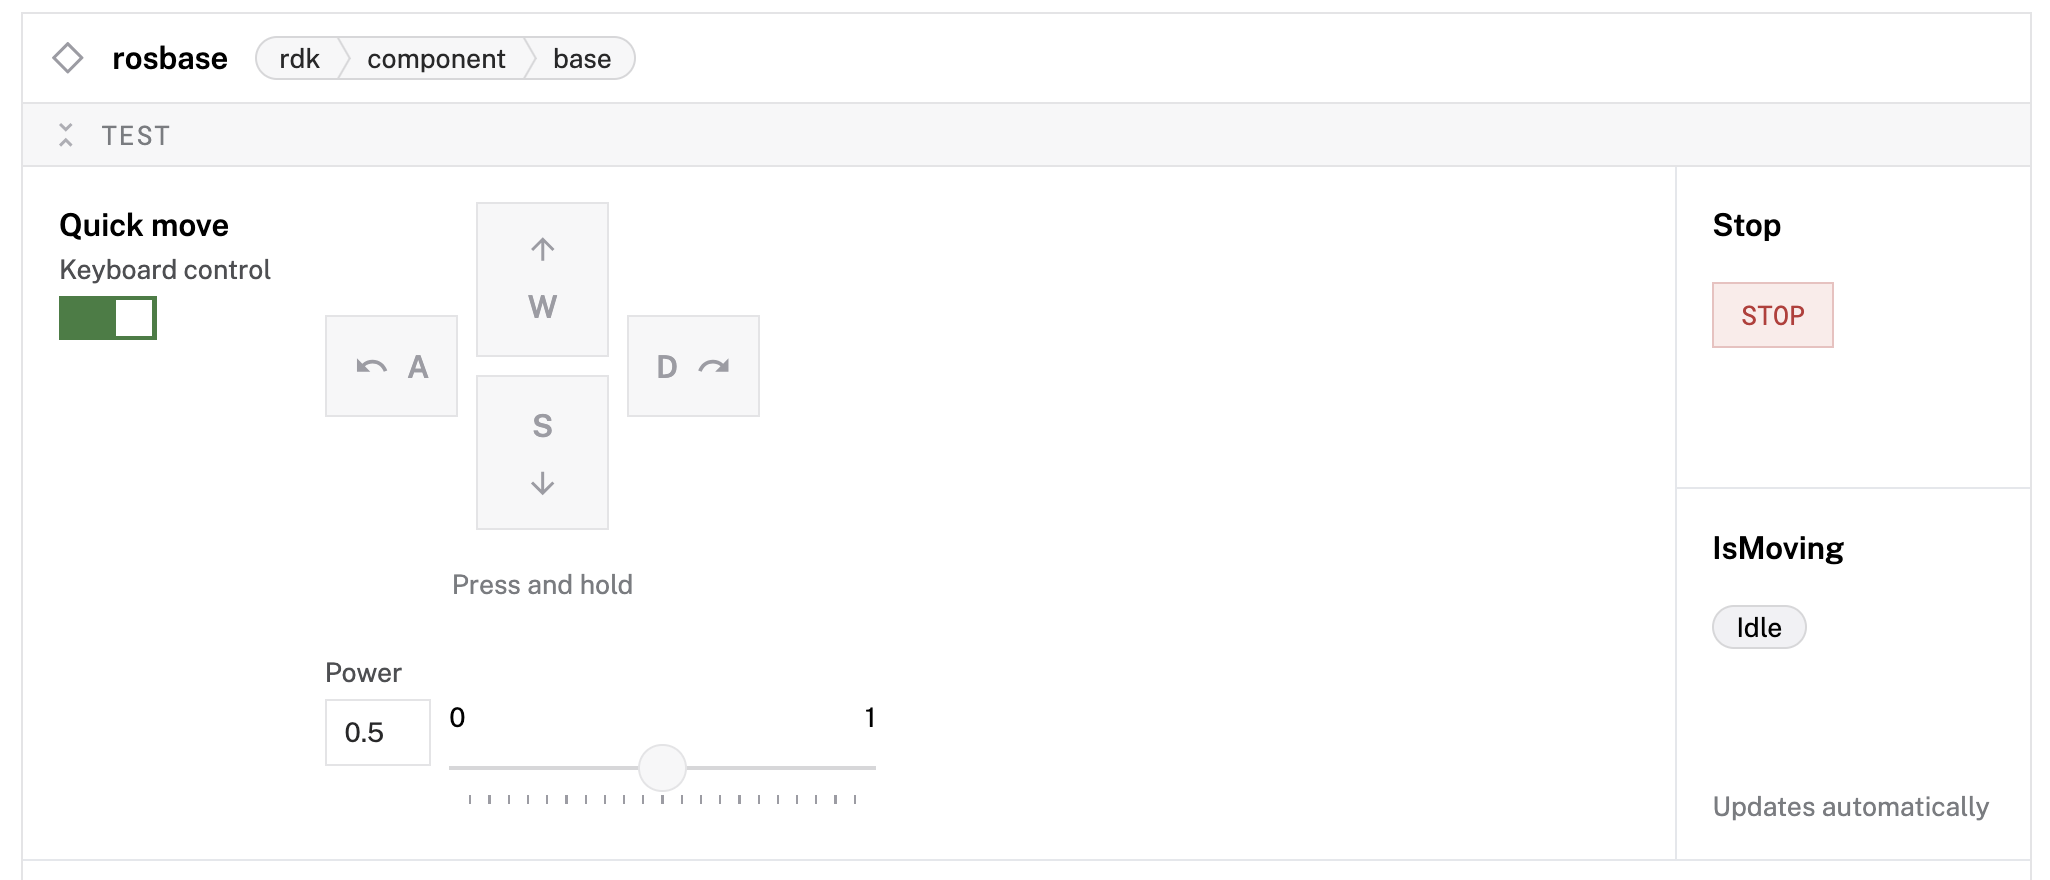
Test advanced movements
- Try the Move straight function:
- Set distance (in mm) and velocity
- Click Execute to move a precise distance

Monitor live camera feed
- Scroll to your
roscameracomponent. - Set the refresh dropdown to "Live" to see the live camera feed from your TurtleBot.
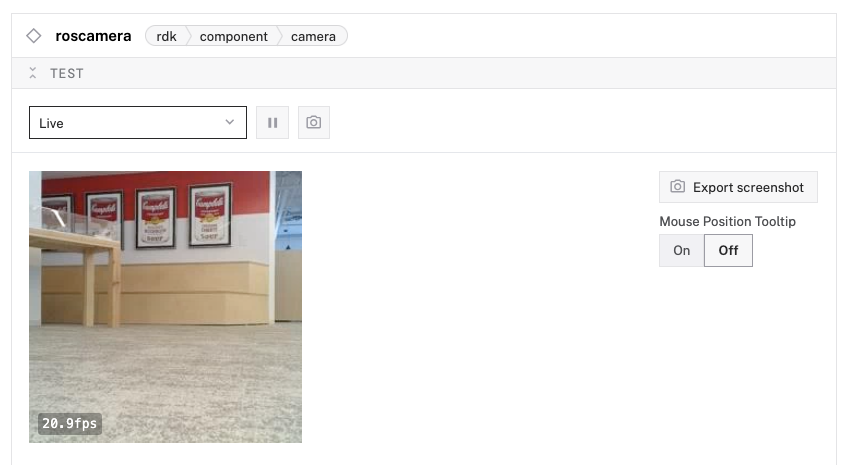
- You can now see what your robot sees while driving it remotely!
Your TurtleBot is now fully controllable from Viam.
Let's explore the data your TurtleBot has been automatically capturing and syncing to the cloud.
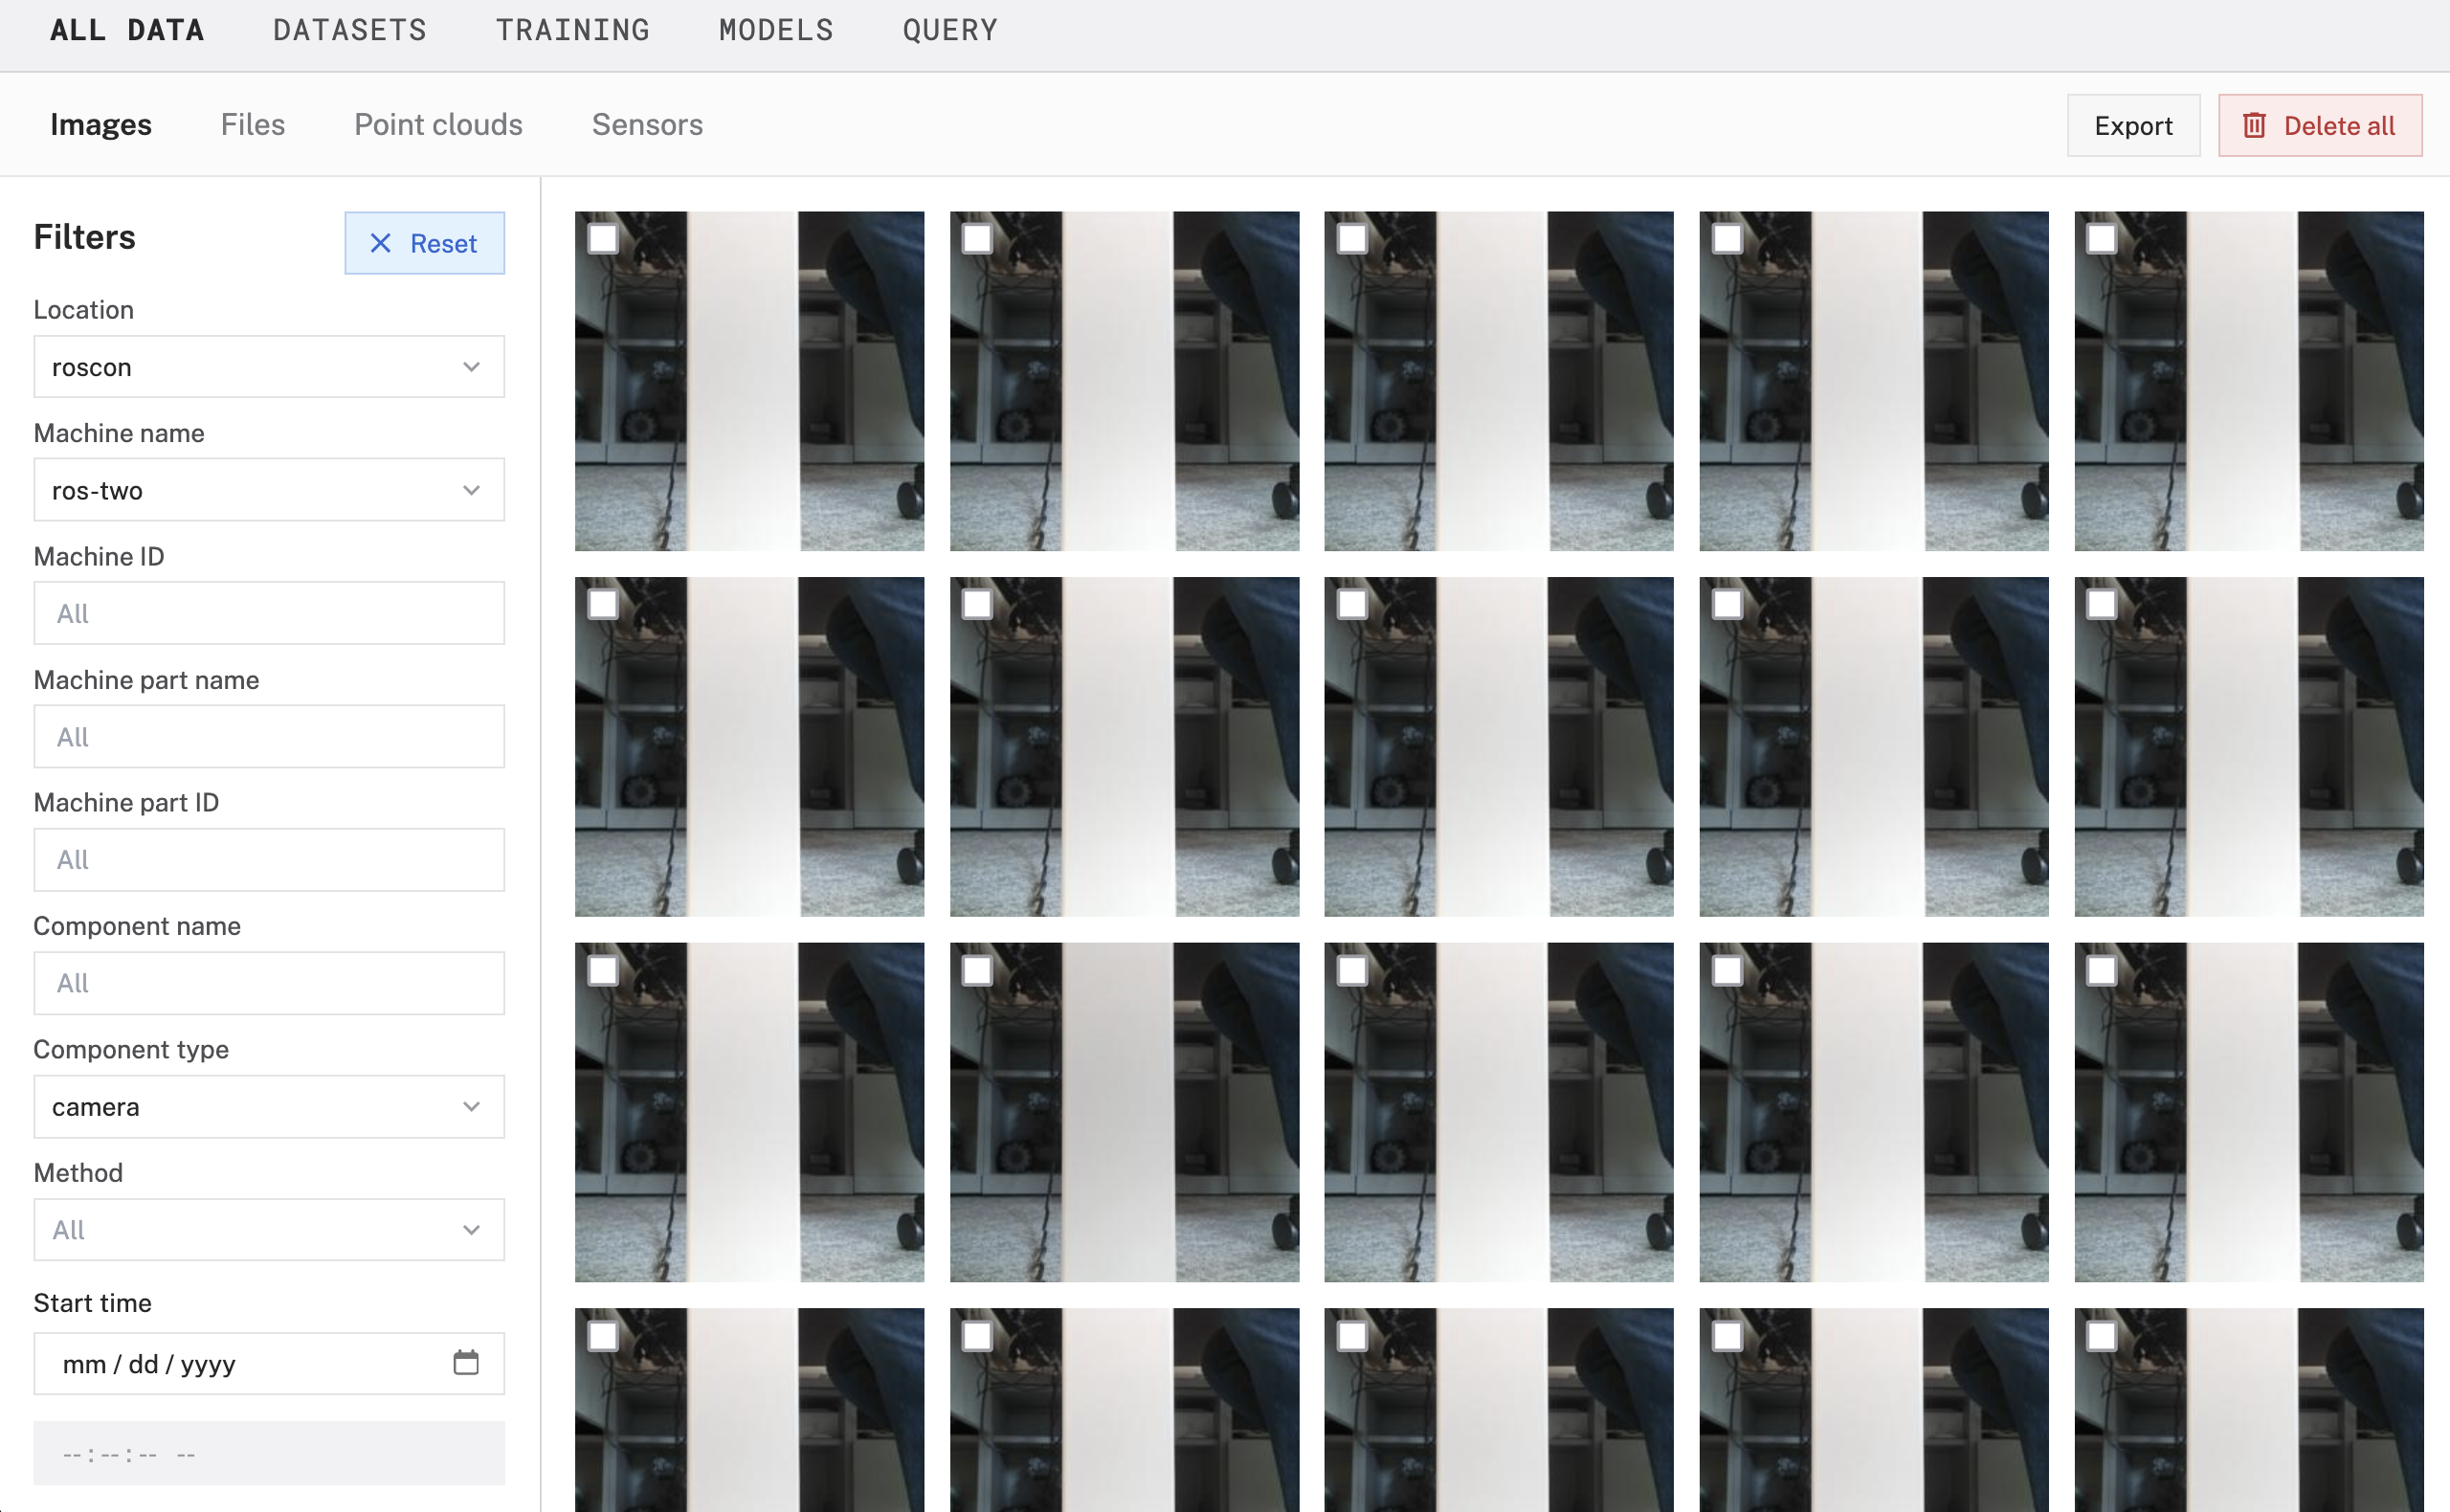
Access the data tab
- In the Viam app, click on the document icon in the top-right of the machine configuration page to view captured data.
- You'll see Images section by default to view photos captured by your TurtleBot's camera.
- You can:
- View individual images with timestamps
- Filter by date range
- Search by tags
- Annotate for machine learning training
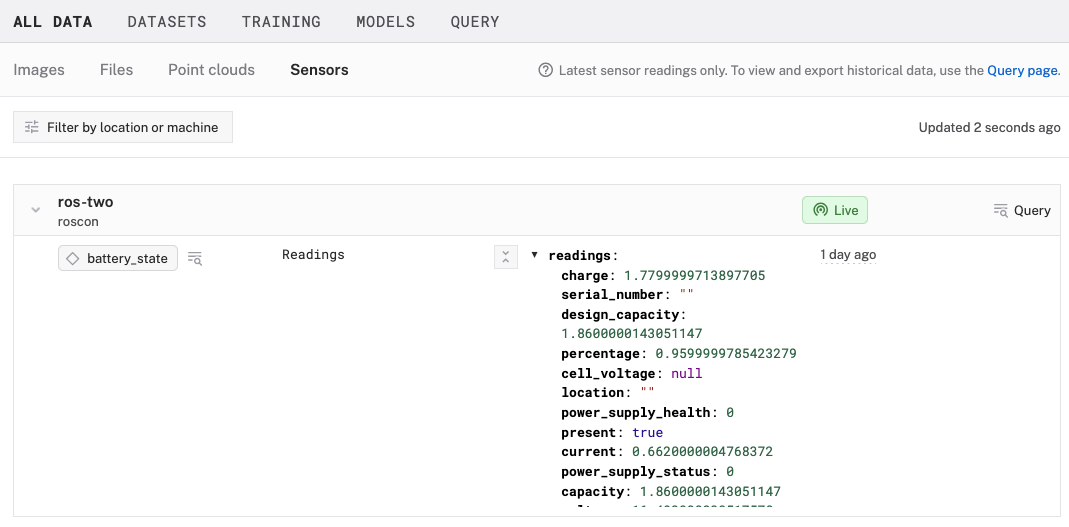
Review sensor data
- Click on the Sensors section to view captured sensor readings.
- You'll see data from:
- Battery status (charge level, voltage, temperature)
- Dock status (whether robot is docked)
- Wheel status (motor health and performance)
- Data is displayed in a JSON format and can be queried using SQL or MQL by clicking on the "Query" in the top-right of your machine card.
Your TurtleBot's data is now safely stored in the cloud and ready for analysis!
Congratulations! 🎉 You've successfully transformed your TurtleBot 4 Lite into a cloud-connected, remotely controllable robot with automated data capture capabilities.
The combination of TurtleBot's robust hardware platform, ROS2's flexible software ecosystem, and Viam's cloud-native robotics tools provides an incredibly powerful foundation for your robotics projects.
What You've Accomplished
- Remote Control: Your TurtleBot can now be operated from anywhere via the Viam web interface
- Data Collection: Automated capture of camera images and sensor readings with cloud sync
- Real-time Monitoring: Live streaming of ROS2 logs and robot telemetry
- Cloud Integration: Seamless data storage and access through Viam's platform
Expanding Your Robot's Capabilities
Now that you have the foundation in place, consider these exciting next steps:
Computer Vision & AI
- Add object detection models to identify and track people or objects
- Train custom machine learning models using your captured image data
Advanced Sensors
- Integrate the TurtleBot's lidar for mapping and obstacle avoidance
- Add the IMU sensor for better motion tracking and stability
Automation & Scheduling
- Set up alerts based on sensor thresholds (low battery, obstacles, etc.)
- Build custom workflows that respond to specific conditions
Fleet Management
- Scale to multiple TurtleBots for coordinated tasks
- Implement centralized monitoring and control
- Share data and models across your robot fleet
Real-World Applications
Your enhanced TurtleBot setup opens doors to numerous practical applications:
- Security & Surveillance: Automated security patrols with real-time alerts
- Research & Education: Data collection for robotics research and classroom demos
- Facility Monitoring: Regular inspections of warehouses, offices, or outdoor spaces
- Environmental Sensing: Mobile data collection for IoT and environmental studies
Resources for Continued Learning
- Integrate your ROS2 robot with Viam - Blog post covering why we built this integration and how it works.
- Viam Documentation - Complete guides and API references
- Viam Community Discord - Connect with other robotics developers
- TurtleBot 4 Documentation - Hardware specifics and advanced configurations
- ROS2 Humble Documentation - Deep dive into ROS2 concepts