This codelab is part of the Viam for educators program, and provides a suggested delivery plan and resources for instructors interested in delivering a hands-on workshop. Take these resources, and make it your own!
Workshop Overview
- Goal: Introduce components as a concept and automate watering a plant with the Python SDK
- Audience: Beginner developers with basic programming and hardware skills
- Duration: ~2-3 hours
What You'll Teach
- How to build a smart system that triggers a water pump to irrigate the plant when the soil moisture falls below a certain threshold.
Watch the Demo Video
See a demonstration of the plant watering automation in this video.
Watch the Workshop Recording
See a full-length recording of this workshop for reference.
Review the list of required components (hardware, software), and determine which materials are provided or required for participants to bring on their own. Provide instructions to participants, giving them ample time to prepare and complete prerequisites.
Hardware and supplies requirements
- 1 - Raspberry Pi 4
- 1 - USB flash drive or microSD card to use with the Pi on the rover, along with an adapter or reader
- 1 - 5V 3A power supply
- 1 - 5V water pump with tubing
- 1 - relay module
- 1 - moisture sensor with included analog-to-digital converter board (ADC)
- 10 - jumper wires
- 1 - wire connectors
- 1 - small screwdriver to turn the screw terminals on the relay and ADC
- 2 - sturdy cups to hold plant soil/coffee grounds and water
- coffee grounds or plant soil
Software and other device requirements
- A Linux, macOS or Windows computer that can run SDK code
- Preferred IDE, such as VS Code
- Python development environment and the Viam Python SDK
- Sign up for a free Viam account, and then sign in to the Viam app
Learning Objectives
Review the suggested learning objectives, and adjust it according to your goals and audience.
- How to physically assemble a functional plant watering device by connecting and wiring the components.
- How to configure the device's components using the Viam app.
- How to write Python code using the Viam Python SDK to control the plant watering device by using custom sensor and motor methods.
- How to test and adjust the system for optimal performance.
Agenda
Review the suggested agenda, and adjust it according to your goals and audience.
- Introduction (10 mins)
- Hardware Assembly (30 mins)
- Software Setup (30 mins)
- Hands-On Experiment (40 mins)
- Q&A/Wrap-Up (10 mins)
Pre-workshop checklist ✅
Review these setup steps as you're planning the workshop to help prepare for it.
- Planning and Logistics
- Verify equipment inventory: Decide which materials are provided or required for participants to bring on their own. Order any materials and supplies that are provided to participants.
- Confirm workstation setup: Verify the workshop room layout supports hardware work, such as tables. Ensure participants have power outlets and internet access, as well as water and paper towels in case of a spill. Have spare supplies, such as Raspberry Pis, adapters/readers, and cables, in case of failures. For virtual workshops, confirm logistics for breakout sessions, providing support, and checkpoints.
- Communicate prerequisites: Share a participant guide prior to the workshop with learning objectives and instructions for installing software and preparing laptops. Provide a checklist for participants to confirm readiness.
- Establish support channels: Determine how participants can get support for real-time troubleshooting (e.g. Slack or Discord channel for virtual workshops, additional helpers in the room for on-site workshops)
- Request Viam stickers: Don't forget to request Viam stickers for the workshop.
- Content Preparation
- Prepare workshop teaching materials: Review the Delivery Plan, sample slide deck, and provided resources. Tailor these materials to suit your participants' needs. Decide whether to present them to the group or provide them for independent reference, such as through a web browser or printed handouts.
- Determine extensibility: During the Hands-on Experiment portion of the delivery plan, there are many options to guide the workshop on a different learning path. Determine if this section will be self-guided exploration, a group exercise, or self-paced learning for participants to explore on their own after the workshop.
- Prepare code and documentation: Review the provided code and add comments as necessary.
- Review discussion topics: Review the suggested group discussion topics and adjust for your participants.
- Review quiz questions: Review the suggested quiz questions and adjust for your participants. Determine if knowledge assessment will be completed throughout the workshop or afterwards.
- Dry Run and Testing
- Test the workshop project: Run through the build following the prepared documentation to ensure it works as expected. Simulate common issues and prepare troubleshooting tips for these scenarios. If physical space is limited, consider sharing supplies.
- Bring backups: In addition to the backup supplies mentioned earlier during planning.
Feel free to make a copy of this sample slide deck, customize it, and make it your own.

During the workshop, instructors can present this customizable slide deck (see above) tailored to your specific workshop needs. Alternatively, learners can follow step-by-step instructions and checkpoints independently by referencing the pages linked below in a web browser.
- Hardware Assembly
- Set up your plant watering components
- Set up your Raspberry Pi
- Software Setup
- Configure your machine
- Add your Raspberry Pi
- Hands-On Experiment
- Test the moisture sensor
- Test the pump
- Configure a custom service
Set up your plant watering device
Before programming the Pi to make the plant watering robot functional, you need to physically set up the plant watering robot by wiring the different components together. You will set up the robot to receive signals from the resistive soil moisture sensor and signal to the pump when it is time to pump water from the water's container to the plant's container.
Refer back to this full wiring diagram as you complete the steps to wire your hardware.
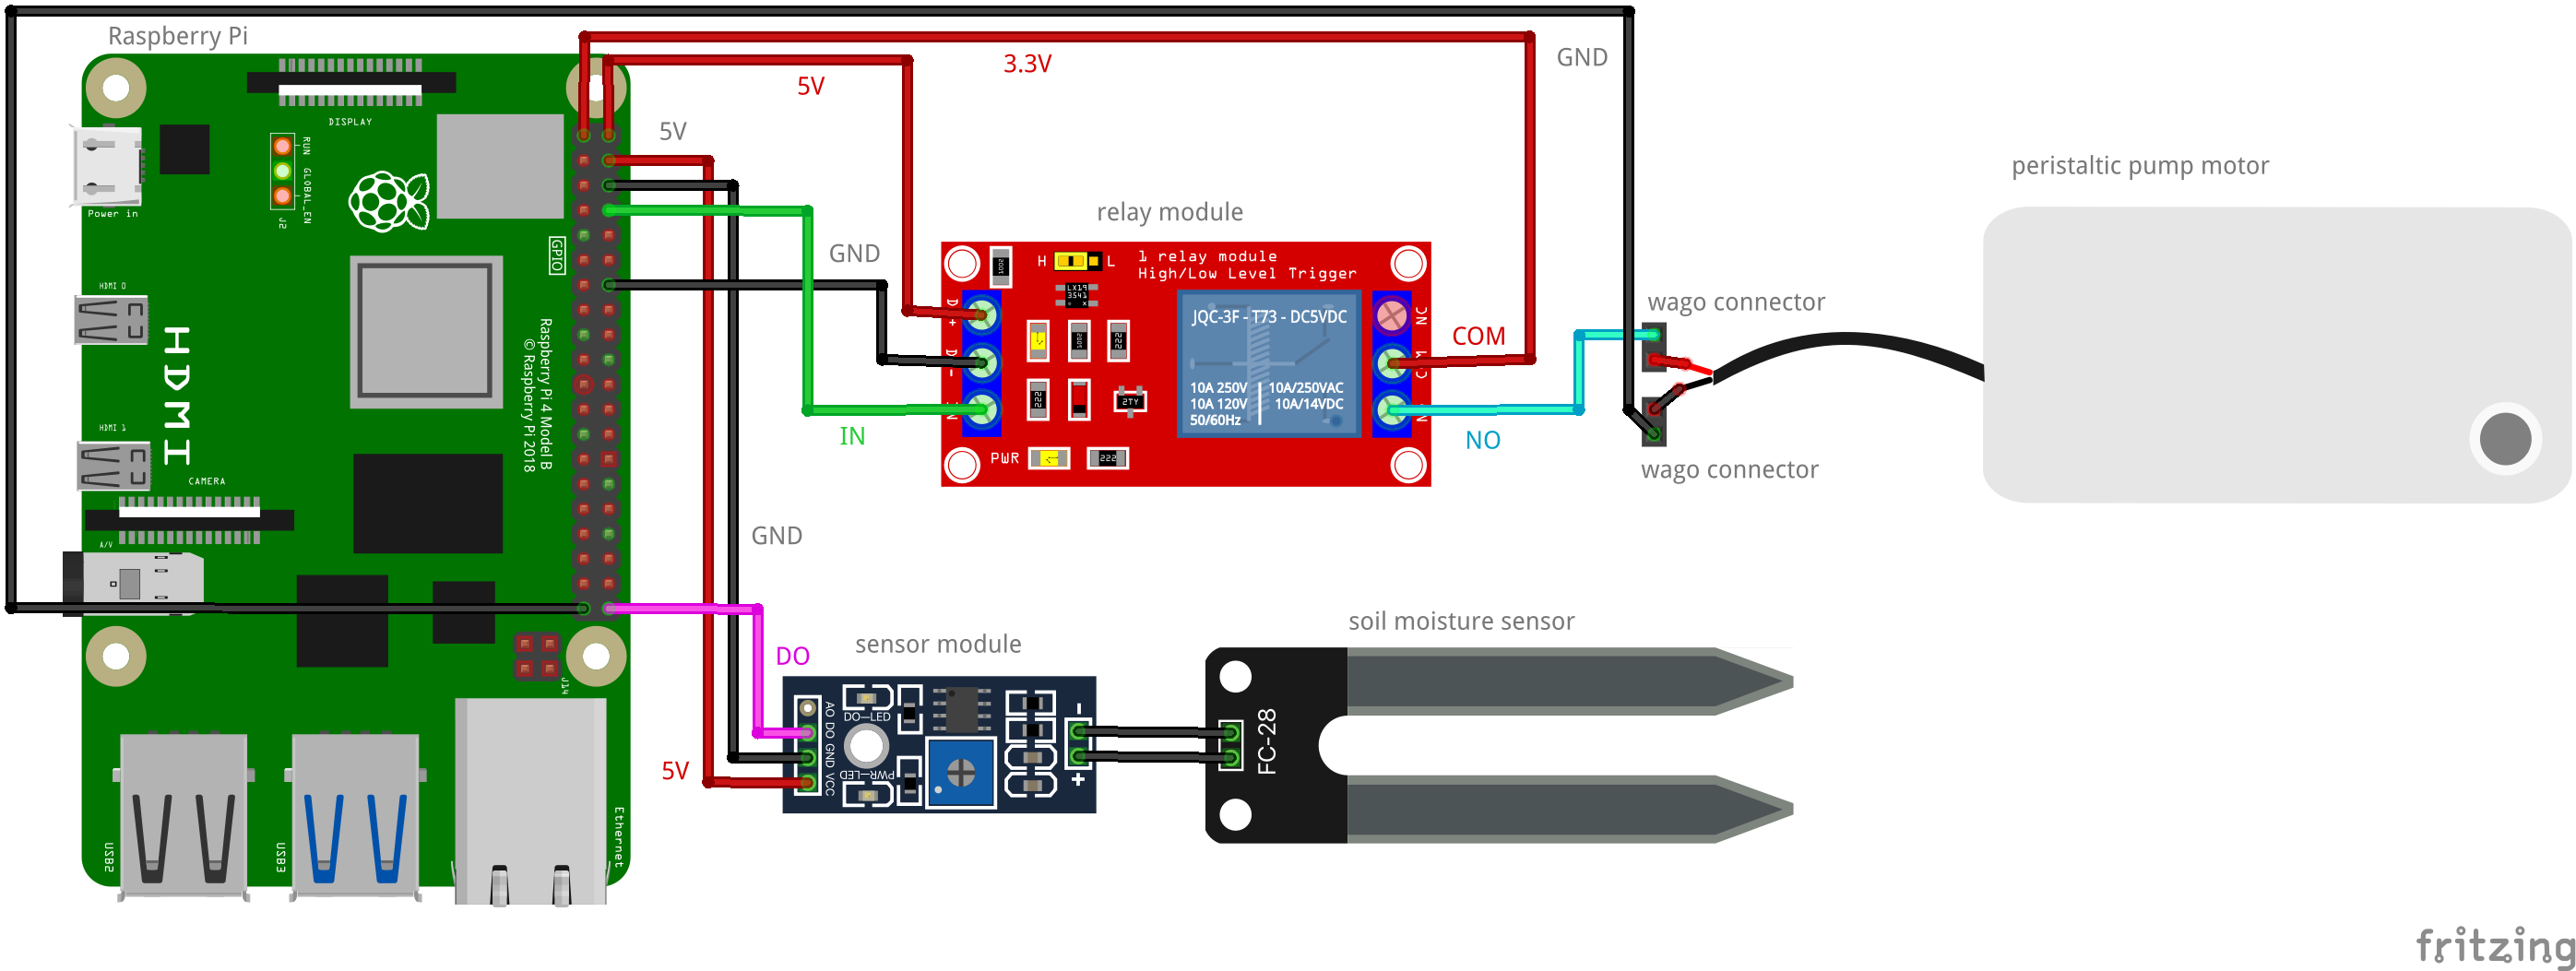
Connect your Raspberry Pi to the moisture sensor module:
- Pin 4 (3V) to VCC (Power)
- Pin 6 (GND) to GND (Ground)
- Pin 40 (GPIO 21) to DO (Digital Output)
For connecting the soil moisture sensor to the sensor module, + goes to +, and - to -.
Connect your Raspberry Pi to the relay module:
- PIN 1 (3.3V) to COM
- PIN 2 (5V) to 5V
- PIN 14 (GND) to GND
- PIN 8 (GPIO 14) to IN
Last step in the wiring section is connecting the relay and Raspberry Pi to the pump. The wire connectors may be required to connect the jumper wires to the bare wires coming from the pump motor:
- NO (Normally Open) on the relay module to either of the pump motor wires
- GPIO 39 (GND) on the Raspberry Pi to the remaining pump motor wire
Submerge the pump in the cup of water, making sure the wire connectors hang outside the the cup and don't touch the water. The legs of the moisture sensor can be placed in the other cup of soil or coffee grounds.
Where is the sensor module getting its power from?
Set up your Raspberry Pi
The Raspberry Pi boots from a microSD card. You need to install Raspberry Pi OS on a microSD card that you will use with your Pi. For more details about alternative methods of setting up your Raspberry Pi, refer to the Viam docs.
Install Raspberry Pi OS
- Connect the microSD card to your computer.
- Download the Raspberry Pi Imager and launch it.
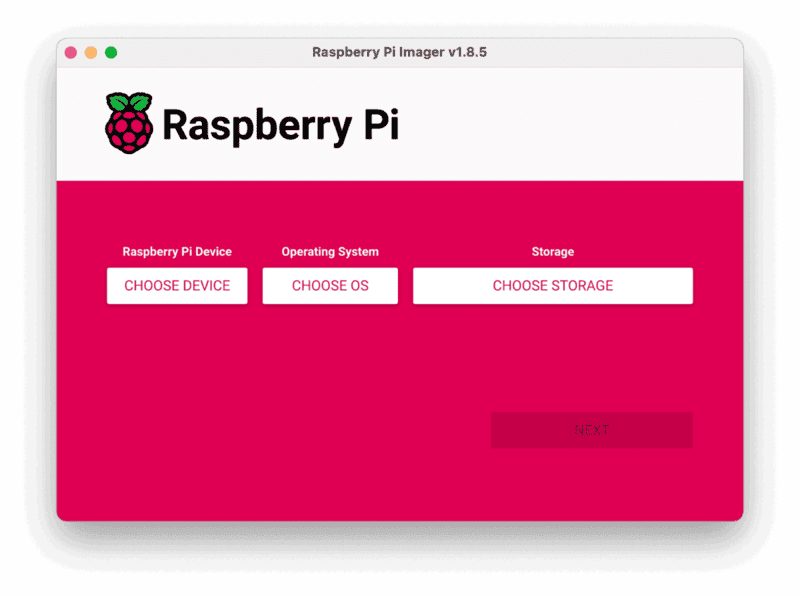
- Click CHOOSE DEVICE. Select your model of Pi, which is Raspberry Pi 4.
- Click CHOOSE OS. Select Raspberry Pi OS (64-bit) from the menu.
- Click CHOOSE STORAGE. From the list of devices, select the USB flash drive you intend to use in your Raspberry Pi.
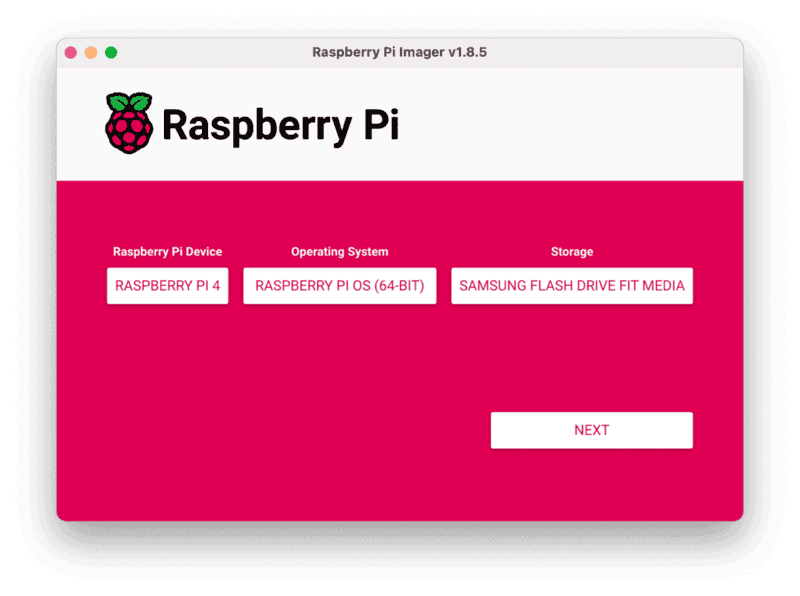
- Configure your Raspberry Pi for remote access. Click Next. When prompted to apply OS customization settings, select EDIT SETTINGS.
- Check Set hostname and enter the name you would like to access the Pi by in that field, for example,
planter. - Select the checkbox for Set username and password and set a username (for example, your first name) that you will use to log into the Pi. If you skip this step, the default username will be
pi(not recommended for security reasons). And specify a password. - Connect your Pi to Wi-Fi so that you can run
viam-serverwirelessly. Check Configure wireless LAN and enter your wireless network credentials. SSID (short for Service Set Identifier) is your Wi-Fi network name, and password is the network password. Change the sectionWireless LAN countryto where your router is currently being operated.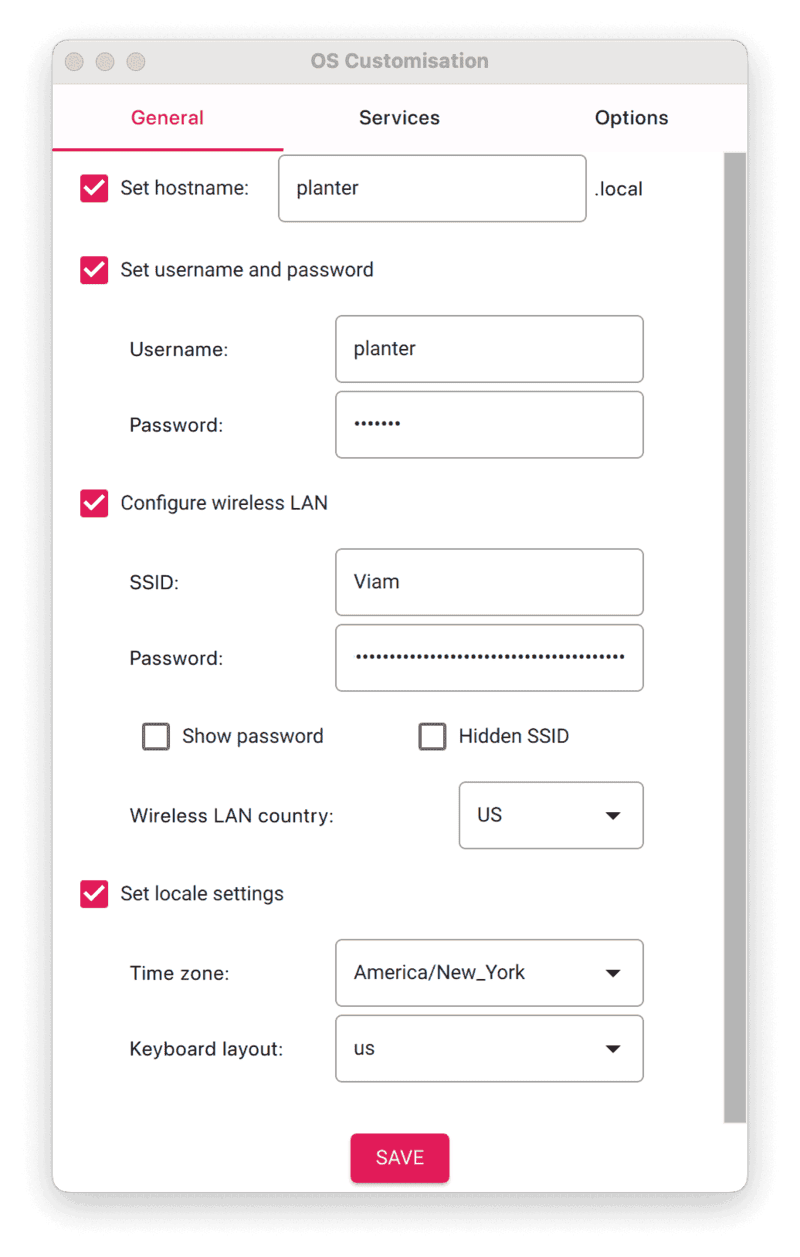
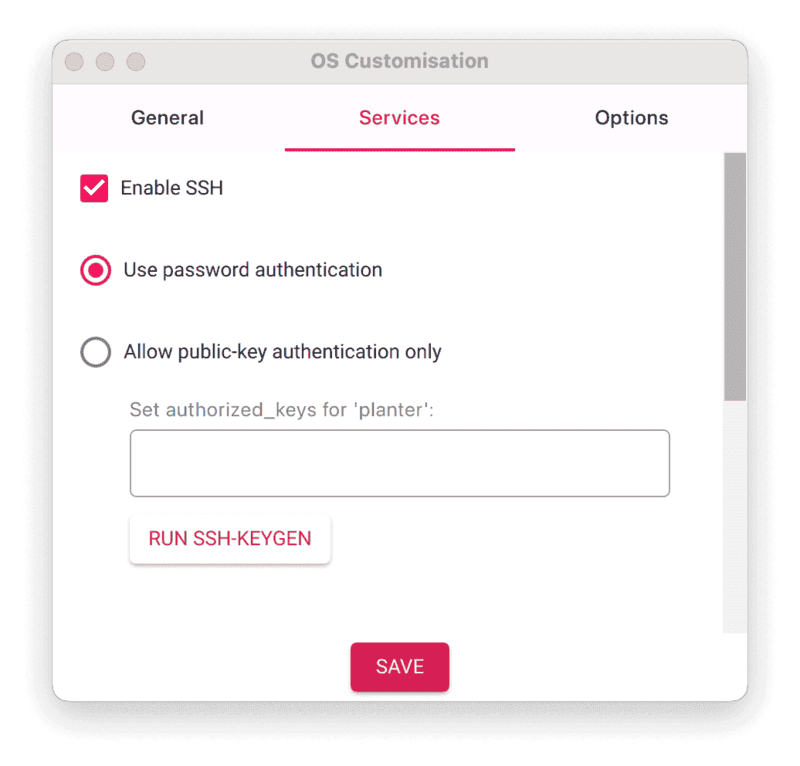
- Select the SERVICES tab, check Enable SSH, and select Use password authentication.
- Save your updates, and confirm
YESto apply OS customization settings. ConfirmYESto erase data on the microSD card. You may also be prompted by your operating system to enter an administrator password. After granting permissions to the Imager, it will begin writing and then verifying the Linux installation to the microSD card. - Remove the microSD card from your computer when the installation is complete.
What is the purpose of setting a custom `hostname` during the Raspberry Pi OS configuration?
Connect with SSH
- Place the microSD card into your Raspberry Pi and boot the Pi by plugging it in to an outlet. A red LED will turn on to indicate that the Pi is connected to power.
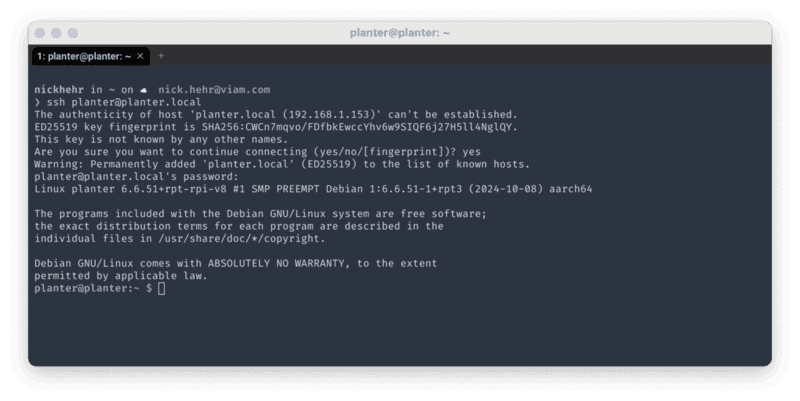
- Once the Pi is started, connect to it with SSH. From a command line terminal window, enter the following command. The text in <> should be replaced (including the < and > symbols themselves) with the user and hostname you configured when you set up your Pi.
ssh <USERNAME>@<HOSTNAME>.local - If you are prompted "Are you sure you want to continue connecting?", type "yes" and hit enter. Then, enter the password for your username. You should be greeted by a login message and a command prompt.
- Update your Raspberry Pi to ensure all the latest packages are installed
sudo apt update
sudo apt upgrade
Configure your machine
- In the Viam app under the LOCATIONS tab, create a machine by typing in a name and clicking Add machine.

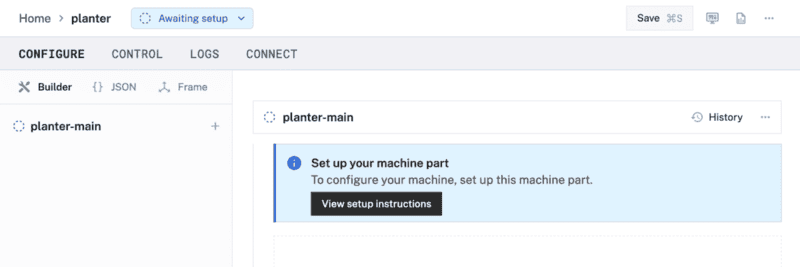
- Click View setup instructions.
- Install
viam-serveron the Raspberry Pi device that you want to use to communicate with and automate your plant watering. Select theLinux / Aarch64platform for the Raspberry Pi to control the rover, and leave your installation method asviam-agent.
- Use the
viam-agentto download and installviam-serveron your Raspberry Pi. Follow the instructions to run the command provided in the setup instructions from the SSH prompt of your Raspberry Pi.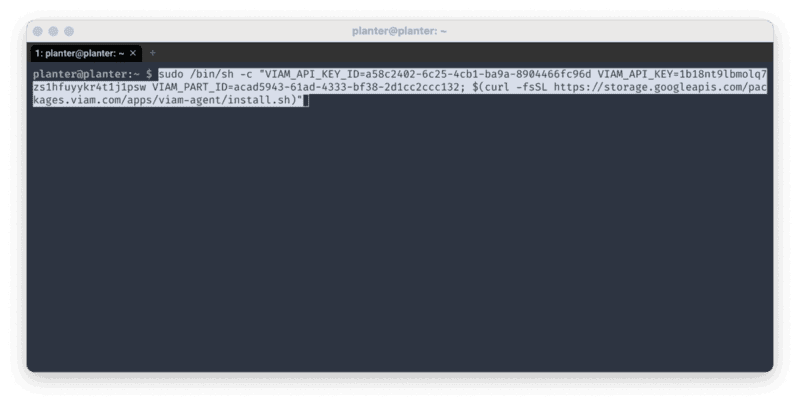 The setup page will indicate when the machine is successfully connected.
Why is it important to connect your machine to the Viam app during setup?
Add your Raspberry Pi
- In the Viam app, find the CONFIGURE tab. It's time to configure your hardware.
- Click the + icon in the left-hand menu and select Component.
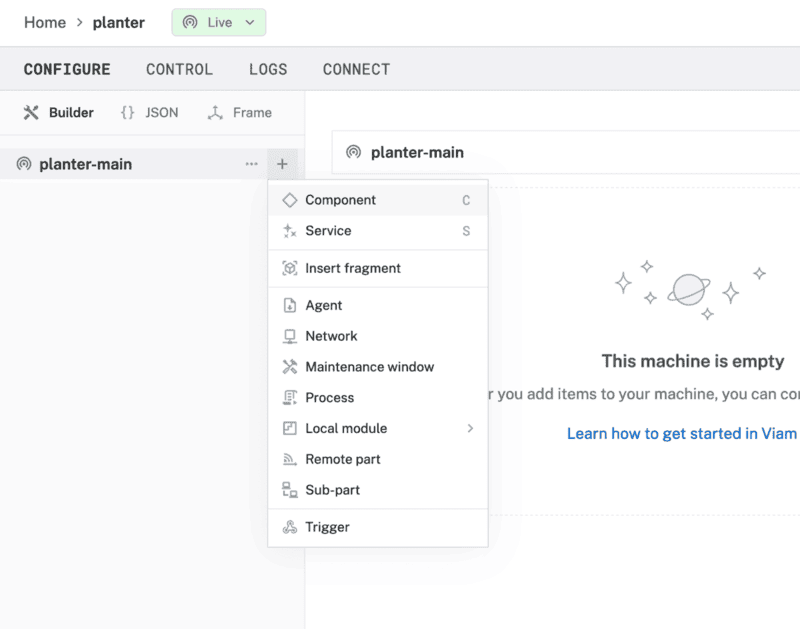
- Select
board, and find theraspberry-pi:rpimodule. This adds the module for working with the Raspberry Pi 4's GPIO pins. Leave the default nameboard-1for now.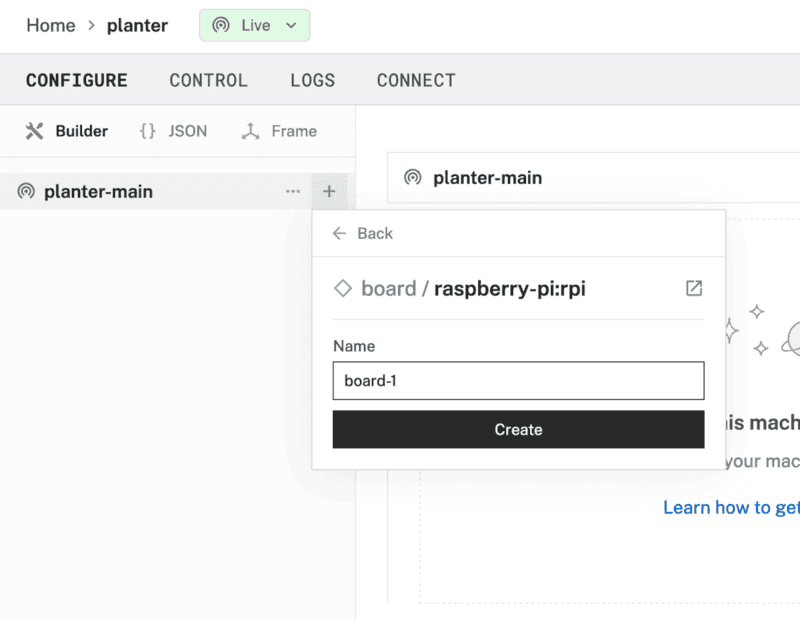
- Notice adding this module adds the board hardware component called
board-1. The collapsible card on the right corresponds to the part listed in the left sidebar.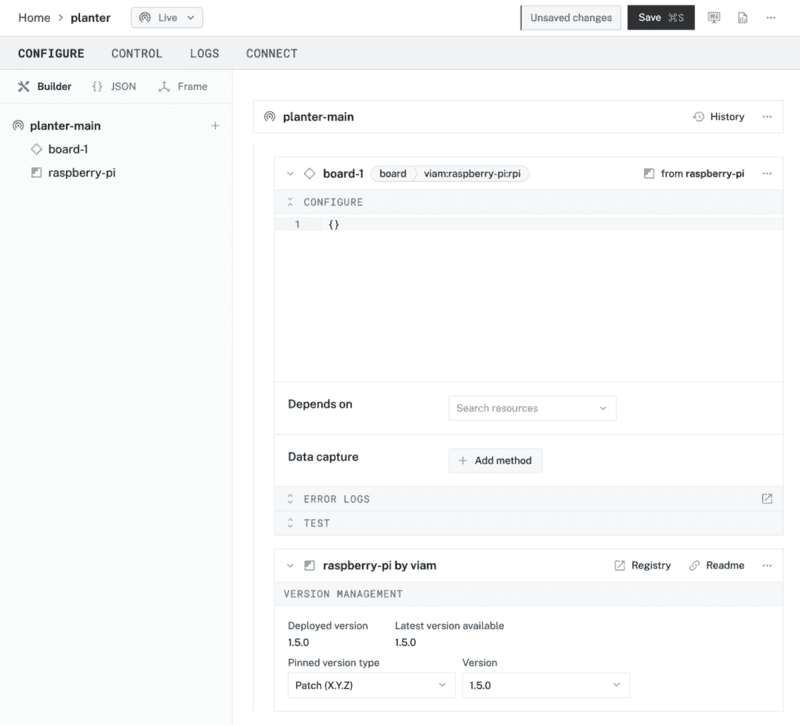
- Click Save in the top right to save and apply your configuration changes.
How does adding modules like `board-1` contribute to the overall architecture of your machine?
Test the moisture sensor
- In the Viam app under the CONTROL tab, you can see the hardware component called
board-1. That's your Raspberry Pi that you configured on the CONFIGURE tab.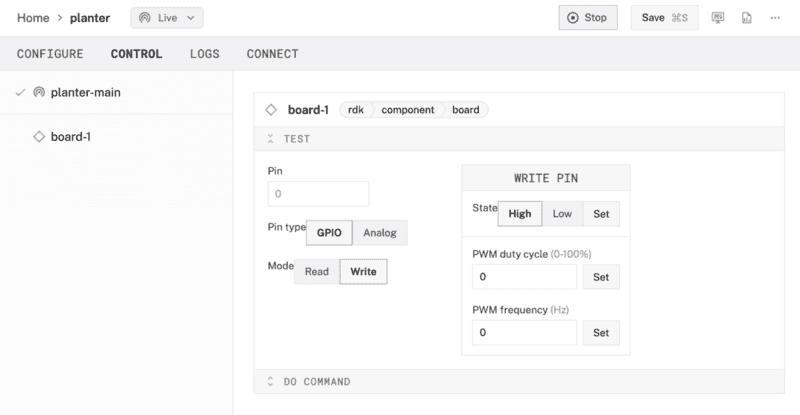
- The module we added has a
GetGPIOfunction to get the digital output of a pin. Enter40in the "Pin" field, select the "Read" mode, and click "Get" for the "State" section under "READ PIN". "Low" means there is enough moisture, "High" means the moisture level has fallen below the threshold: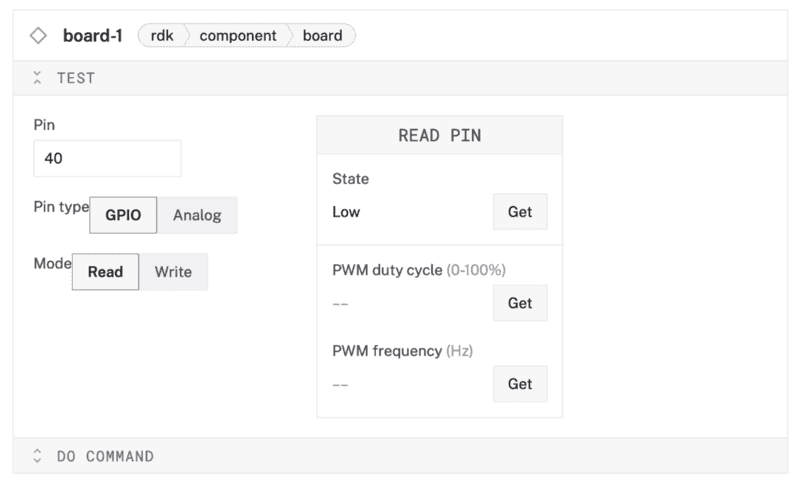
Test the pump
- In the Viam app under the CONTROL tab, you can see the hardware component called
board-1. That's your Raspberry Pi that you configured on the CONFIGURE tab. - The module we added has a
SetGPIOfunction to set the digital output of a pin. Enter8in the "Pin" field, select the "Write" mode, then select "High" and click "Set" for the "State" section under "WRITE PIN". "High" will turn on the pump motor, "Low" will turn it off.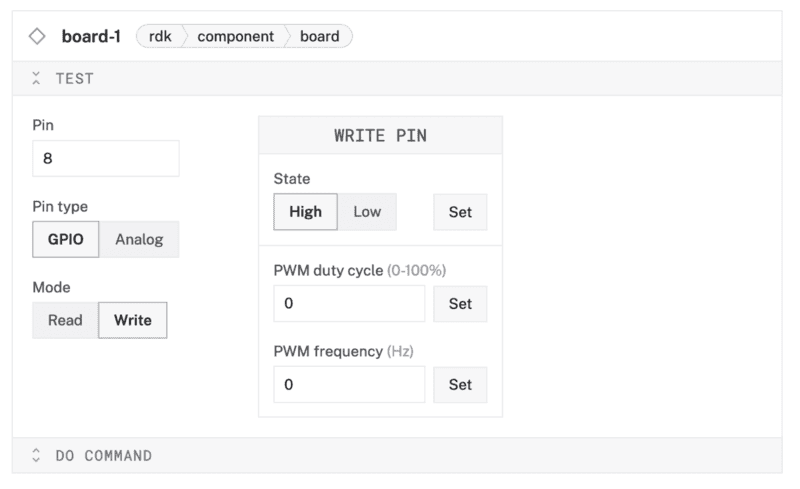
Program your plant watering device
At this point, you have configured and tested your machine and peripherals, but nothing is happening automatically. In the next section, you'll add a custom service to make your device a little smarter. The service will periodically get sensor data, turn on the pump motor if the value is low, and turn off again when the value is high.
Add the watering-controller service
- In the Viam app, find the CONFIGURE tab.
- Click the + icon in the left-hand menu and select Service.
- Select
generic, and find thewatering-controller:plant-wateringmodule. This adds the module for automating the water pump based on the digital sensor feedback. Set the name towatering.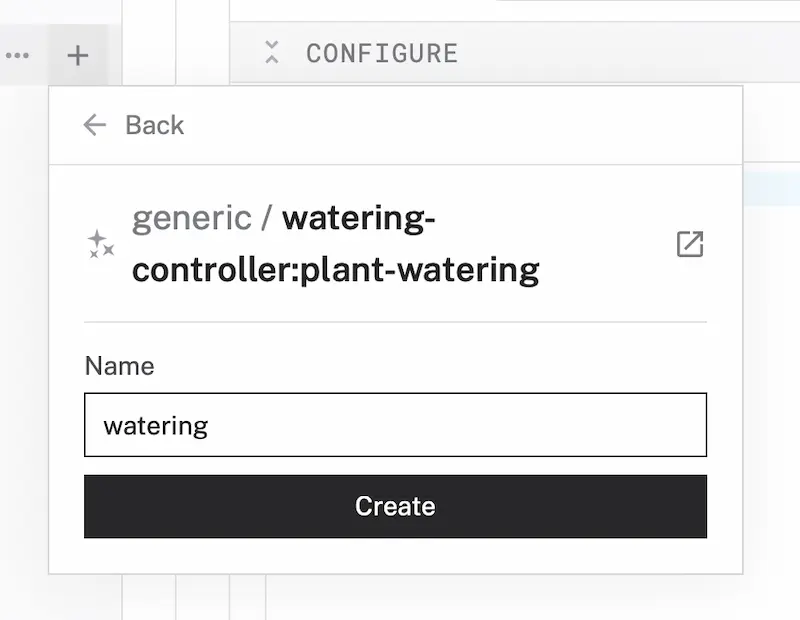
- Notice adding this module adds the watering-controller service called
watering. From the Attributes section of the panel, add the following JSON configuration.{ "board_name": "board-1" }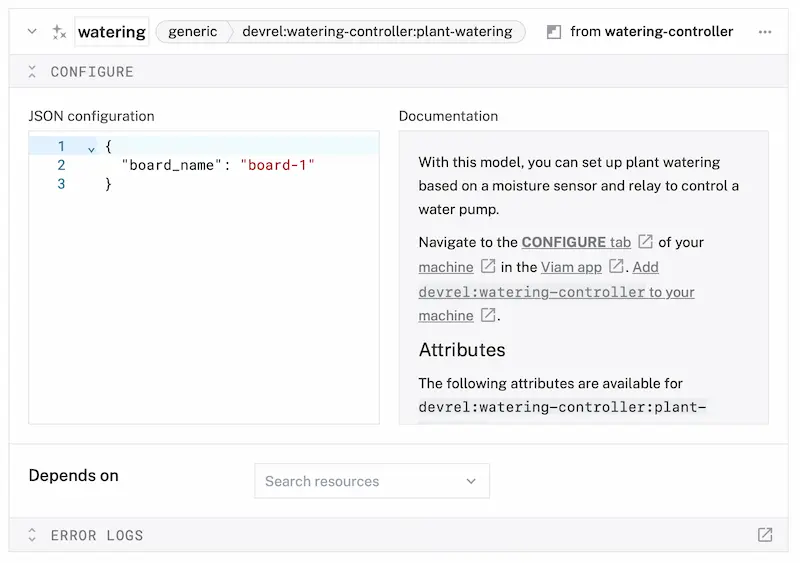
- Click Save in the top right to save and apply your configuration changes.
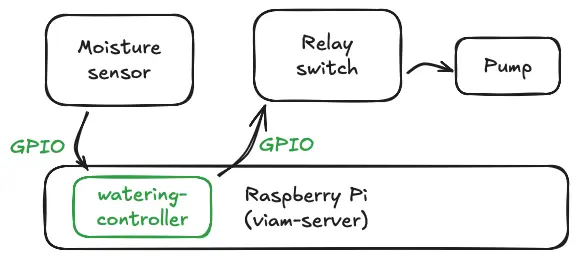
This will automatically start the "control loop" visualized in the above diagram. If you need to stop the loop at any point, you can send the "stop" command from the CONTROL tab using the following JSON message:
{
    "stop": ""
}
Then restart it again by send the "start" command.
Or disable the resource from the CONFIGURE tab: 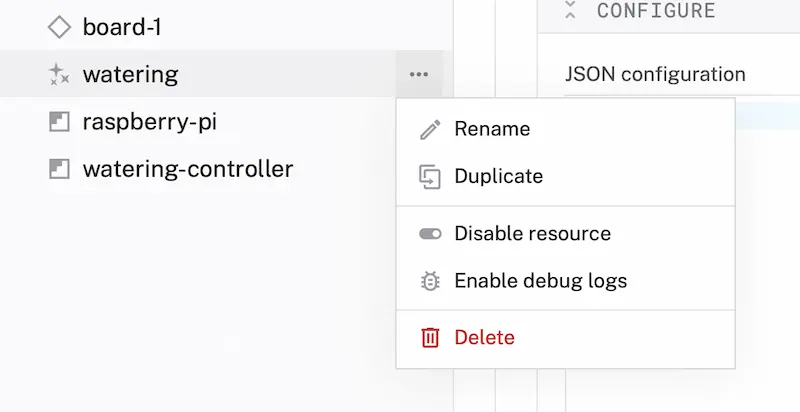
You can find the source code and documentation for the service on GitHub: https://github.com/viam-devrel/watering-controller
What is the primary role of the `watering-controller` service in the plant watering system?
Additional resources
- The website pinout.xyz is a helpful resource with the exact layout and role of each pin for Raspberry Pi. When working with Viam, make sure to reference the physical pin numbers, and not the GPIO numbers listed on
pinout.xyz. - The demo video provides a brief overview of the project.
- Viam APIs provide consistent methods of working with components, such as a
board,camera, and services, such ascomputer vision. Refer to the Viam documentation for API reference for all components and services. - Besides Python, Viam provides SDKs in various programming languages to write control code for the backend, frontend, and mobile applications.

Common pitfalls and troubleshooting guidance
- Safety
- Be careful when working with water around powered electrical components. Mixing them could result in them breaking.
- Security
- Do not share your API credentials publicly. Sharing this information could compromise your system security by allowing unauthorized access to your machine, or to the computer running your machine.
- Flashing firmware
- Make sure you are using a 5V 3A (25W) power supply.
- Participants must remember the
hostnameandusernamethey set while flashing their Raspberry Pi, as they will need this when they SSH into the Pi. - To save time, instructors can flash all the Pis ahead of time with pre-determined credentials and share the credentials with participants during the workshop. Each Pi should have a unique
hostnameto avoid conflicts on the shared local network, such as<student-name>-planteror<group-name>-planterif they are working in groups.- If you're using SD cards, verify that you have a way to write data onto them before providing them to participants.
- Configuring machine and peripherals
- If any problems occur while setting up the machine and peripherals in the Viam app, check under the LOGS tab to see what might be going wrong.
- Check that all wires are securely attached to the correct pins.
- Click on the TEST panel on the CONFIGURE or CONTROL tab and test if you can use the board there.
- Also refer to the overall Viam troubleshooting guide.
Logistics for continued learning
Participants have several options for continuing their projects beyond the workshop environment:
- Take-home projects: For participants allowed to take their project home after the workshop, the
viam-agenton the Raspberry Pi can simplify the setup process:- Provisioning mode: Upon rebooting the Raspberry Pi in a new environment like at home, the
viam-agentautomatically creates a Wi-Fi hotspot if it cannot connect to a known network. - Connect to the hotspot: Look for a network named
viam-setup-HOSTNAMEin your list of available Wi-Fi networks, whereHOSTNAMEis the custom hostname you set during the workshop, andviamsetupis the default password. Connect your laptop to this network. - Provide network information for the machine: Go to the provisioning portal at
http://viam.setup/in a browser to follow the on-screen instructions to configure the Raspberry Pi for your home Wi-Fi.
- Provisioning mode: Upon rebooting the Raspberry Pi in a new environment like at home, the
- Remote control: If participants cannot take their device home but want to continue their projects, they can access it remotely:
- Access the workshop device: Participants can control the workshop device remotely from anywhere in the world. A webcam can be set up for participants to view the device activation in real time.
- Code from home: Without SSH access to the Raspberry Pi, participants can still write and test code on their laptops and integrate changes during their next in-person session or via workshop-provided tools.
Group discussion topics 🗣️
Review suggested topics for discussion at key points during the workshop.
- What were the biggest challenges participants faced during the workshop (e.g., assembly, coding, debugging)?
- Share troubleshooting experiences and how participants resolved issues.
- What additional features could improve the system (e.g. sensors, cloud services, mobile app)?
- How can automated plant watering be used in homes, schools, or offices?
- Discuss different ways a plant watering device can interact with the environment in industrial settings and outdoor spaces.
- Discuss the feasibility of deploying a network of automated plant watering devices for a citywide project.
- How can the design of the device be improved for better accessibility, performance, or durability?
Quiz questions ❓
Review the suggested quiz questions below to evaluate participants' understanding of key concepts. These questions can be used to assess knowledge either during (see multiple choice answers in the delivery plan) or after the workshop.
- Hardware Assembly
- What is the purpose of setting a custom
hostnameduring the Raspberry Pi OS configuration? - What hardware signals are used to indicate with the soil moisture is too low?
- What is the purpose of setting a custom
- Software Setup
- Why is it important to connect your machine to the Viam app during setup?
- What does it mean that
viam-serverenables remote access to the Raspberry Pi? - How does the Viam app simplify the process of testing and controlling hardware components like the board?
- Hands-on Experiment
- What is the primary role of
viam-serverin the system architecture of your plant watering setup? - What is the purpose of the
board_namefield in the watering-controller service configuration?
- What is the primary role of
Next-level projects
Here are some ideas for expanding and enhancing the current project to create autonomous behaviors.
- Train a custom ML model guide: to enable classification to recognize when your plant is healthy or not.
- Use the Viam mobile SDK to build an iOS or Android application to control the machine's components.
- Create an smart plant assistant using voice control and a local LLM.
Post-workshop resources for participants
- Viam documentation for reference
- Viam Discord community for inspiration and support
- Viam how-to guides for task-based learning, codelabs for hands-on learning, and tutorials for project-based learning.

Contribute your own workshop
This workshop and other educational codelabs are part of this Viam open-source project. You are invited to document your own workshop(s) to share with the Viam community. Be sure to follow these contributing guidelines, and let us know about it in the Viam Discord community!