This codelab is part of the Viam for educators program, and provides a suggested delivery plan and resources for instructors interested in delivering a hands-on workshop. Take these resources, and make it your own!
Workshop Overview
- Goal: Introduce sensors and actuators as concepts and build a people detection alert
- Audience: Beginner developers with basic programming and hardware skills
- Duration: ~2-3 hours
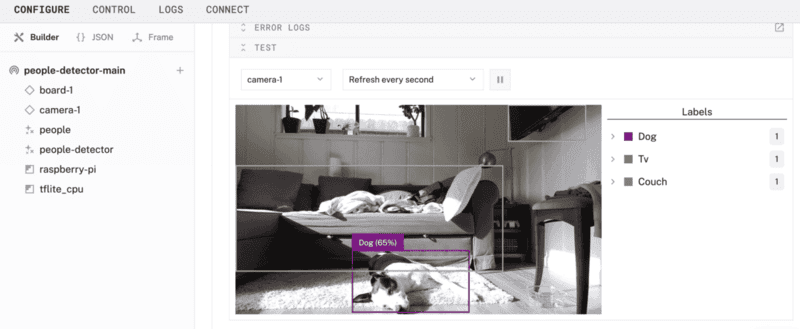
What You'll Teach
- How to build an alert system with Computer Vision that triggers a buzzer when a person is detected
Review the list of required components (hardware, software), and determine which materials are provided or required for participants to bring on their own. Provide instructions to participants, giving them ample time to prepare and complete prerequisites.

Hardware and supplies requirements
- 1 - Raspberry Pi 4
- 1 - USB flash drive or microSD card to use with the Pi, along with an adapter or reader
- 1 - power supply for your Pi
- 1 - USB web camera and a cable to connect it to your Pi
- 1 - passive piezo buzzer
- 2 - jumper wires to connect the buzzer to the Pi
- 1 - [optional] store-bought or 3D-printed Raspberry Pi case (like this one here) that provides access to GPIO pins
- 1 - [optional] a breadboard can be used for your piezo buzzer, especially if you plan to wire additional components
Software and other device requirements
- A computer with MacOS, Windows, or Linux to flash your Raspberry Pi and configure the device's components, along with required software:
- Preferred IDE, such as VS Code
- Python3
- Raspberry Pi Imager
- Sign up for a free Viam account, and then sign in to the Viam app
Learning Objectives
Review the suggested learning objectives, and adjust it according to your goals and audience.
- How to use modules from the Viam registry
- How to set up a control logic module on a Viam machine
- How to use environment variables with your Viam machine
- How to move control code to your machine
Agenda
Review the suggested agenda, and adjust it according to your goals and audience.
- Introduction (10 mins)
- Hardware Assembly (30 mins)
- Software Setup (30 mins)
- Hands-On Experiment (40 mins)
- Q&A/Wrap-Up (10 mins)
Pre-workshop checklist ✅
Review these setup steps as you're planning the workshop to help prepare for it.
- Planning and Logistics
- Verify equipment inventory: Decide which materials are provided or required for participants to bring on their own. Order any materials and supplies that are provided to participants.
- Confirm workstation setup: Verify the workshop room layout supports hardware work, such as tables for wiring the components. Ensure participants have power outlets and internet access. Have spare supplies, such as Raspberry Pis, adapters/readers, and cables, in case of failures. For virtual workshops, confirm logistics for breakout sessions, providing support, and checkpoints.
- Communicate prerequisites: Share a participant guide prior to the workshop with learning objectives and instructions for installing software and preparing laptops. Provide a checklist for participants to confirm readiness.
- Establish support channels: Determine how participants can get support for real-time troubleshooting (e.g. Slack or Discord channel for virtual workshops, additional helpers in the room for on-site workshops).
- Request Viam stickers: Don't forget to request Viam stickers for the workshop.
- Content Preparation
- Prepare workshop teaching materials: Review the Delivery Plan, sample slide deck, and provided resources. Tailor these materials to suit your participants' needs. Decide whether to present them to the group or provide them for independent reference, such as through a web browser or printed handouts.
- Determine extensibility: During the Hands-on Experiment portion of the delivery plan, there are many options to guide the workshop on a different learning path. Determine if this section will be self-guided exploration, a group exercise, or self-paced learning for participants to explore on their own after the workshop.
- Prepare code and documentation: Review the provided code and add comments as necessary.
- Review discussion topics: Review the suggested group discussion topics and adjust for your participants.
- Review quiz questions: Review the suggested quiz questions and adjust for your participants. Determine if knowledge assessment will be completed throughout the workshop or afterwards.
- Dry Run and Testing
- Test the workshop project: Run through the build following the prepared documentation to ensure it works as expected. Simulate common issues and prepare troubleshooting tips for these scenarios. If physical space is limited, consider sharing a Raspberry Pi.
- Bring backups: Final check to bring the backup supplies mentioned earlier during planning.
Feel free to make a copy of this sample slide deck, customize it, and make it your own.
During the workshop, instructors can present this customizable slide deck (see above) tailored to your specific workshop needs. Alternatively, learners can follow step-by-step instructions and checkpoints independently by referencing the pages linked below in a web browser.
- Hardware Assembly
- Set up your Raspberry Pi
- Connect with SSH
- Set up your machine peripherals
- Software Setup
- Configure your machine
- Configure your Raspberry Pi board
- Configure your your webcam
- Configure your ML model service
- Configure your vision service
- Configure your piezo buzzer
- Hands-On Experiment
- Program your people detection alert
- Configure and run a Viam control module
- Finishing touches
Set up your Raspberry Pi
The Raspberry Pi boots from a USB flash drive (or microSD card). You need to install Raspberry Pi OS on a USB flash drive that you will use with your Pi. For more details about alternative methods of setting up your Raspberry Pi, refer to the Viam docs.
Install Raspberry Pi OS
- Connect the USB flash drive (or microSD card) to your computer.
- Download the Raspberry Pi Imager and launch it.
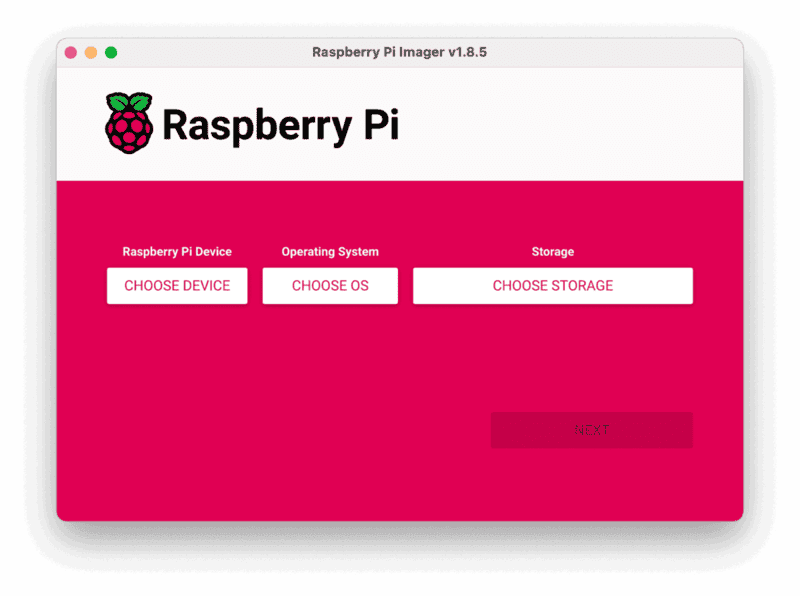
- Click CHOOSE DEVICE. Select your model of Pi, which is Raspberry Pi 4.
- Click CHOOSE OS. Select Raspberry Pi OS (64-bit) from the menu.
- Click CHOOSE STORAGE. From the list of devices, select the USB flash drive you intend to use in your Raspberry Pi.
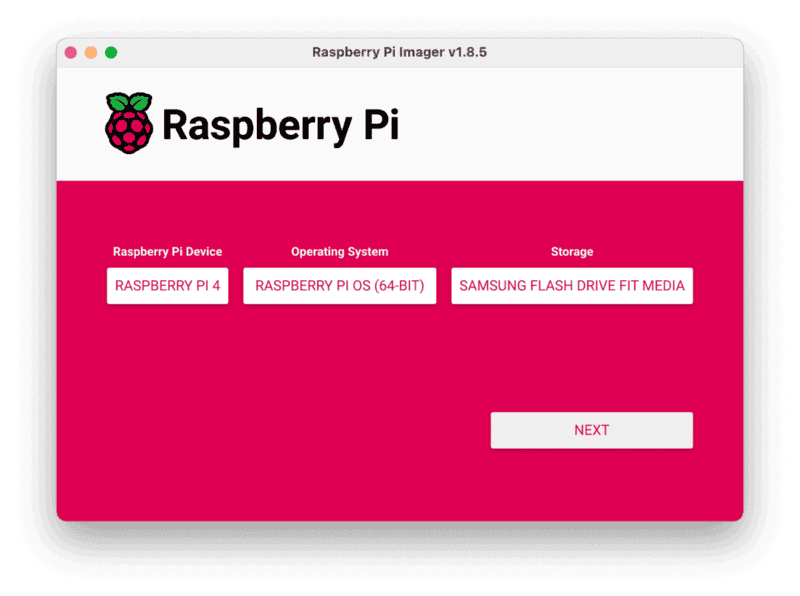
- Configure your Raspberry Pi for remote access. Click Next. When prompted to apply OS customization settings, select EDIT SETTINGS.
- Check Set hostname and enter the name you would like to access the Pi by in that field, for example
testshown here. Each Pi should have a uniquehostnameto avoid conflicts on the shared local network, such as<student-name>-detectionor<group-name>-detectionif working in groups. - Select the checkbox for Set username and password and set a username (for example, your first name) that you will use to log into the Pi. If you skip this step, the default username will be
pi(not recommended for security reasons). And specify a password. - Connect your Pi to Wi-Fi so that you can run
viam-serverwirelessly. Check Configure wireless LAN and enter your wireless network credentials. SSID (short for Service Set Identifier) is your Wi-Fi network name, and password is the network password. Change the sectionWireless LAN countryto where your router is currently being operated.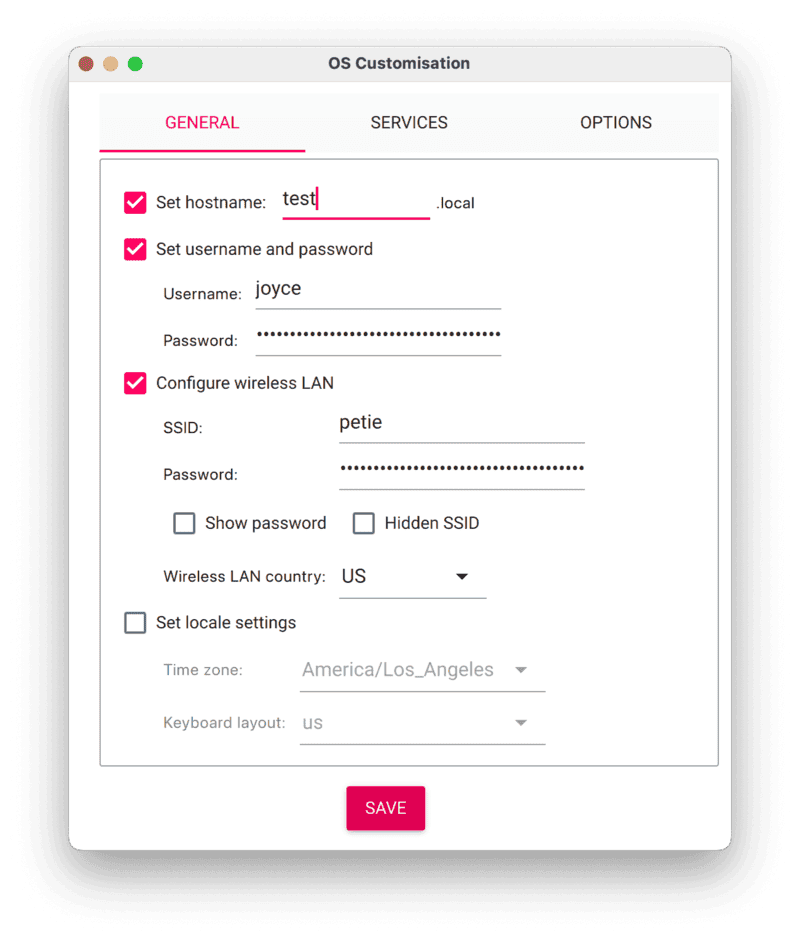
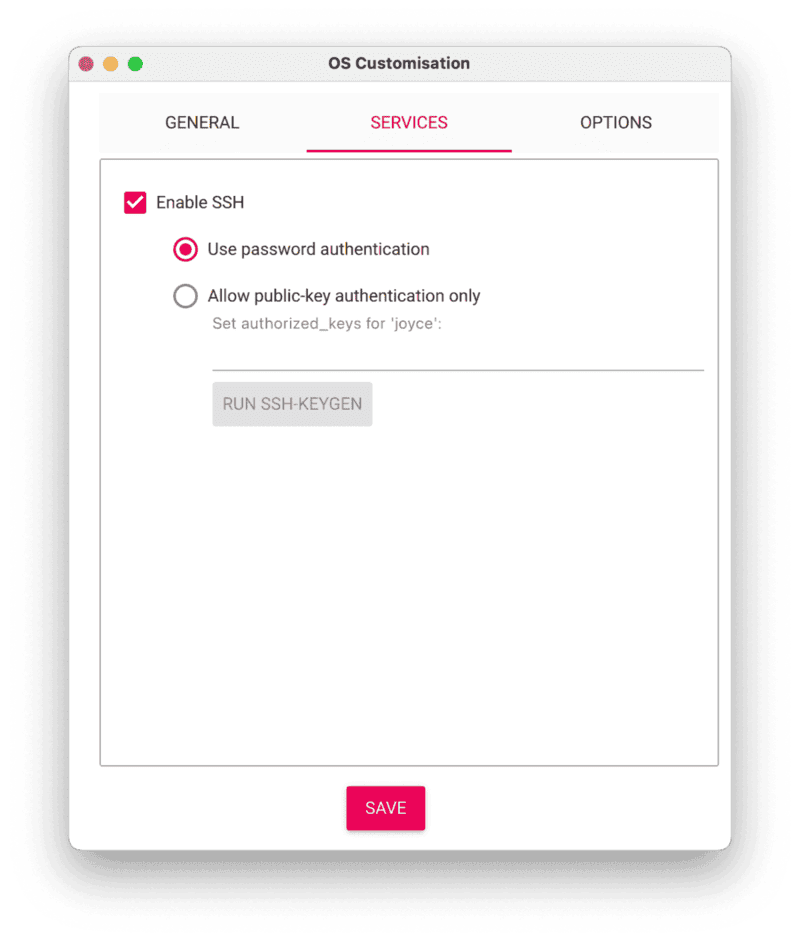
- Select the SERVICES tab, check Enable SSH, and select Use password authentication.
- Save your updates, and confirm
YESto apply OS customization settings. ConfirmYESto erase data on the USB flash drive. You may also be prompted by your operating system to enter an administrator password. After granting permissions to the Imager, it will begin writing and then verifying the Linux installation to the USB flash drive. - Remove the USB flash drive from your computer when the installation is complete.
What is the purpose of setting a custom `hostname` during the Raspberry Pi OS configuration?
Connect with SSH
- Place the USB flash drive into a USB port on your Raspberry Pi and boot the Pi by plugging it in to an outlet. A red LED will turn on to indicate that the Pi is connected to power.
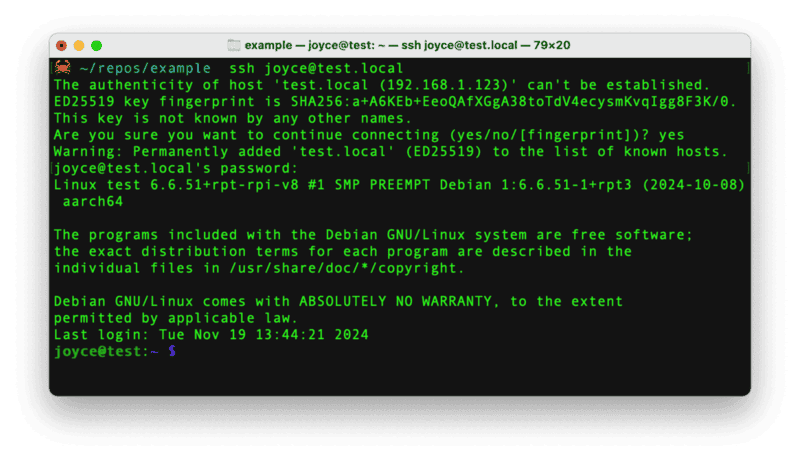
- Once the Pi is started, connect to it with SSH. From a command line terminal window, enter the following command. The text in <> should be replaced (including the < and > symbols themselves) with the user and hostname you configured when you set up your Pi.
ssh <USERNAME>@<HOSTNAME>.local - If you are prompted "Are you sure you want to continue connecting?", type "yes" and hit enter. Then, enter the password for your username. You should be greeted by a login message and a command prompt.
- Update your Raspberry Pi to ensure all the latest packages are installed
sudo apt update
sudo apt upgrade
Set up your machine peripherals
- Connect the webcam: Connect the webcam's USB lead to any USB port on your Pi. The webcam transmits video data to the Raspberry Pi through the USB interface.
- Connect the piezo buzzer: The passive piezo buzzer can be controlled via a GPIO pin on the Raspberry Pi. Refer to the following wiring diagram to connect the Raspberry Pi to the piezo buzzer.
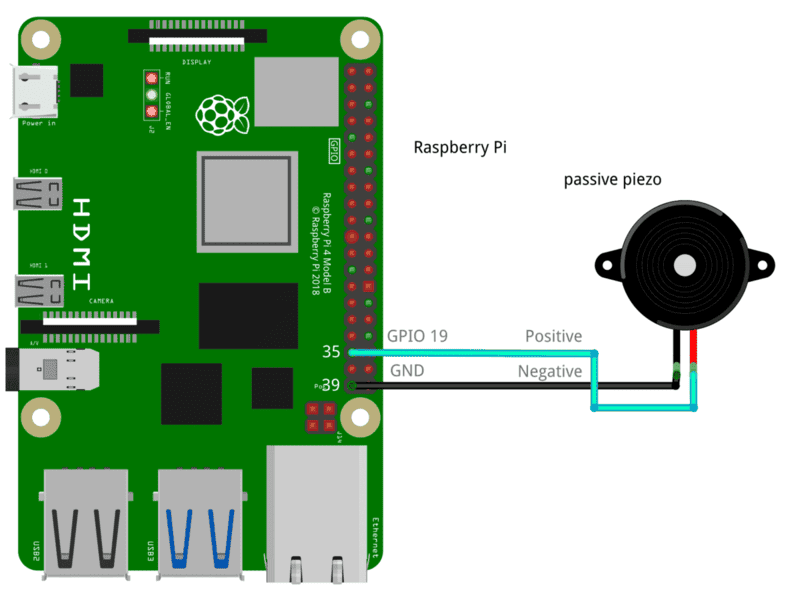
- Pin 35 (GPIO 19) to Positive
- Pin 39 (GND) to Negative
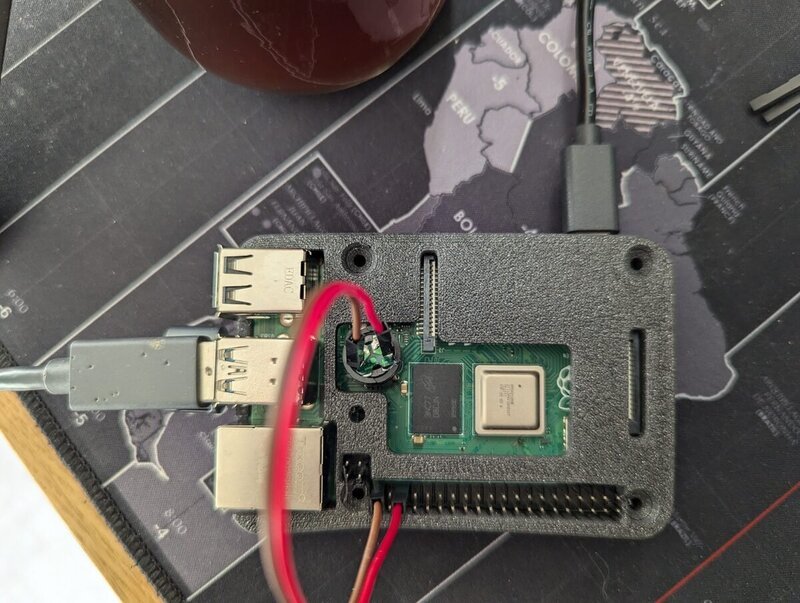
Now that we have physically connected our hardware components, let's configure the software in the next section.
Configure your machine
- In the Viam app under the LOCATIONS tab, create a machine by typing in a name and clicking Add machine.

- Click View setup instructions.

- Install
viam-serveron the Raspberry Pi device that you want to use to communicate with and control your camera and piezo buzzer. Select theLinux / Aarch64platform for the Raspberry Pi, and leave your installation method asviam-agent.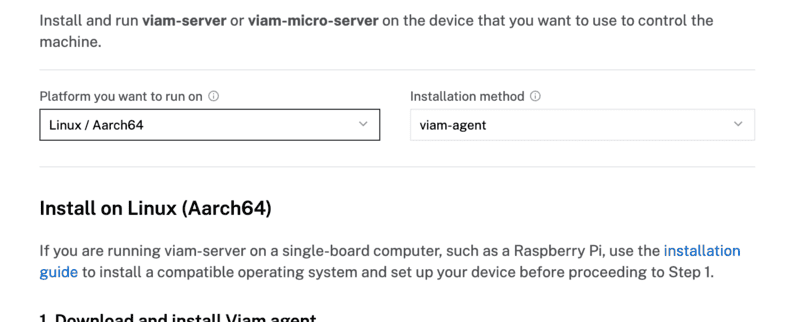
- Use the
viam-agentto download and installviam-serveron your Raspberry Pi. Follow the instructions to run the command provided in the setup instructions from the SSH prompt of your Raspberry Pi.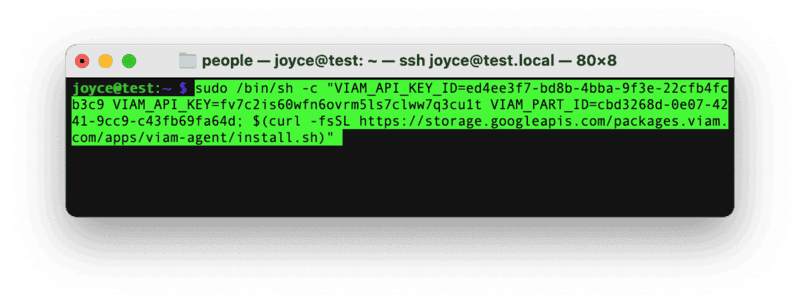
- The setup page will indicate when the machine is successfully connected.

Why is it important to connect your machine to the Viam app during setup?
What is the primary role of `viam-server` in the system architecture of your people detector setup?
Configure your Raspberry Pi board
To access the GPIO pins, let's add our Raspberry Pi board to our machine in the Viam app.
- In the Viam app, find the CONFIGURE tab.
- Click the + icon in the left-hand menu and select Component.
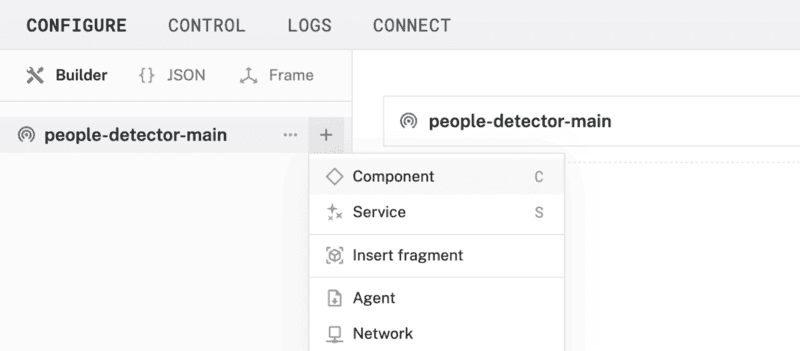
- Select
board, and find theraspberry-pi:rpi4module. This adds the module for working with the Raspberry Pi 4's GPIO pins. Leave the default nameboard-1for now. - Notice adding this module adds the board hardware component called
board-1. The collapsible card on the right corresponds to the part listed in the left sidebar.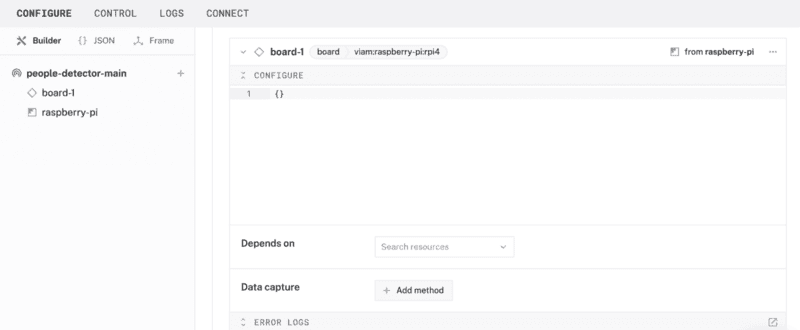
- Click Save in the top right to save and apply your configuration changes.
Configure your USB webcam
Make sure your webcam is already connected to the Pi.
- In the Viam app under the CONFIGURE tab, click the + icon in the left-hand menu and select Component.
- Select
camera, and find thewebcammodule. This adds the module for working with a USB webcam. Leave the default namecamera-1for now. - Notice adding this component adds the webcam hardware component called
camera-1. From the Attributes section of the panel, select avideo_path.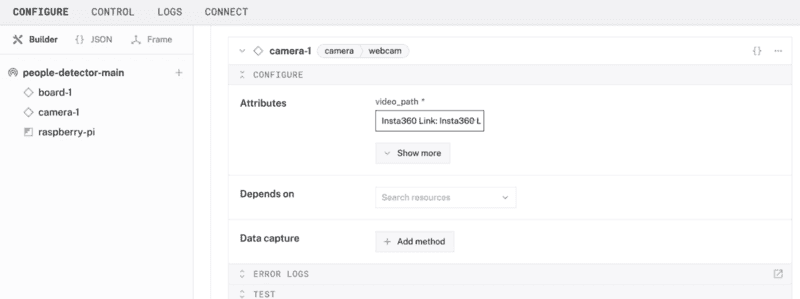
- Click Save in the top right. This may take a moment to apply your configuration changes.
- At the bottom of the
camera-1panel, expand the TEST section to ensure you have configured the camera properly and see a video feed.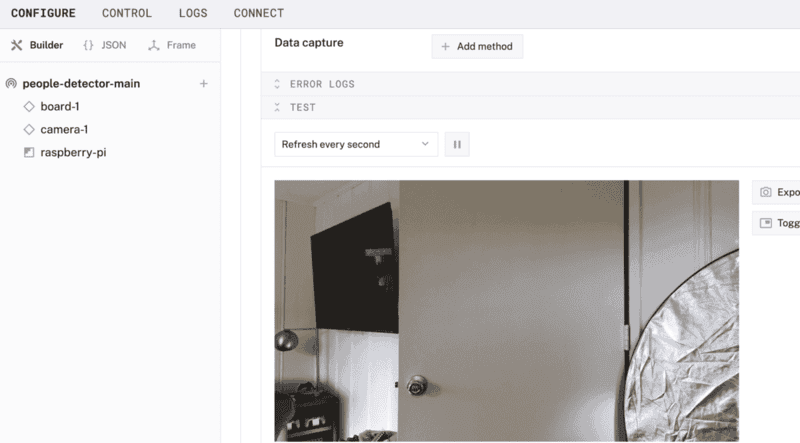
How does adding modules like `board-1` or `camera-1` contribute to the overall architecture of your machine?
Configure your ML model service
- In the Viam app under the CONFIGURE tab, click the + icon in the left-hand menu and select Service.
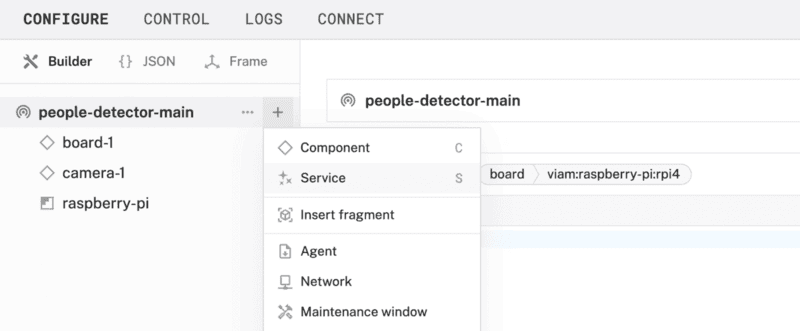
- Select
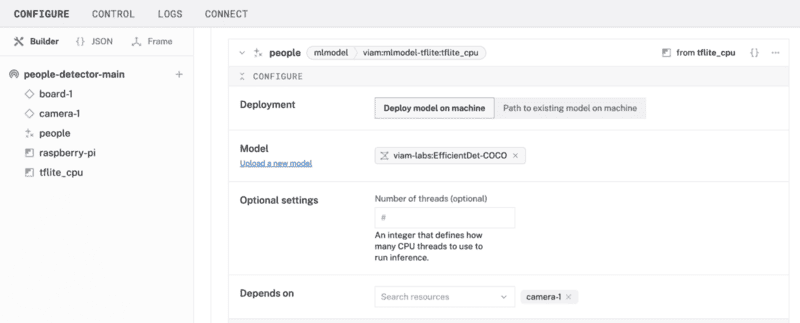
ML model, and find theTFLite CPUmodule. This adds support for running TensorFlow Lite models on resource-contrained devices. Name the servicepeople.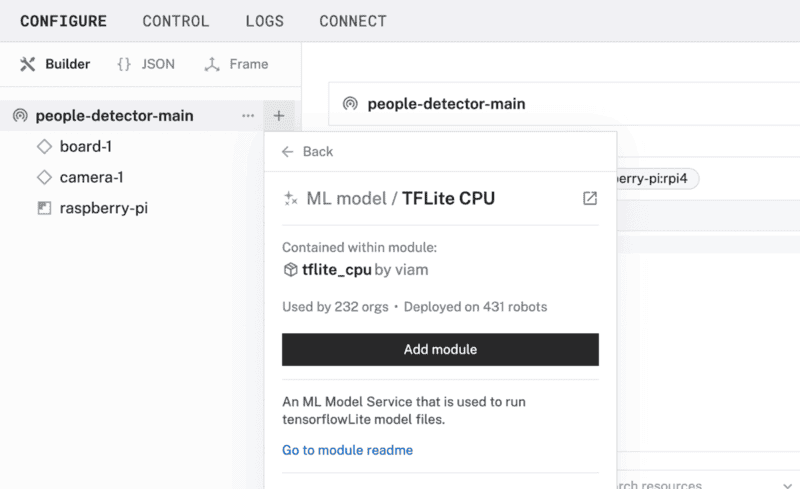
- In the new ML Model service panel, configure the service by by setting the Deployment field to
Deploy model on machine. - In the Model field, select the
EfficientDet-COCO by viam-labsmodel under the Registry tab. This model is specifically optimized for resource-constrained devices like the Raspberry Pi.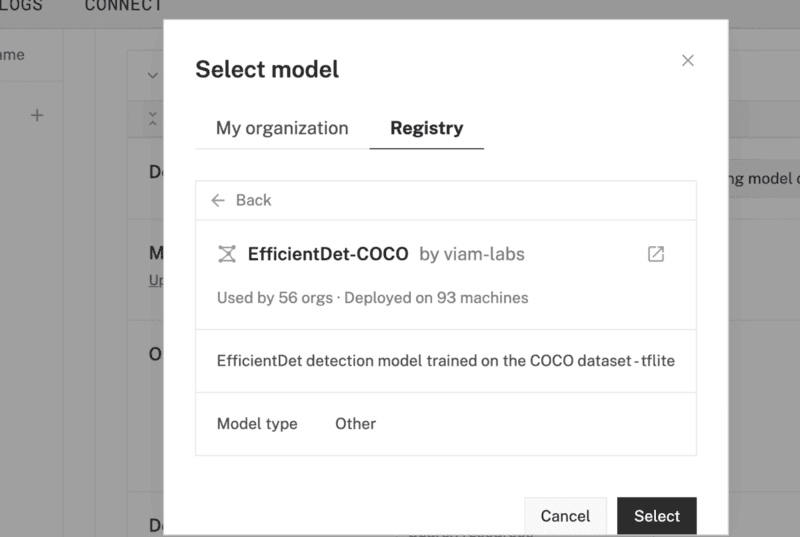
- Your ML model configuration should now look like this:
- Click Save to apply your configuration changes.
Configure your vision service
- In the Viam app, navigate to the CONFIGURE tab. Click the + icon in the left-hand menu and select Service.
- Select
vision, then find and choose theML modelmodule. This adds a new vision service to your machine. Name the servicepeopleDetector.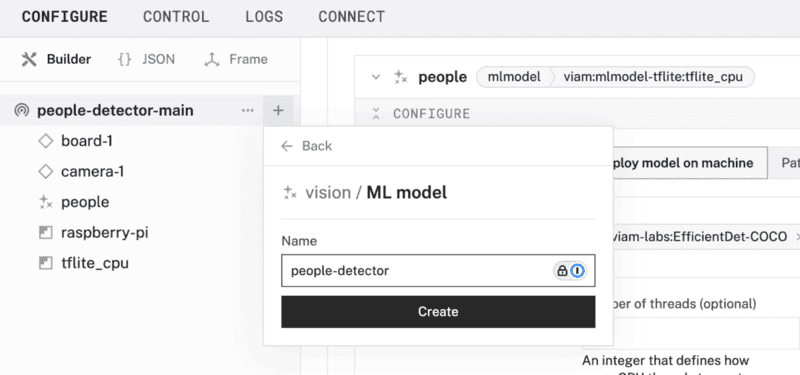
- In the new vision service panel, configure the service by selecting
peoplein the ML model field. This links your vision service to the ML model service you set up in the previous step.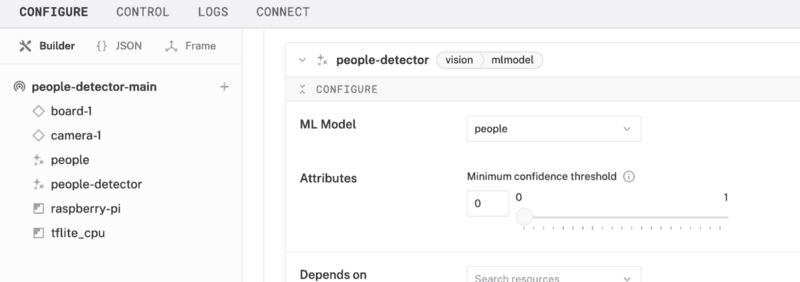
- Click Save to apply your configuration changes. Note that this may take a moment to complete.
- At the bottom of the
peopleDetectorpanel, expand the TEST section to verify your configuration. You should see bounding boxes and labels around detected objects. - To control the sensitivity of object detection, adjust the
Minimum confidence thresholdunder the Attributes field.
What is the primary relationship between the ML Model Service and the Vision Service in this configuration?
Configure your piezo buzzer
You can manually and programmatically use the GPIO pins of the board component to send PWM signals to control your buzzer. However, to streamline this next step, let's use a prebuilt module.
- In the Viam app under the CONFIGURE tab, click the + icon in the left-hand menu and select Component.
- Select
generic, and find thebuzzer:piezomodule. This adds the module for controlling your buzzer. Name the componentpiezo.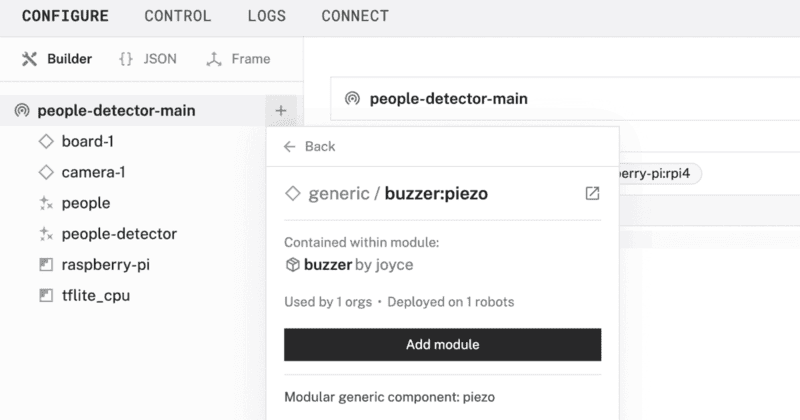
- In the new
piezopanel, configure your component by adding the following attributes in the CONFIGURE field. This tells your piezo component to use a specific pin (physical pin 35) on a specific board (calledboard-1in the Viam app) that you wired in a previous step.{ "piezo_pin": "35", "board": "board-1" } - Select your board
board-1from the Depends on field.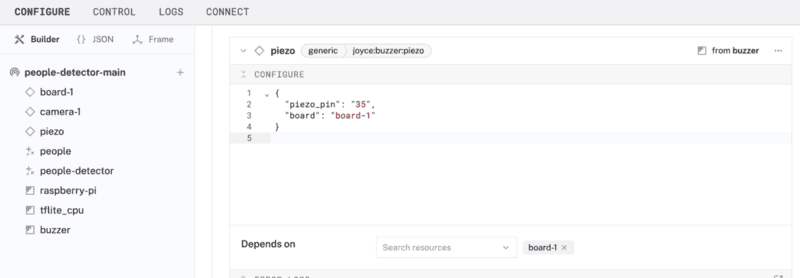
- Click Save to apply your configuration changes. This may take a moment.
- Since we are using a generic component, let's test it out under the CONTROL tab. Find your
piezocomponent on this page. Expand the DO COMMAND field, input the following code, and hit Execute.{ "sound_buzzer": { "frequency": 1200, "duration": 1.5, "duty_cycle": 0.7 } } You are executing a
 DoCommandon a generic component that has been predefined to accept parameters such asfrequency,duration, andduty_cycle. - Experiment with different values in those fields to see what happens when you execute the command again. If you have extra time, try sending the following Do command.
{
  "play_harry_potter": {}
}
What is the primary purpose for using PWM (Pulse Width Modulation) to control a passive piezo buzzer?
Program your people detector
At this point, the Vision Service relies on the ML Model Service to analyze visual data. It uses pre-trained machine learning models, such as EfficientDet-COCO, to perform tasks like object detection. Currently, many objects are being detected in the camera feed.
In this section, we'll add code to alert us when a person is detected. And if a person is detected, the piezo buzzer will sound.
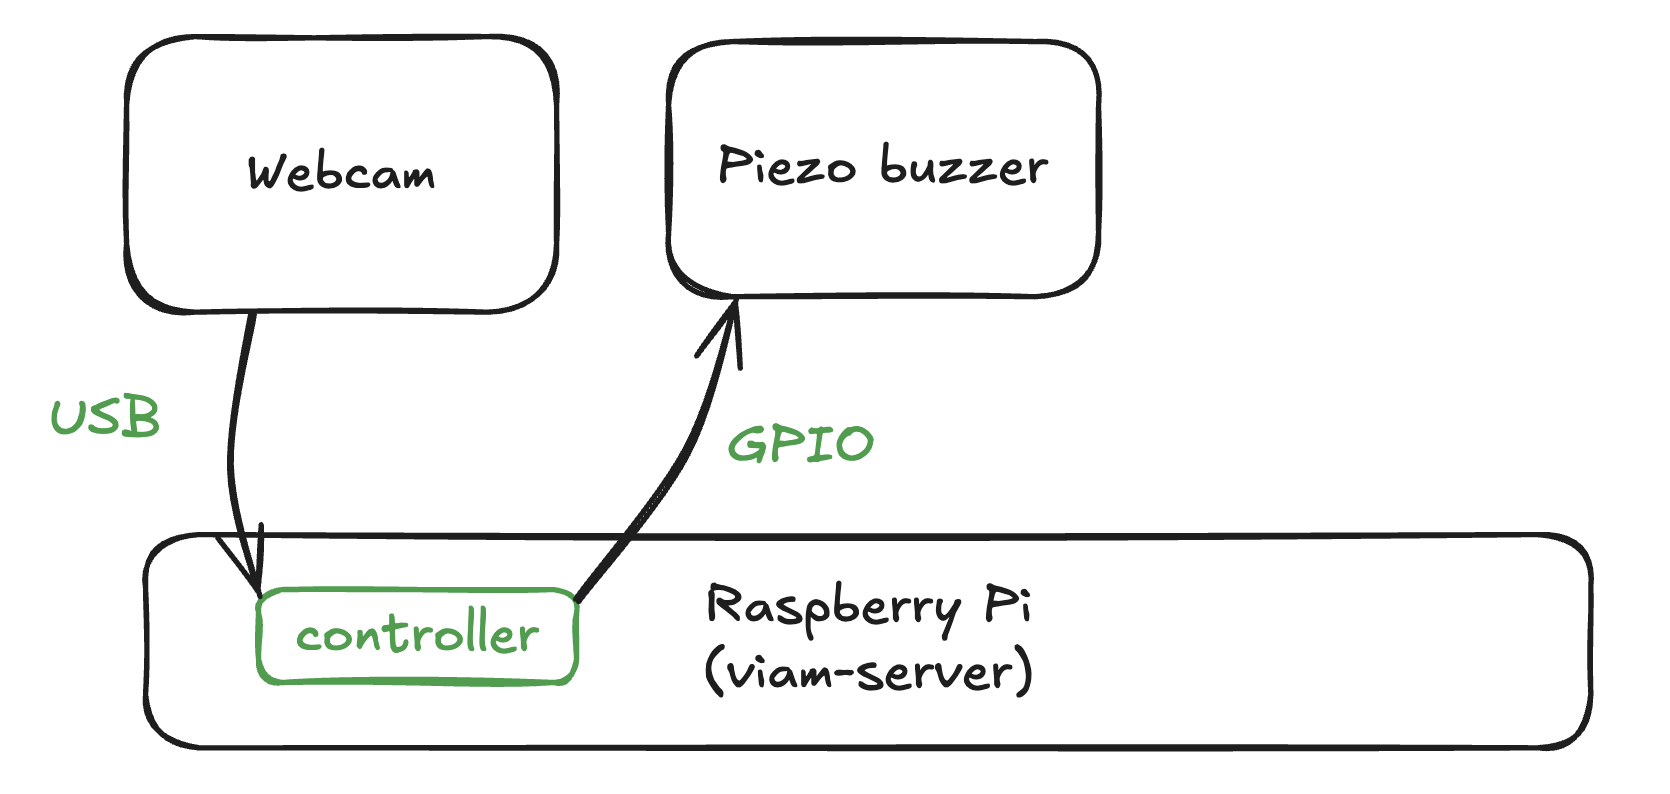
Add a control logic module
Now let's add a control logic module to our Viam machine.
- In the Viam app, go to the CONFIGURE tab. Click the + icon in the left-hand menu and select Component or service.
- Find, and add the module called
people-piezo, and update the name of the module tocontroller.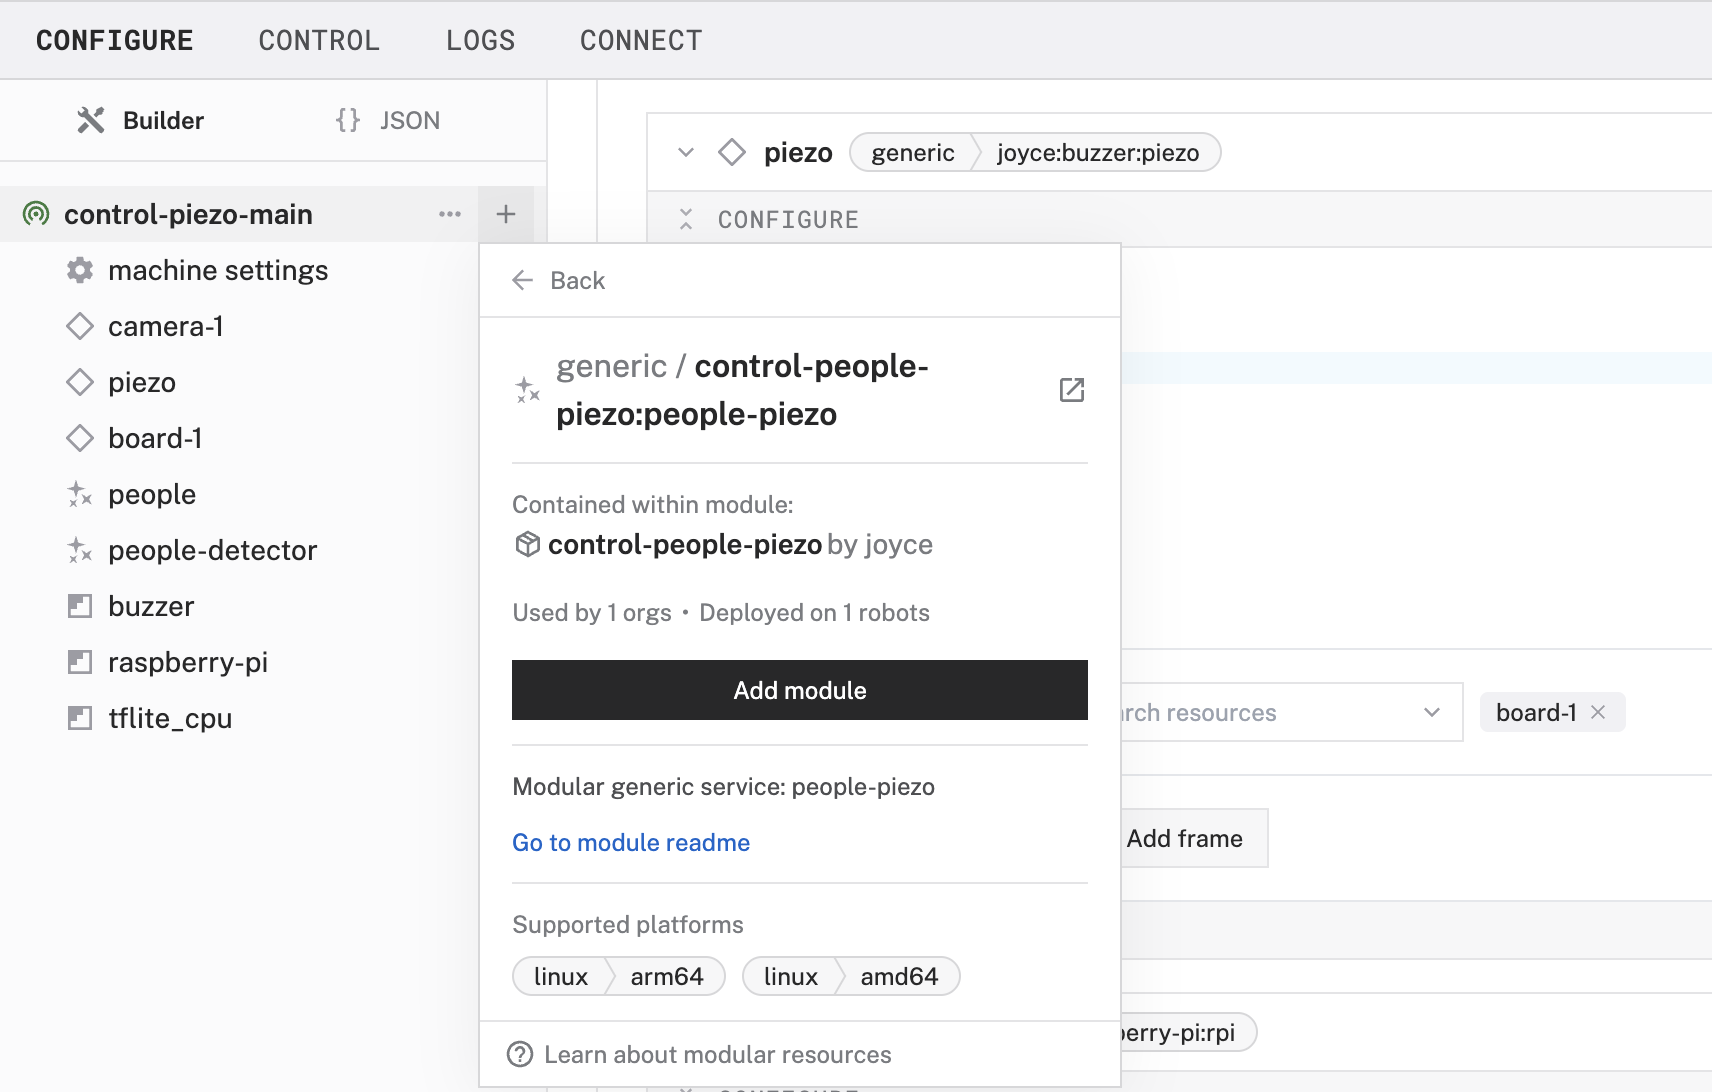
- In the new
controllerservice, find the corresponding panel on the right, and add the required JSON configuration. The name of the camera, generic component, and vision service can be found in the Viam app interface.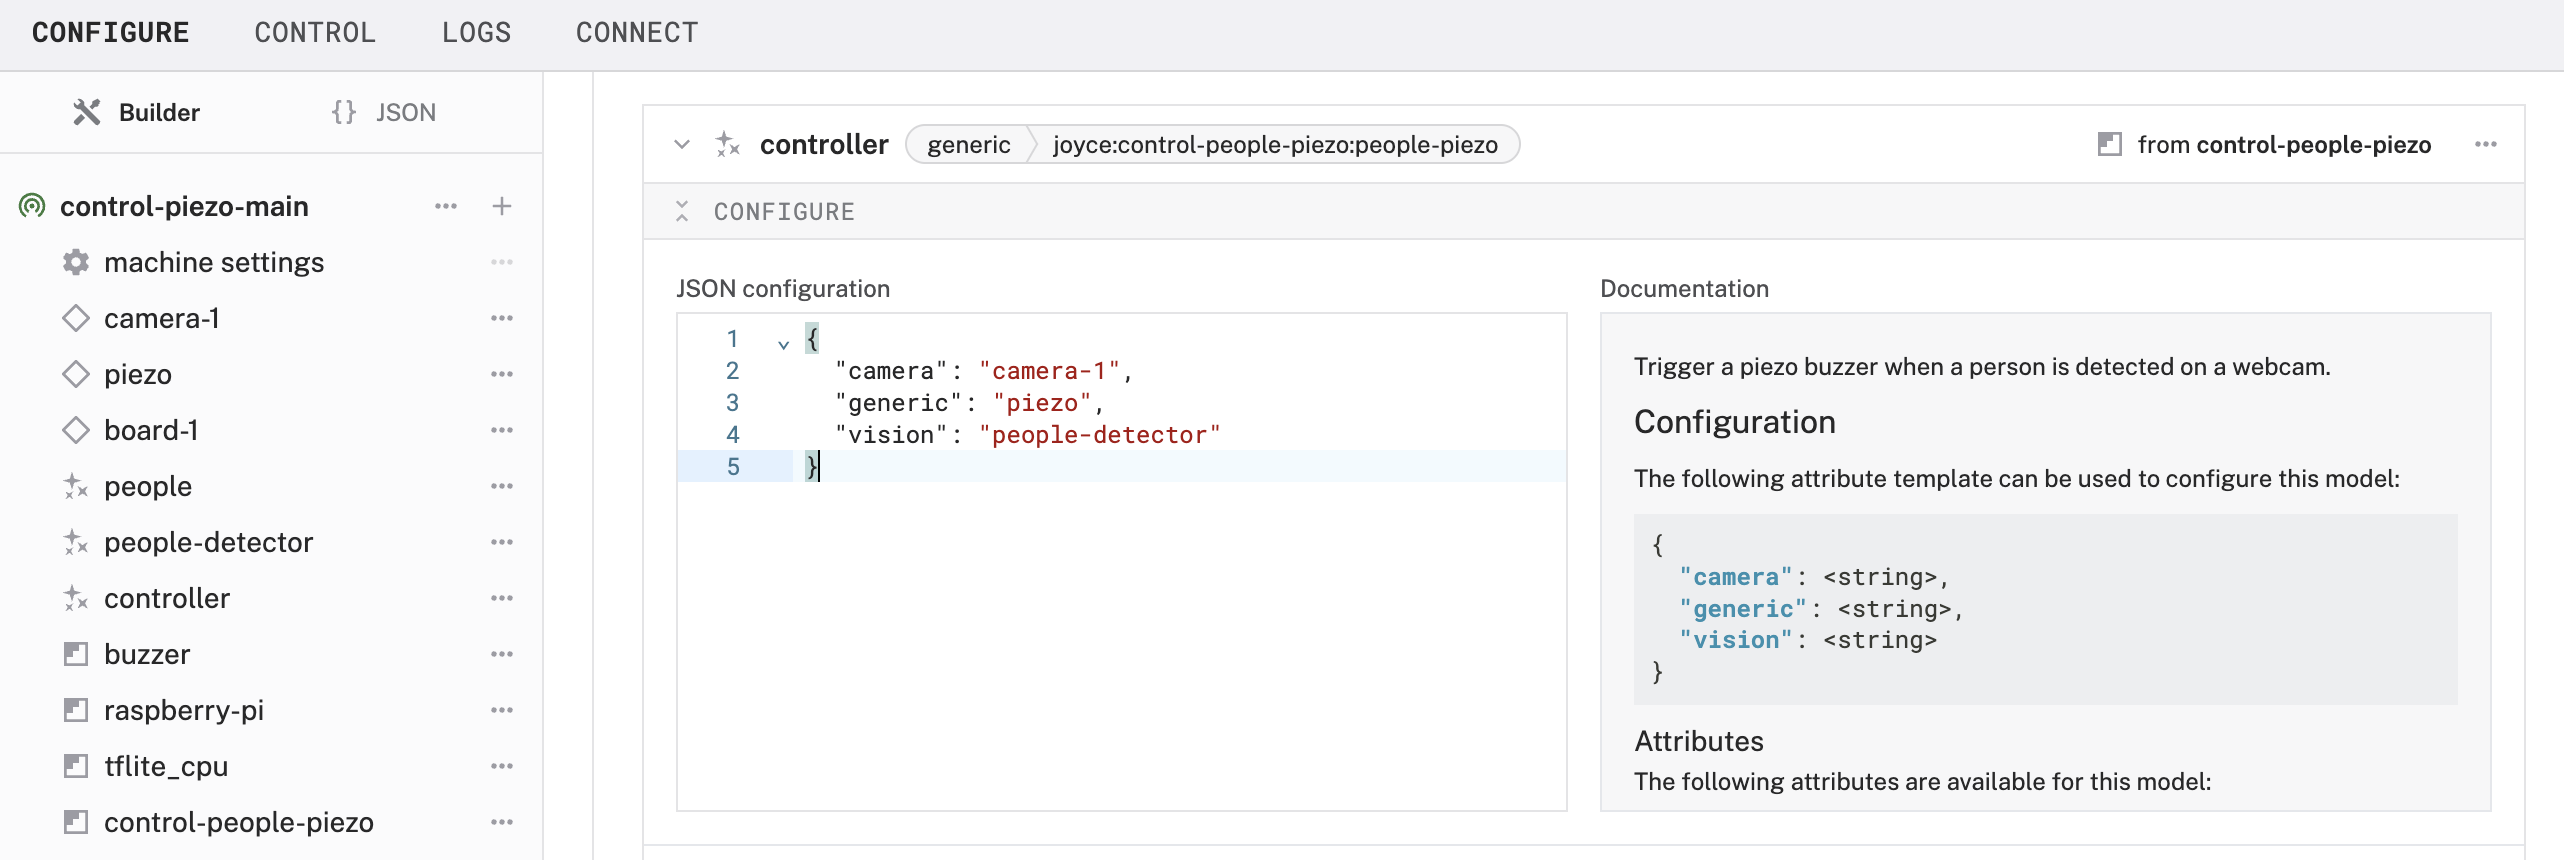
{ "camera": "camera-1", "generic": "piezo", "vision": "people-detector" } - Save and apply your changes.
- Test the new control module by navigating to the CONTROL tab. Find the
people-detectorservice and observe what happens when a person is detected.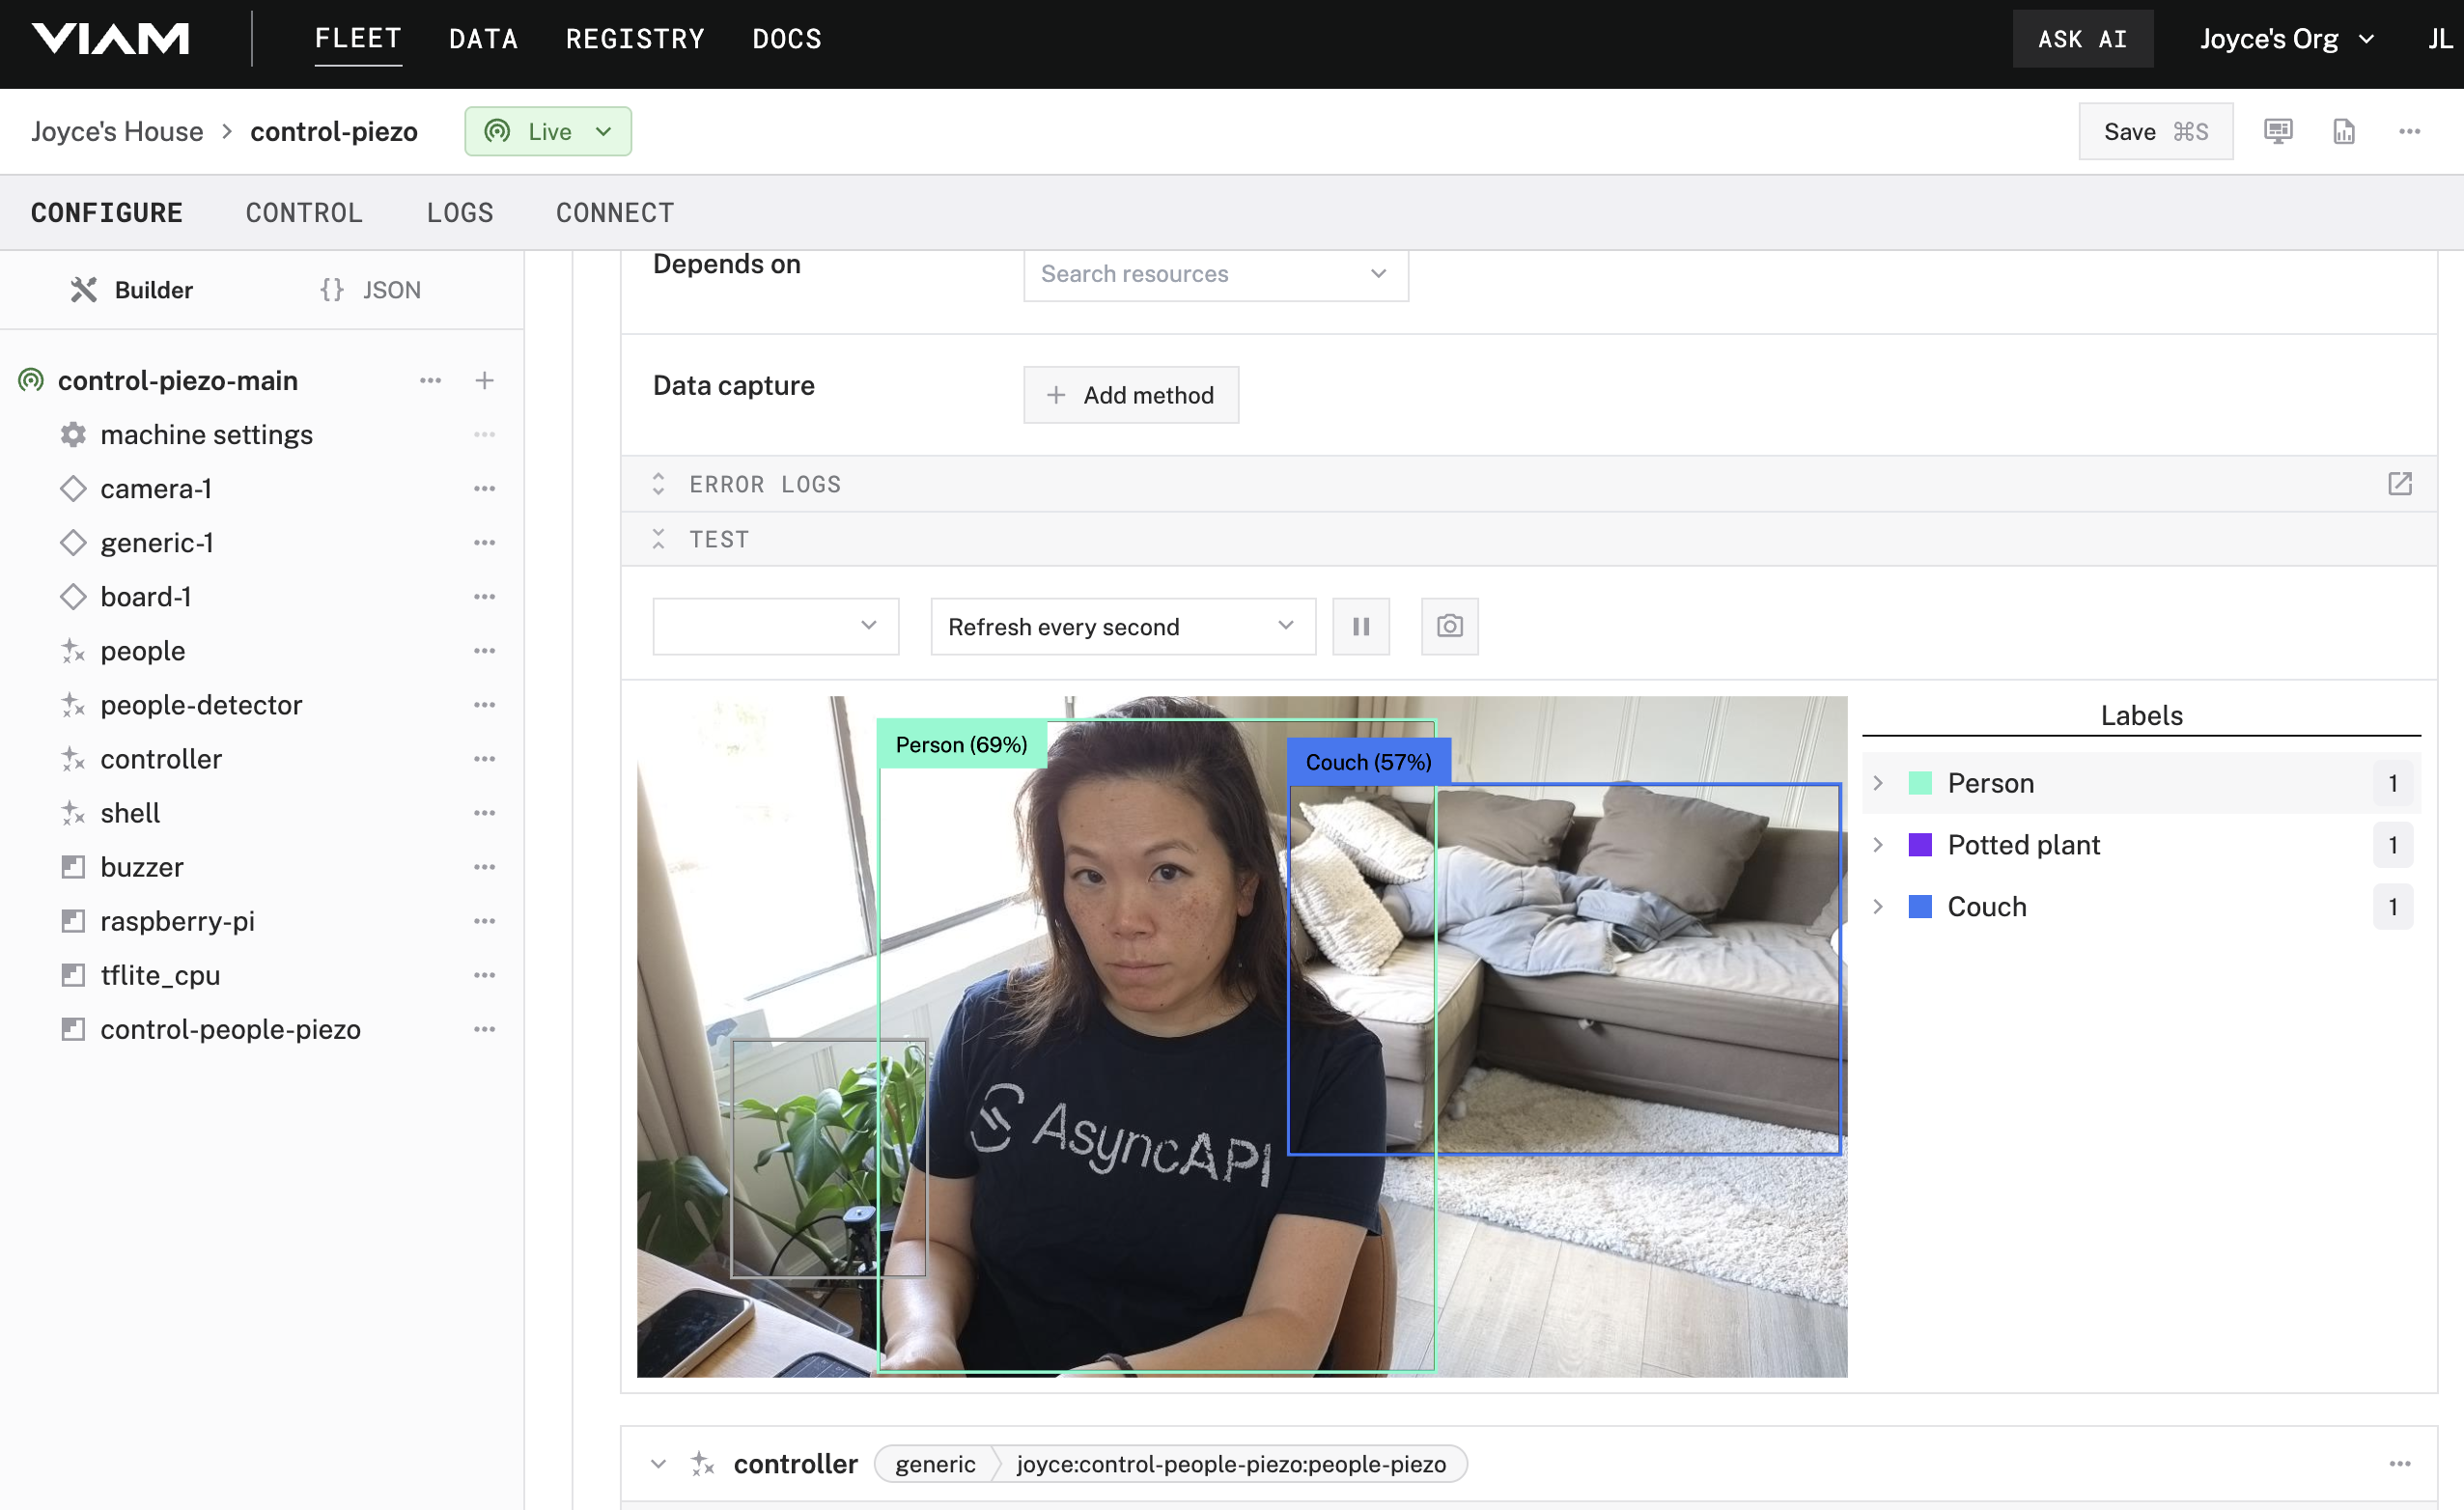
What is the primary role of the control logic module in the people detection system?
Finishing touches
Now that your system is working the way you want it, it's time to tidy up our project so it's not a loose jumble of wires and parts.
- Assemble the enclosure: 3D print (or buy) an enclosure for your Raspberry Pi. I found an existing design that I liked to fit a Raspberry Pi 4 Model B that provides access to the GPIO pins. You can modify an existing design to include notches for your piezo buzzer and webcam.
- Detector placement: Set this up near a place you want to monitor. For example, if you want to sound the buzzer when someone is near your desk, point the camera in a direction that will capture your approach.
- Train a custom ML model: Instead of actuating the piezo when any person is detected, train your own ML model to detect when a specific person or pet is detected. You could extend this logic to trigger actuation if a person is detected but not one that is known.
- Update the actuation: Instead of actuating the piezo when an object is detected, integrate a service to send a notification, generate an insult, or turn on a smart light.
- Custom control module: Instead of using the
people-piezocontrol module, deploy your own custom control logic to a machine.
Additional resources
- The website pinout.xyz is a helpful resource with the exact layout and role of each pin for Raspberry Pi. When working with Viam, make sure to reference the physical pin numbers, and not the GPIO numbers listed on
pinout.xyz. - ML model service | Viam docs
- Vision service | Viam docs

Common pitfalls and troubleshooting guidance
- Security
- Do not share your API credentials publicly. Sharing this information could compromise your system security by allowing unauthorized access to your machine, or to the computer running your machine.
- Flashing firmware
- Make sure you are using a 5V 5A (25W) power supply for the Raspberry Pi.
- Participants must remember the
hostnameandusernamethey set while flashing their Raspberry Pi, as they will need this when they SSH into the Pi. - To save time, instructors can flash all the Pis ahead of time with pre-determined credentials and share the credentials with participants during the workshop. Each Pi should have a unique
hostnameto avoid conflicts on the shared local network, such as<student-name>-detectionor<group-name>-detectionif they are working in groups.- If you're using SD cards, verify that you have a way to write data onto them before providing them to participants.
- Working with actuators
- Disabling a resource: In a group setting, working with piezos can be fun, but also potentially disruptive. Learners can disable the resource by toggling off
controller, for example.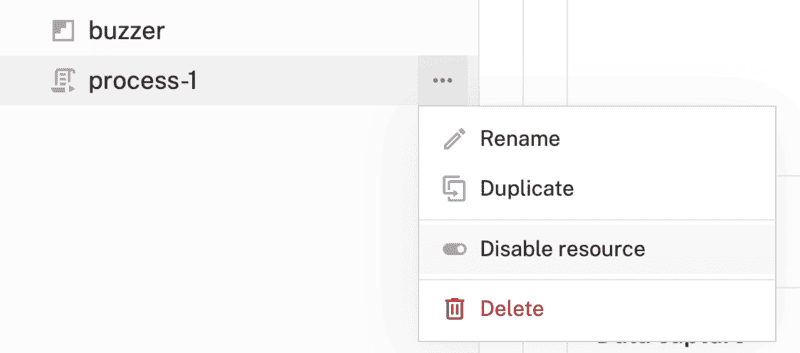
- Alternative actuators: A buzzer is just one type of actuator, but the possibilities are endless.
- Use an RGB LED, which functions similarly as a PWM-actuated component
- Use a smart plug to control a lamp as shown in this module or this tutorial.
- Use a servo motor to wave a flag or hit a gong.
- Disabling a resource: In a group setting, working with piezos can be fun, but also potentially disruptive. Learners can disable the resource by toggling off
- Configuring machine and peripherals
- If any problems occur while setting up the machine and peripherals in the Viam app, check under the LOGS tab to see what might be going wrong.
- Also refer to the overall Viam troubleshooting guide.

Logistics for continued learning
Participants have several options for continuing their projects beyond the workshop environment:
- Take-home projects: For participants allowed to take their projects home after the workshop, the
viam-agenton the Raspberry Pi can simplify the setup process:- Provisioning mode: Upon rebooting the Raspberry Pi in a new environment like at home, the
viam-agentautomatically creates a Wi-Fi hotspot if it cannot connect to a known network. - Connect to the hotspot: Look for a network named
viam-setup-HOSTNAMEin your list of available Wi-Fi networks, whereHOSTNAMEis the custom hostname you set during the workshop, andviamsetupis the default password. Connect your laptop to this network. - Provide network information for the machine: Go to the provisioning portal at
http://viam.setup/in a browser to follow the on-screen instructions to configure the Raspberry Pi for your home Wi-Fi.
- Provisioning mode: Upon rebooting the Raspberry Pi in a new environment like at home, the
- Remote control: If participants are not allowed to take their projects home after the workshop, but want to continue working on their projects from home, they can access the Raspberry Pi remotely from anywhere in the world and continue accessing camera data. If participants do not have SSH access into the Raspberry Pi, participants can write and run code on their laptops from home.
Group discussion topics 🗣️
Review suggested topics for discussion at key points during the workshop.
- What were the biggest challenges participants faced during the workshop (e.g., wiring, coding, debugging)?
- Share troubleshooting experiences and how participants resolved issues.
- How can object detection be used in homes, schools, or offices?
- What additional features could improve the system (e.g., alerts, cloud integration, mobile app)?
- Discuss how to add multiple cameras can work together while detecting objects in different rooms or in outdoor spaces.
- Discuss the feasibility of deploying a network of cameras for larger-scale surveillance (e.g., a citywide project).
Quiz questions ❓
Review the suggested quiz questions below to evaluate participants' understanding of key concepts. These questions can be used to assess knowledge either during (see multiple choice answers in the delivery plan) or after the workshop.
- Hardware Assembly
- What is the purpose of setting a custom
hostnameduring the Raspberry Pi OS configuration? - What is the primary purpose for using PWM (Pulse Width Modulation) to control a passive piezo buzzer?
- What is the purpose of setting a custom
- Software Setup
- Why is it important to connect your machine to the Viam app during setup?
- What is the primary role of
viam-serverin the system architecture of your people detector setup? - How does adding modules like
board-1orcamera-1contribute to the overall architecture of your machine? - What is the primary relationship between the ML Model Service and the Vision Service in our configuration?
- What is the advantage of using a generic module like
buzzer:piezoto control the piezo buzzer in this system? - How does the Viam app simplify the process of testing and controlling hardware components like the webcam and piezo buzzer?
- Hands-on Experiment
- What is the advantage of testing the piezo buzzer's
DoCommandfunction during the setup process? - What is the primary role of the control logic module in the people detection system?
- What is the advantage of testing the piezo buzzer's
Next-level projects
Here are some ideas for expanding and enhancing the current project.
- Explore other object detection sensors to use on your next build | Viam blog
- Explore other ML models like a YOLO model | Viam blog
- Deploy a model from Hugging Face onto your Viam machine | blog
- Replace or add actuators as described in the previous section:
- Use an RGB LED, which functions similarly as a PWM-actuated component
- Use a smart plug to control a lamp as shown in this module or this tutorial.
- Use a servo motor to wave a flag or hit a gong.
Post-workshop resources for participants
- Viam documentation for reference
- Viam Discord community for inspiration and support
- Viam how-to guides for task-based learning, codelabs for hands-on learning, and tutorials for project-based learning.

Contribute your own workshop
This workshop and other educational codelabs are part of this Viam open-source project. You are invited to document your own workshop(s) to share with the Viam community. Be sure to follow these contributing guidelines, and let us know about it in the Viam Discord community!

